A script is a message / set of previously stored messages, or previously written phrases or sentences that provide a direction in a specific conversation. The scripts can include topics to start a conversation, content of a topic, answers to questions and ideas that can connect the conversations.
Conversational scripts can even help to change the current subject, ask questions, lead the conversation, be the main speaker and even end the conversations.
The script must be customized to take the particular linguistic characteristics of the user into account, and their topics of interest. The scripts can also be customized considering specific situations, guided by the user's previous conversations or their choices made.
ChatCompose has a script creation interface, which can help you create the perfect script for your sales, qualify your customers or answer support requests.
Let's take the following example. Your website or service is an e-commerce site that generates footwear sales.
To model the script, first ask yourself What do the users want to do in my site?
The options can be:
To implement this example we use the interface to create scripts.
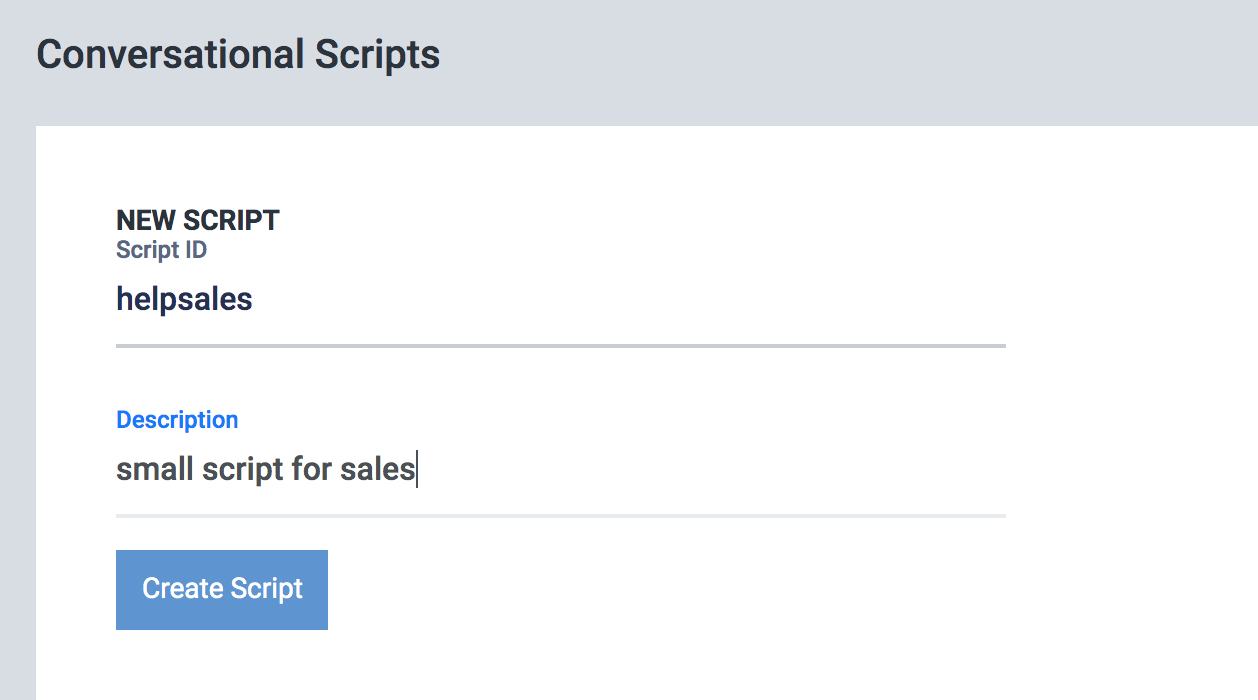
First you enter the script identifier and an initial message. We will call the identifier "helpsales", and provide a small description for the script.
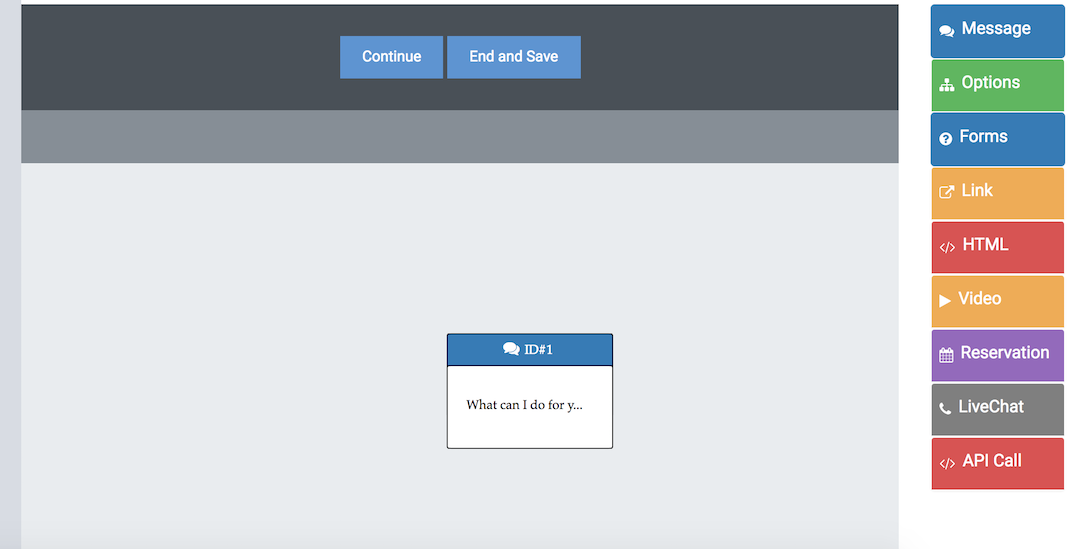
By clicking on "create script" we go to the graphical interface for designing scripts, here you can see a component box with the name "Start". Click on it and replace the default message with "What can I do for you?". It will look like this:
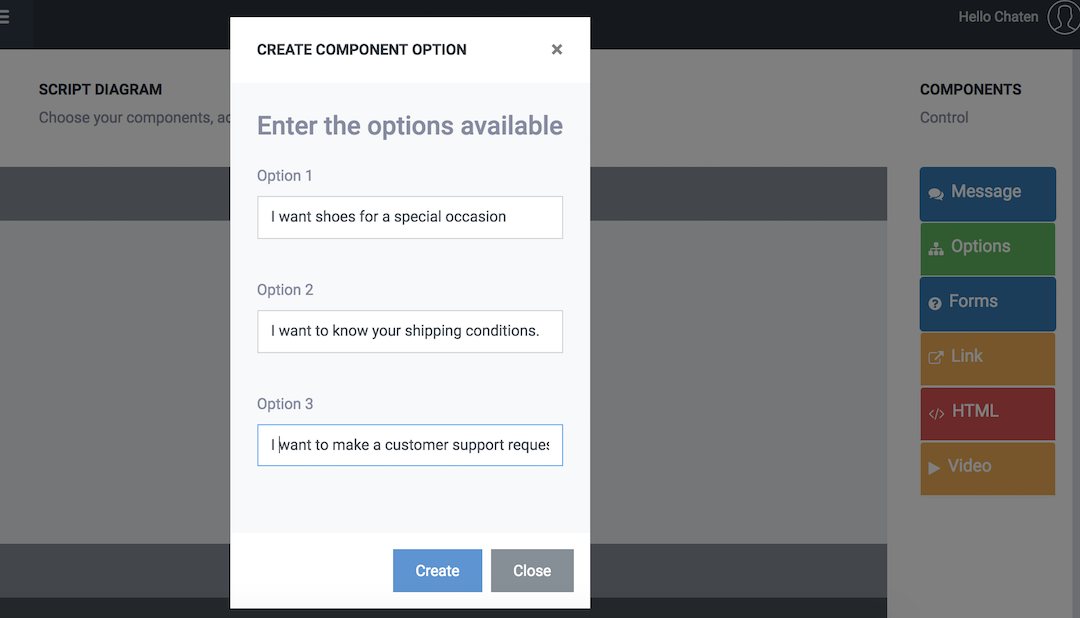
To continue, and given that we have already defined the options, we add the option component to the diagram by clicking on the panel on the right.
In this step you will open the configuration of the component, where we enter the possible options that we defined earlier.
After clicking create, the component will be added in the interface.
You will also see that the panel on the right has been deactivated and shows you the message:
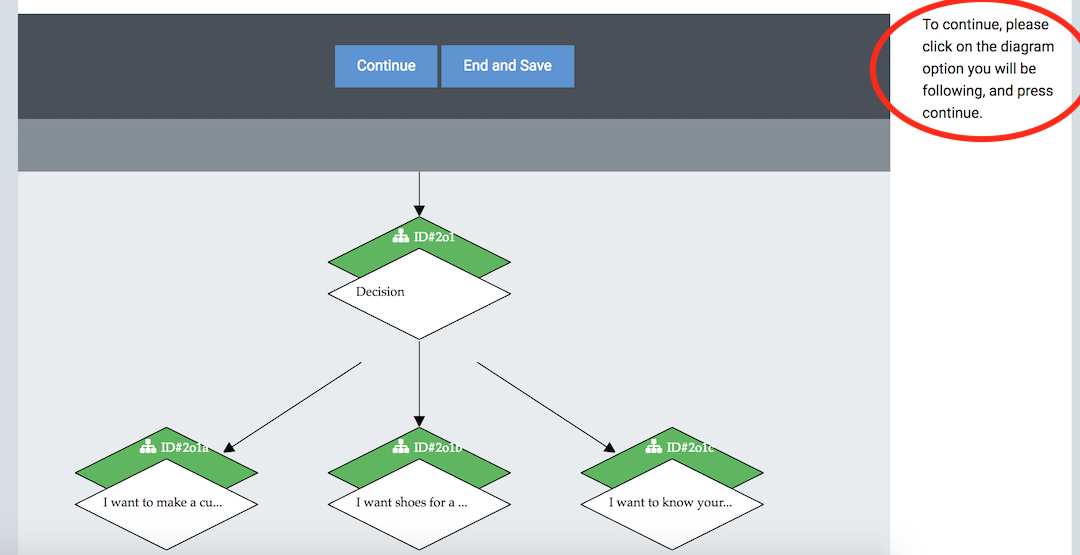
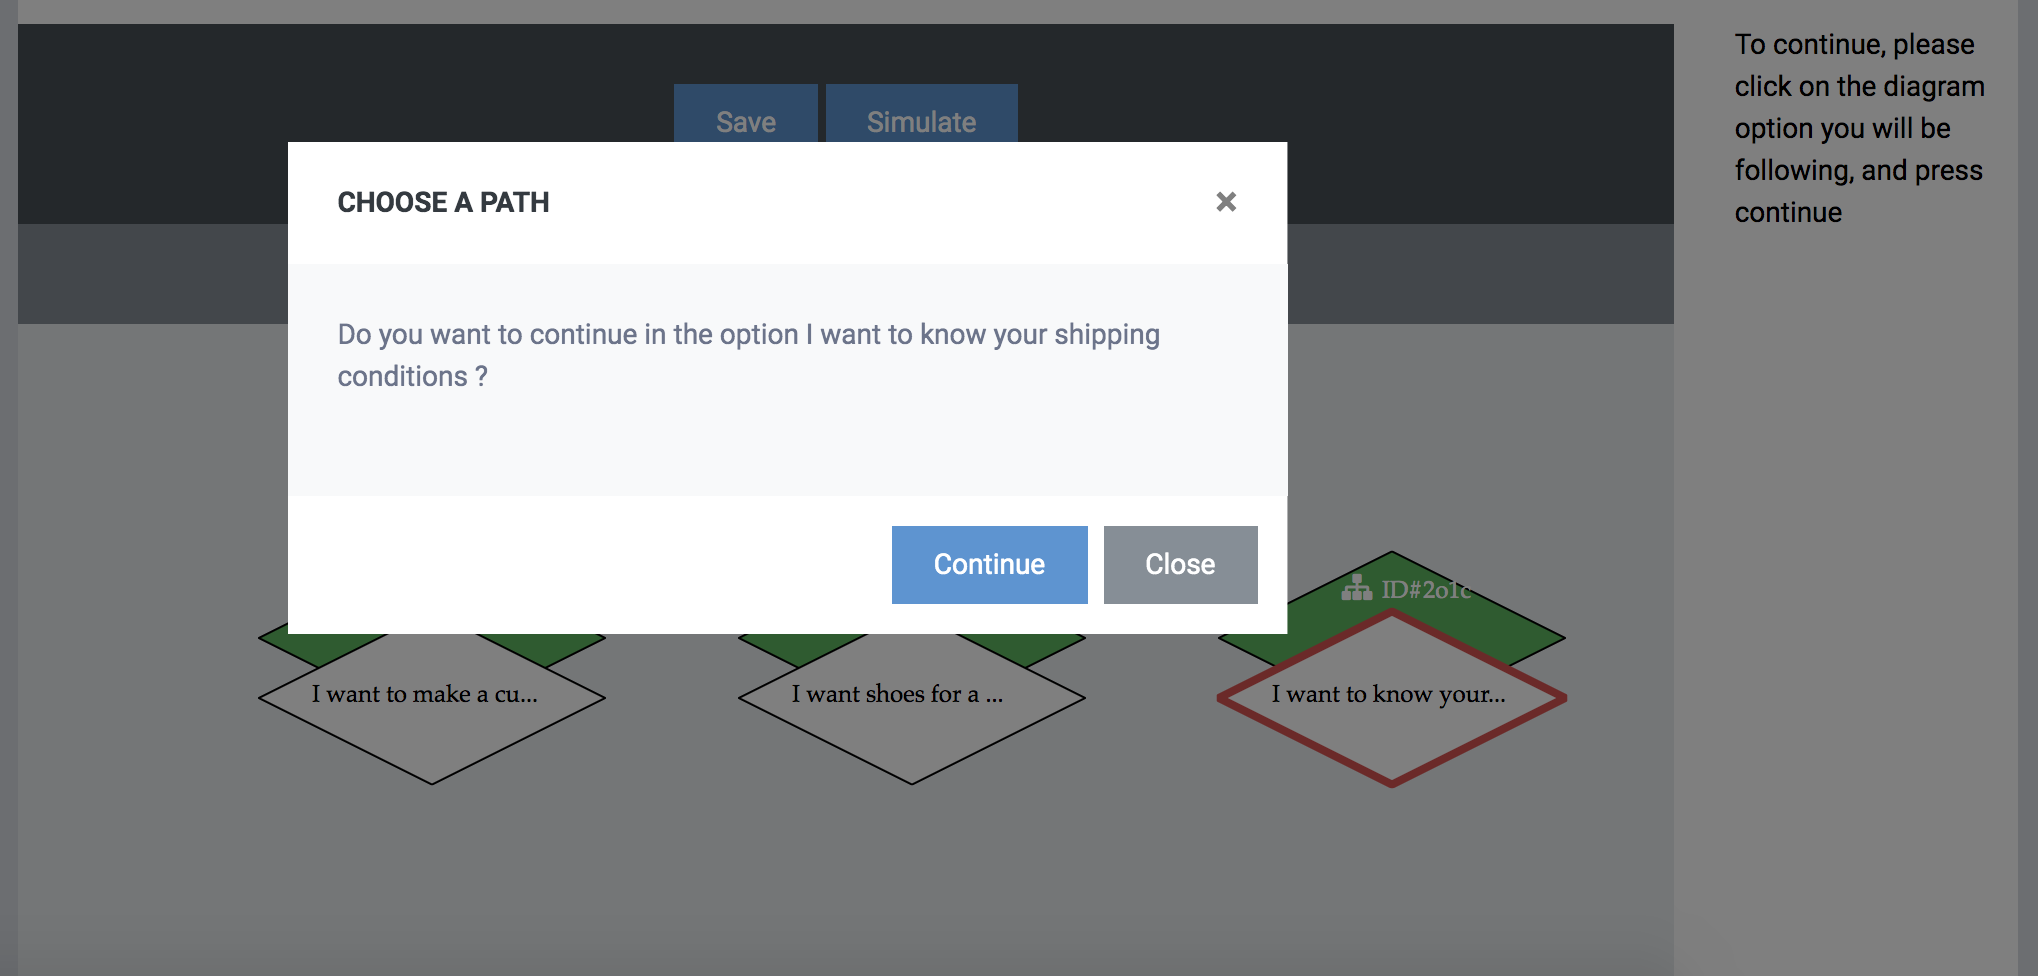
This means that to continue you will have to choose an option with which to continue.
To choose the option where you will continue, mouse over it to check which one is it, and click on it (it will turn red). Once selected, press the "Continue" button.
Now that we have selected the option where we are going to continue, and the component panel has reappeared, we can enter more components.
Since we have chosen the option "I want to know the shipping conditions", you can show them a message in response. To reply in text click on the message component and write the text "the shipping conditions are ......". Click on create.
Now that we have finished with that option we can continue with the other options. We will continue with "I want to make a customer service request".
Click on the corresponding option and press continue. Now we enter a message component with "Perfect! Before contacting the support team we need some information from you". Immediately add the form component, which is responsible for capturing the request and user data.
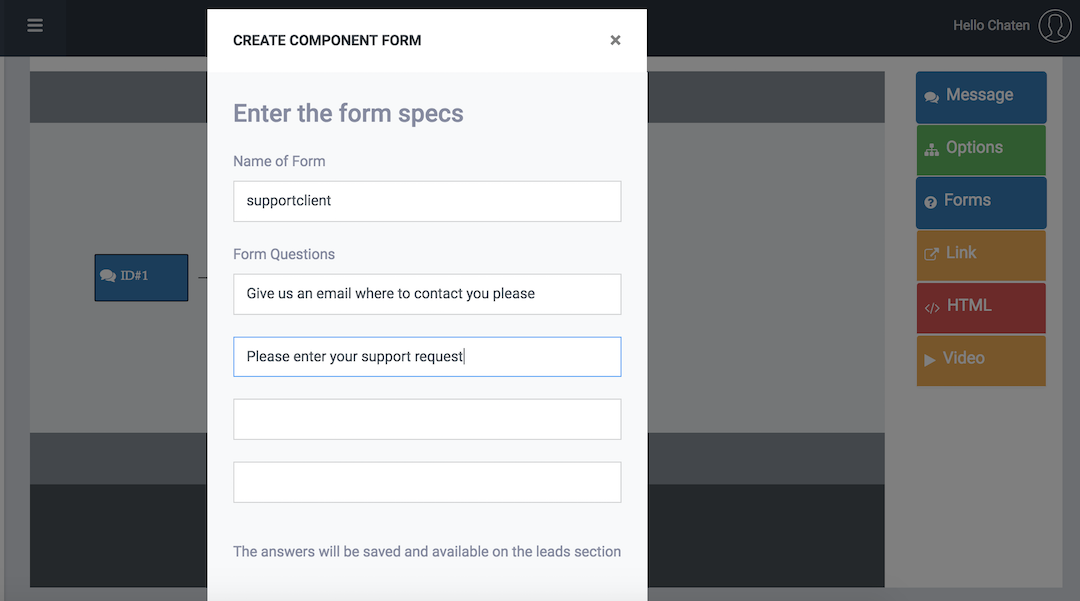
Enter an identifier for the form (it will appear in the Leads section, where you will be able to see the captured data), and enter the questions that you are going to ask the user. We are going to enter the following. "Give us an email where to contact you please" followed by the question "Please enter your support request". The form will appear inside your diagram.
To finish with the script we will also follow the option "I would like shoes for a special occasion". Click on the option and continue.
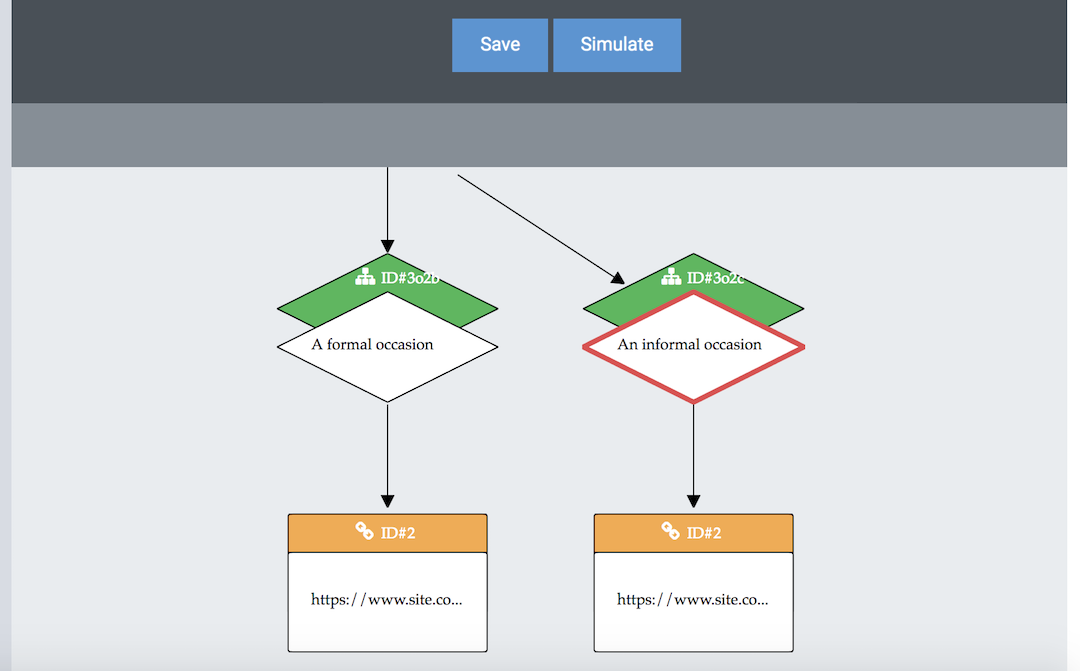
In this option we are going to enter another message component with "Awesome! I can help you, tell me for what occasion you would like your shoes". Immediately enter an option component with the options "A formal occasion" and "An informal occasion". We press create.
In the option "A formal occasion", we will offer the user a link to a page of our site with formal dress shoes. We press the option, continue and enter a new component, called a link. Within the link we will fill in the title of the link and its url. Enter the url "https://www.site.com/formal" with the title "Variety of formal shoes". We create and continue with the other option.
Now we follow the option "An informal occasion", we click, we press continue and we enter another link component, this time with the url "https://www.site.com/informal" with the title "Variety of informal shoes" . The diagram should look something like this:
To finish we press the "Save" button. Now we have the script ready and saved in the system.
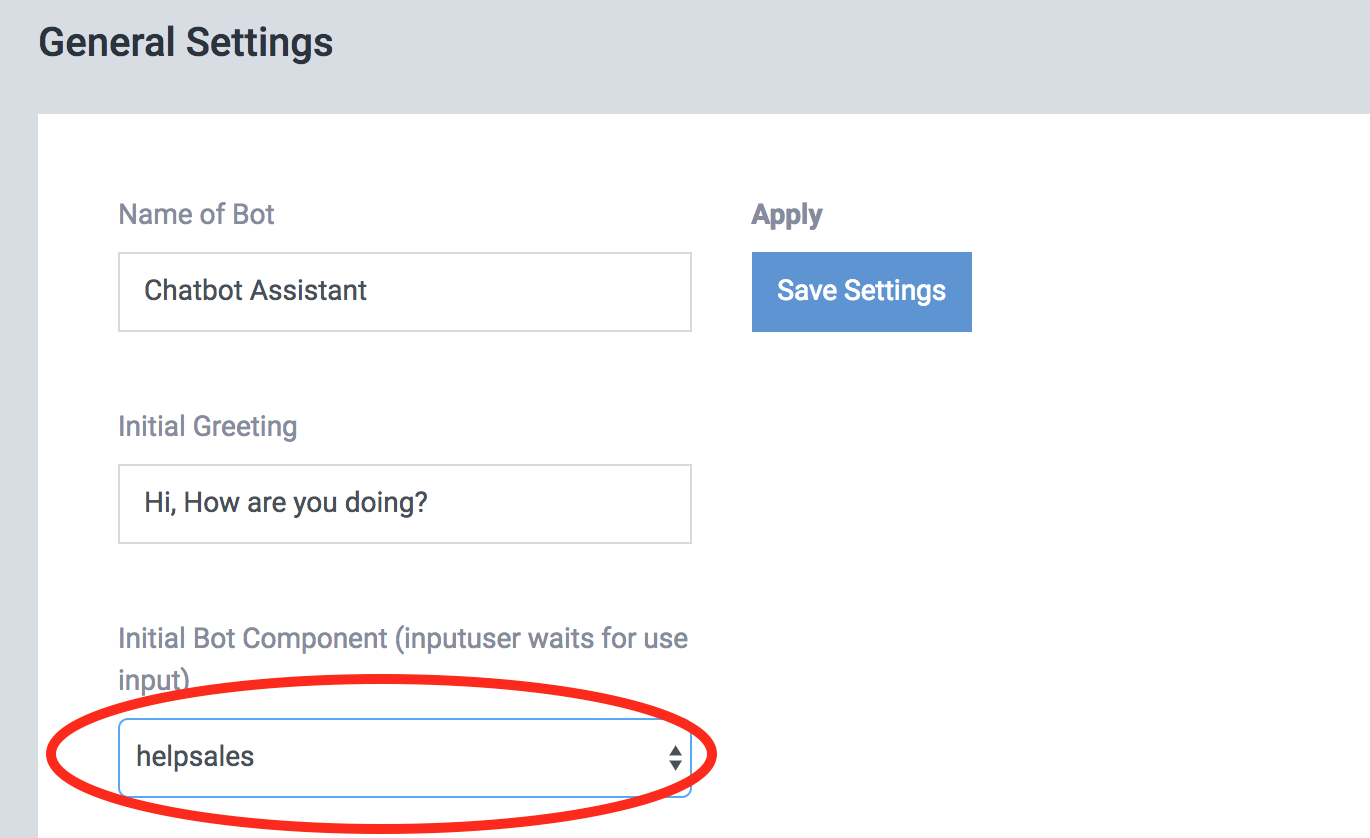
To implement the script we have the option to enter it (1) as a response to a specific question in Database,(2) as the initial component in a specific page in Install> Pages and (3) as the initial component of the chatbot in Install> General.
We will choose alternative 3 and we will install it as the initial component of the chatbot.
You can try the script we have done by clicking on the chatbot on the right.
Now we are ready, and we have a general notion of how to create conversational scripts in ChatCompose. You can create as many scripts as you want, and for the purposes you want. A good alternative is to use the scripts to generate leads, qualify potential clients, offer support, schedule meetings and conduct surveys.
Script Button: Use the script button to link your script to another existing script or component.
The creation interface also has some advanced features, which you can use to improve your script creation process.
Jump to: This function allows you to go back or jump to another component within your script. You must be careful when choosing this function because once chosen you can not undo it.
To jump to another component, click on the component where you will jump or return inside the diagram.
IMPORTANT: Make sure that between your current component and the target component there is a:
Otherwise, an infinite loop or cycle could occur.
Simulate: This function allows you to simulate the script as you are creating it.
Remember that to update the simulation you must click on "reset" and "start".
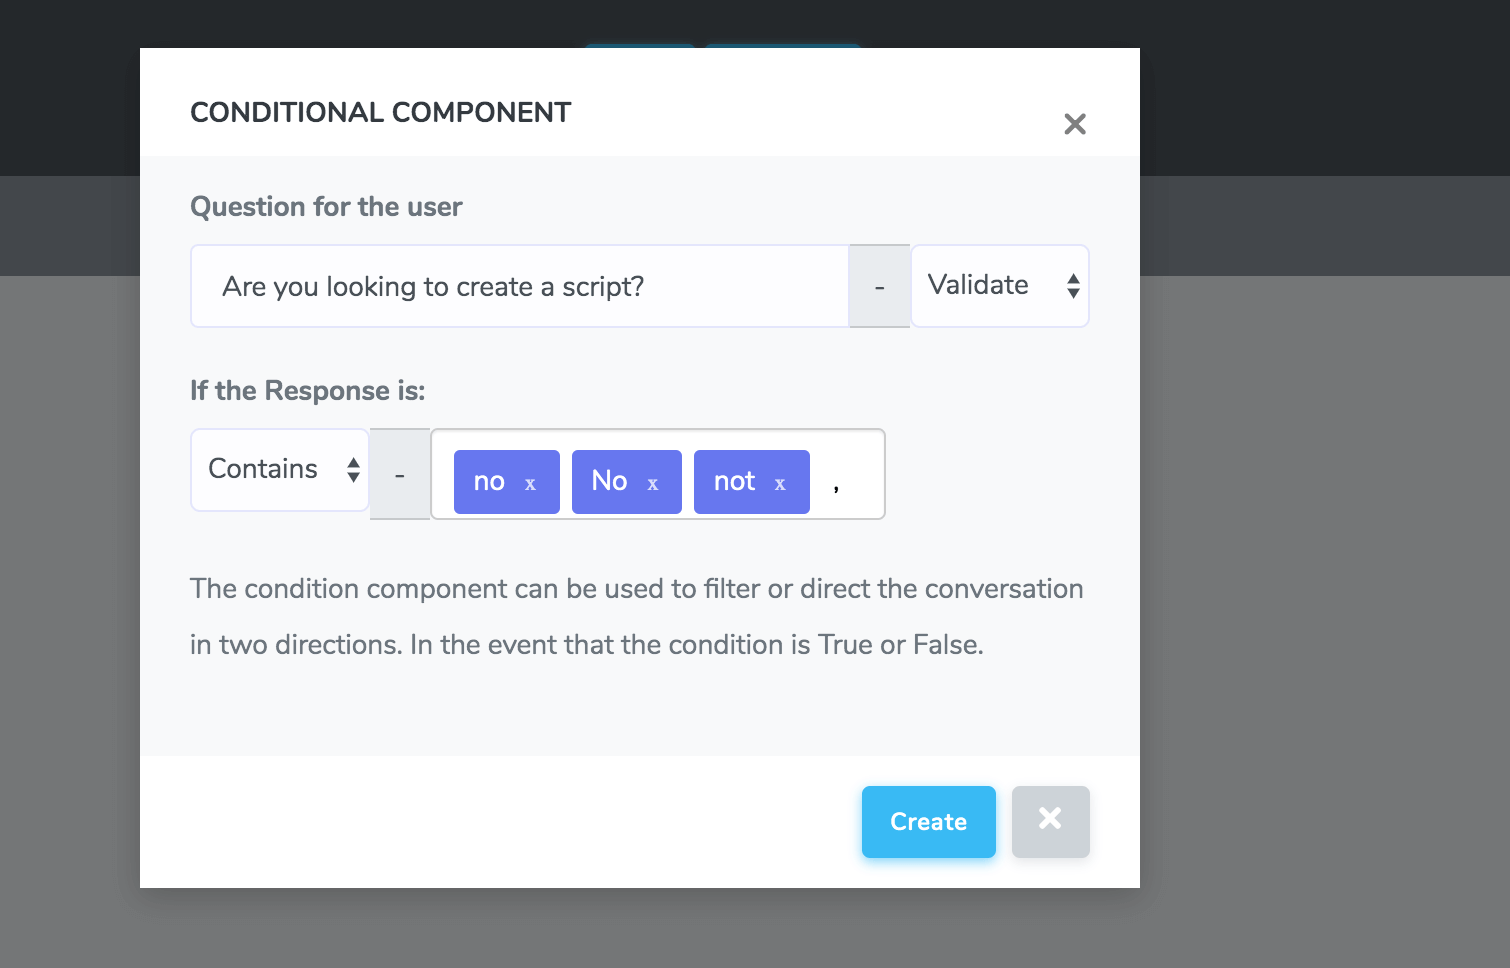
Condition: This component will allow you to filter and direct the conversation based on the user input.
You can evaluate the response and direct the conversation towards a specific purpose. For example, if you ask "Are you looking to create a script", you can check if the response contains the keywords "no", "No" and "not", and then direct the conversation for the condition True or False.
To load and edit your scripts navigate to the "Load Scripts" section. There you can load your scripts made from a list to edit them.
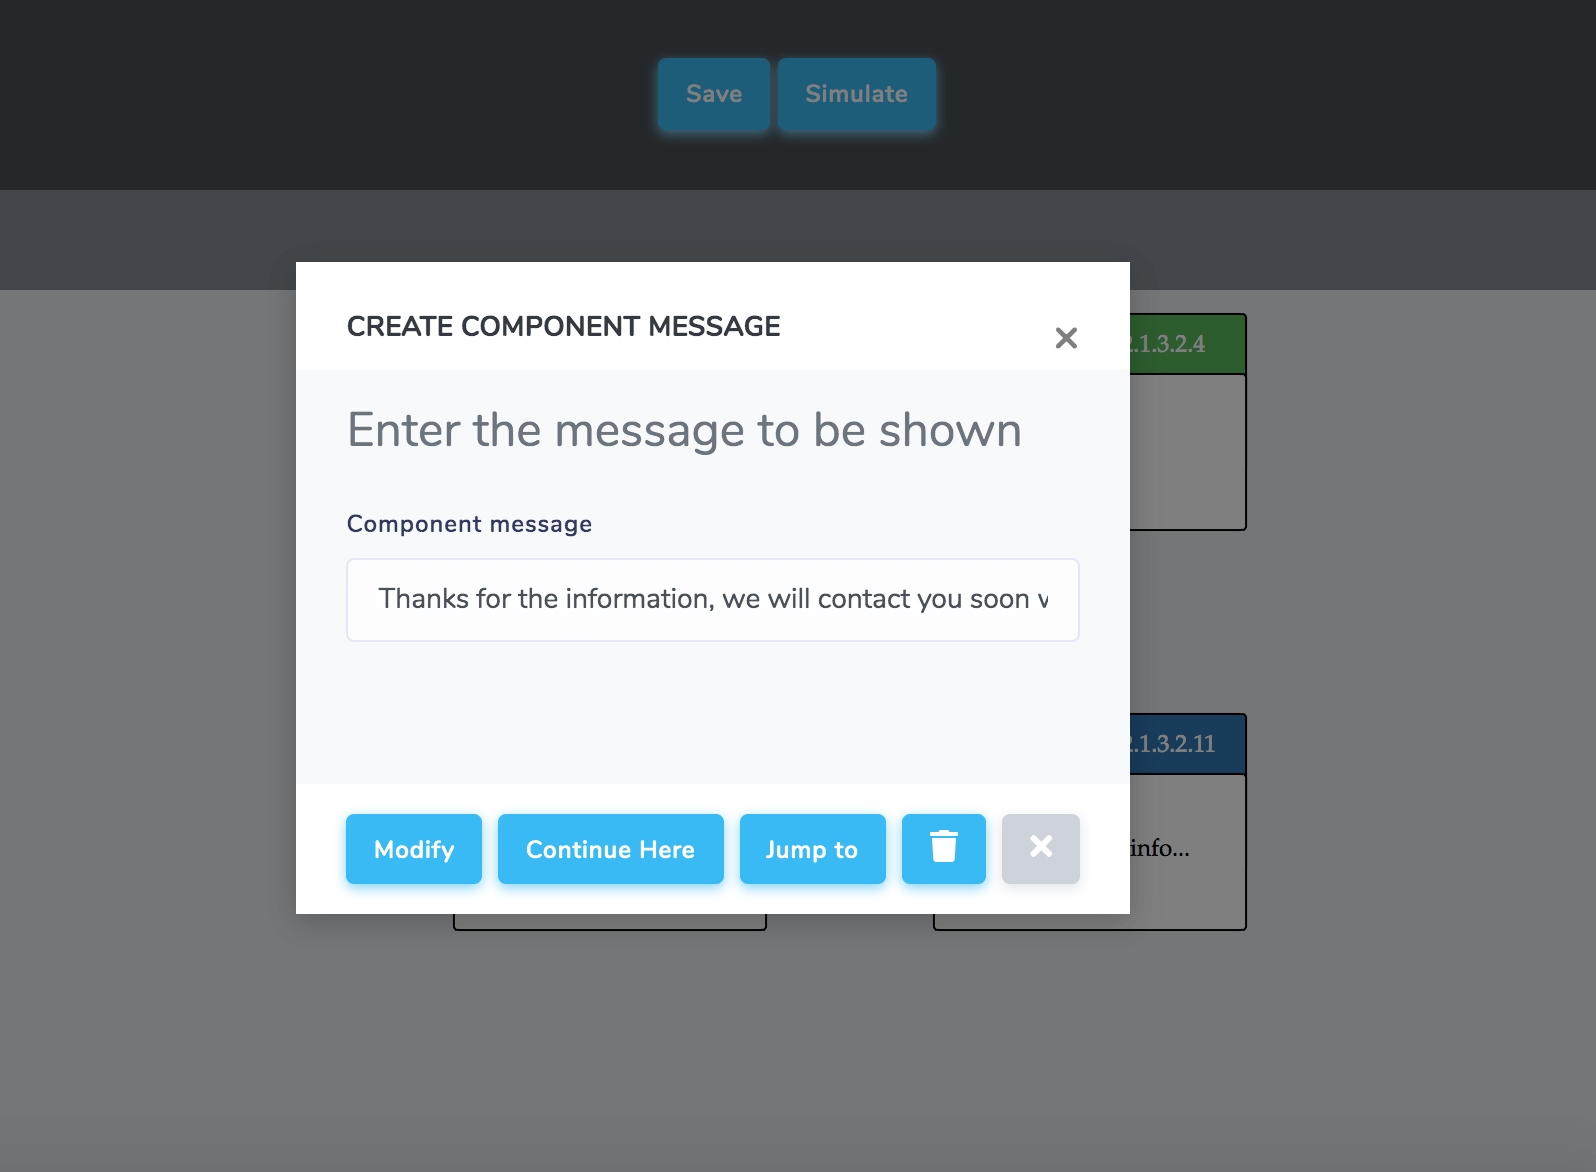
You can edit the content of your scripts by clicking on the components and changing the text within them. To add or delete components you need to do it through the final components of your script (without children).
By clicking on the final components you can start adding more components in your script or delete the ones you no longer want to have.
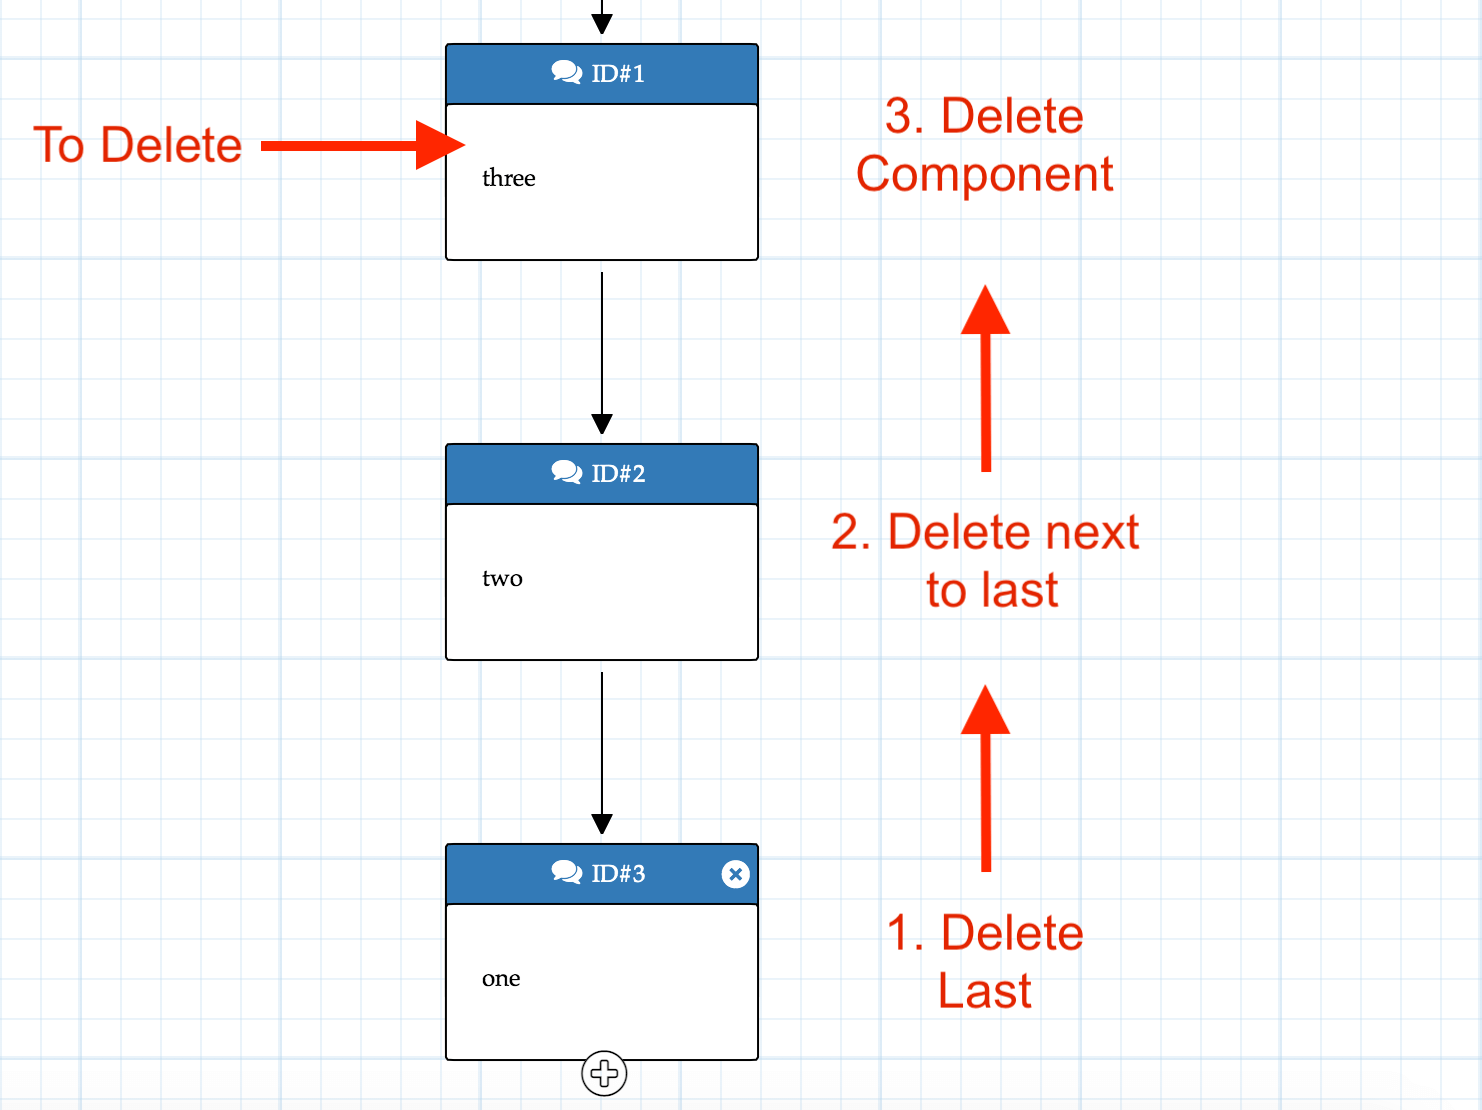
If you want to delete or add components higher up you need to remove the components of that branch until you reach the point where you want to continue.
Watch the video:
Advanced Scripts