ChatCompose is a chatbot platform that offers a wide variety of integration channels and use cases, including chatbots for web.
Installing a chatbot on the website of your company or business covers many needs ranging from lead generation, to online reservations. Everything is automated and consequently will cause you to save time, optimize your service and save some money. Hence the importance of knowing how to create a chatbot for your website.
A chatbot is a text (and sometimes audio) interface that can be created through prepared scripts and / or questions and answers. The chatbot can use artificial intelligence to answer questions, receive orders, perform tasks automatically and provide all the services for which it has been trained. The chatbot can work wonders for your business, if you know how to create and install it on your website. And to make the most of this solution, here is a small tutorial.
To teach you how to create a chatbot for your website, the first thing to define is what use cases you want to give your chatbot. Although a bot can do many tasks at the same time in an automated way, it is good that it points towards specific objectives to achieve them.
Those who want a chatbot on their website, generally look for use cases such as generating leads, making reservations and appointments and doing surveys. Based on the majority requests, we will explain how to create a bot in those cases.
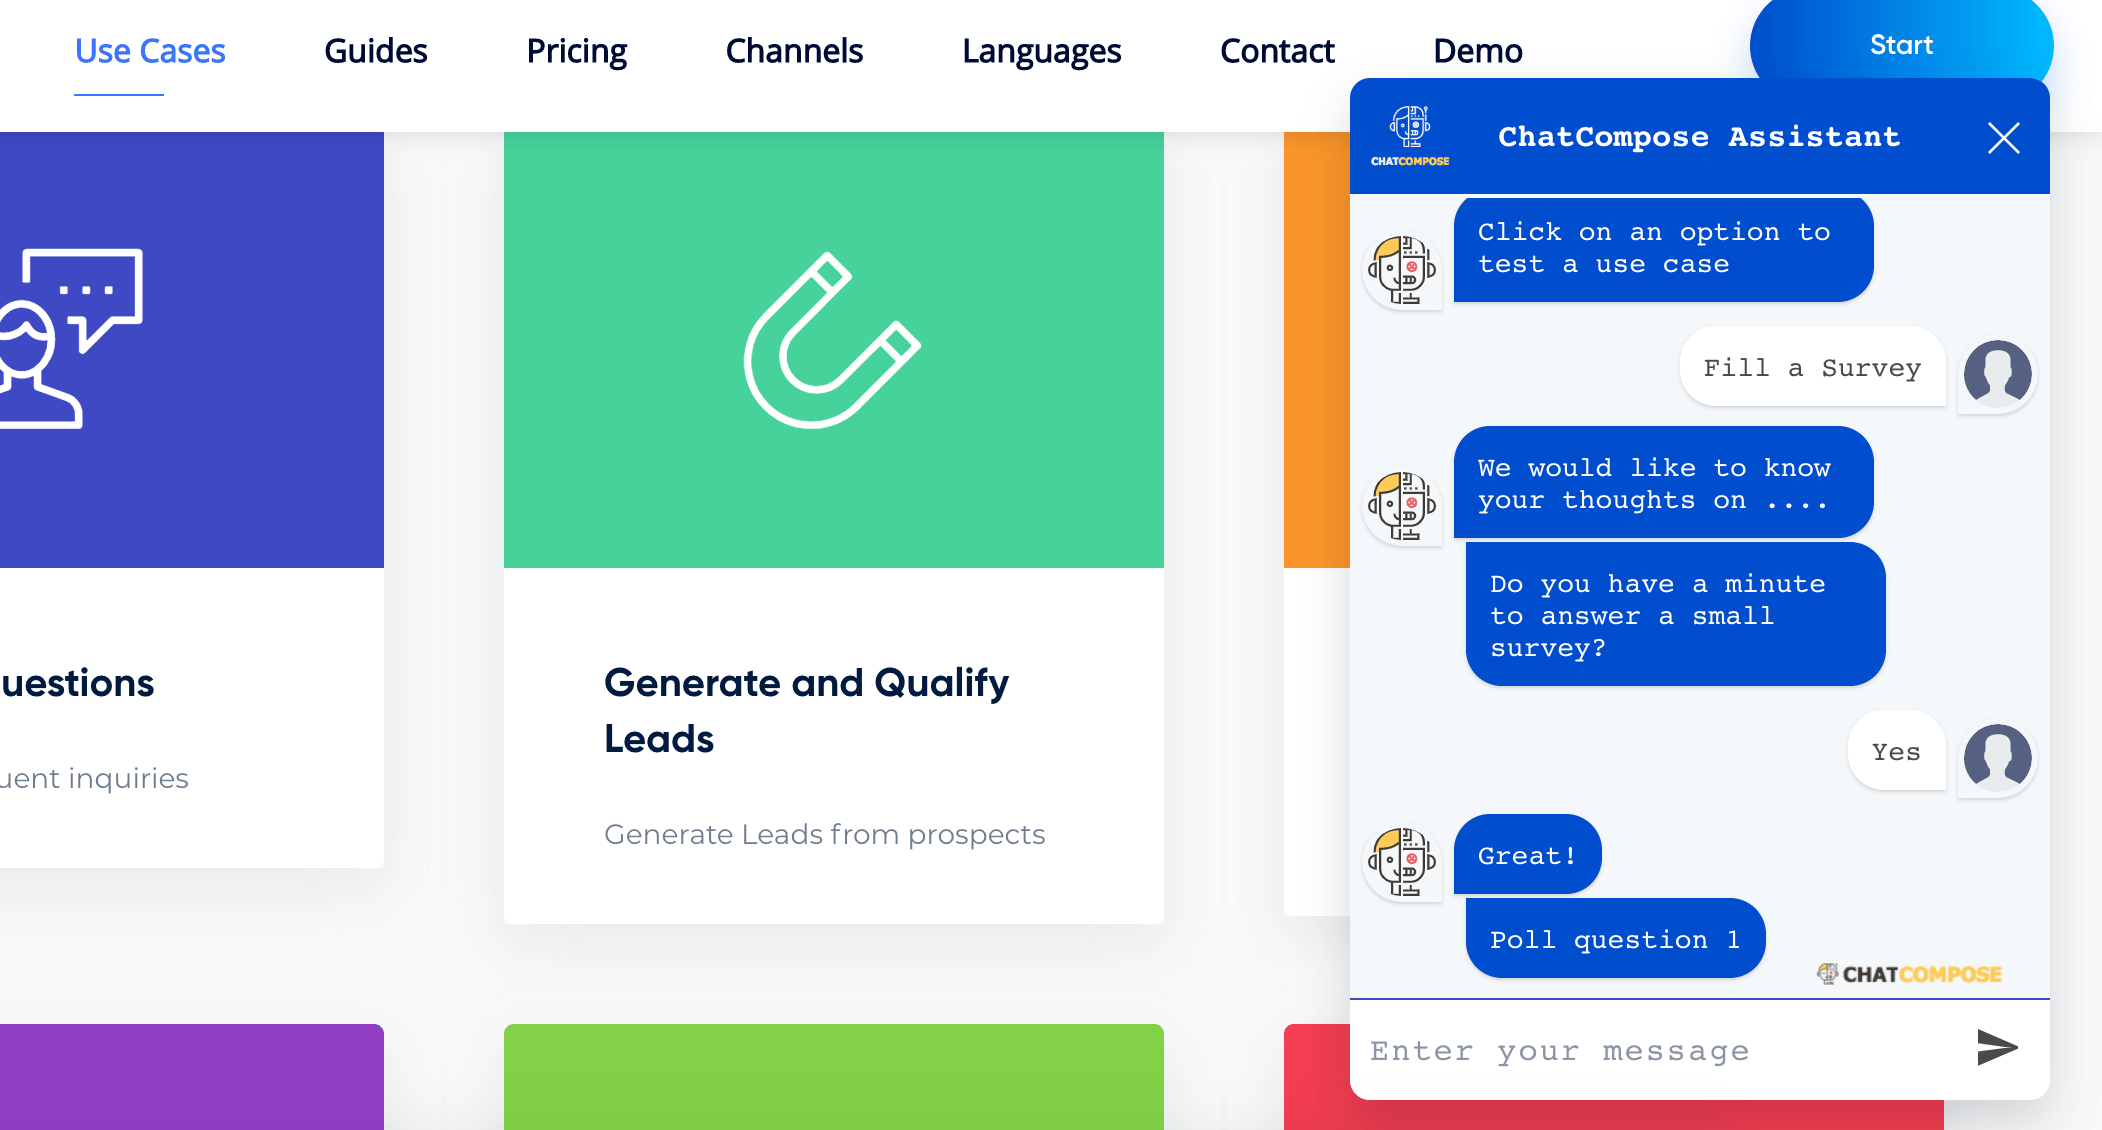
Chatbots can automate the lead generation process. For a long time, companies and businesses used more or less sophisticated forms to convince potential customers to give their data. However, the lead information, the most valuable asset that every company that works with clients can have, is jealously protected by people. Many prospective clients, at the outset, refuse to continue the process when they see a form, whether due to suspicion or fatigue.
The bot can collect all the information that a form would commonly collect, but through a conversation, which in addition to being a little more subtle, makes customers feel better. People are curious by nature, and will want to continue conversing with the chatbot.
In fact, it has been shown that 69% of consumers prefer chatbots to communicate quickly with brands. Let's look at a simple example of lead capture with a bot below.
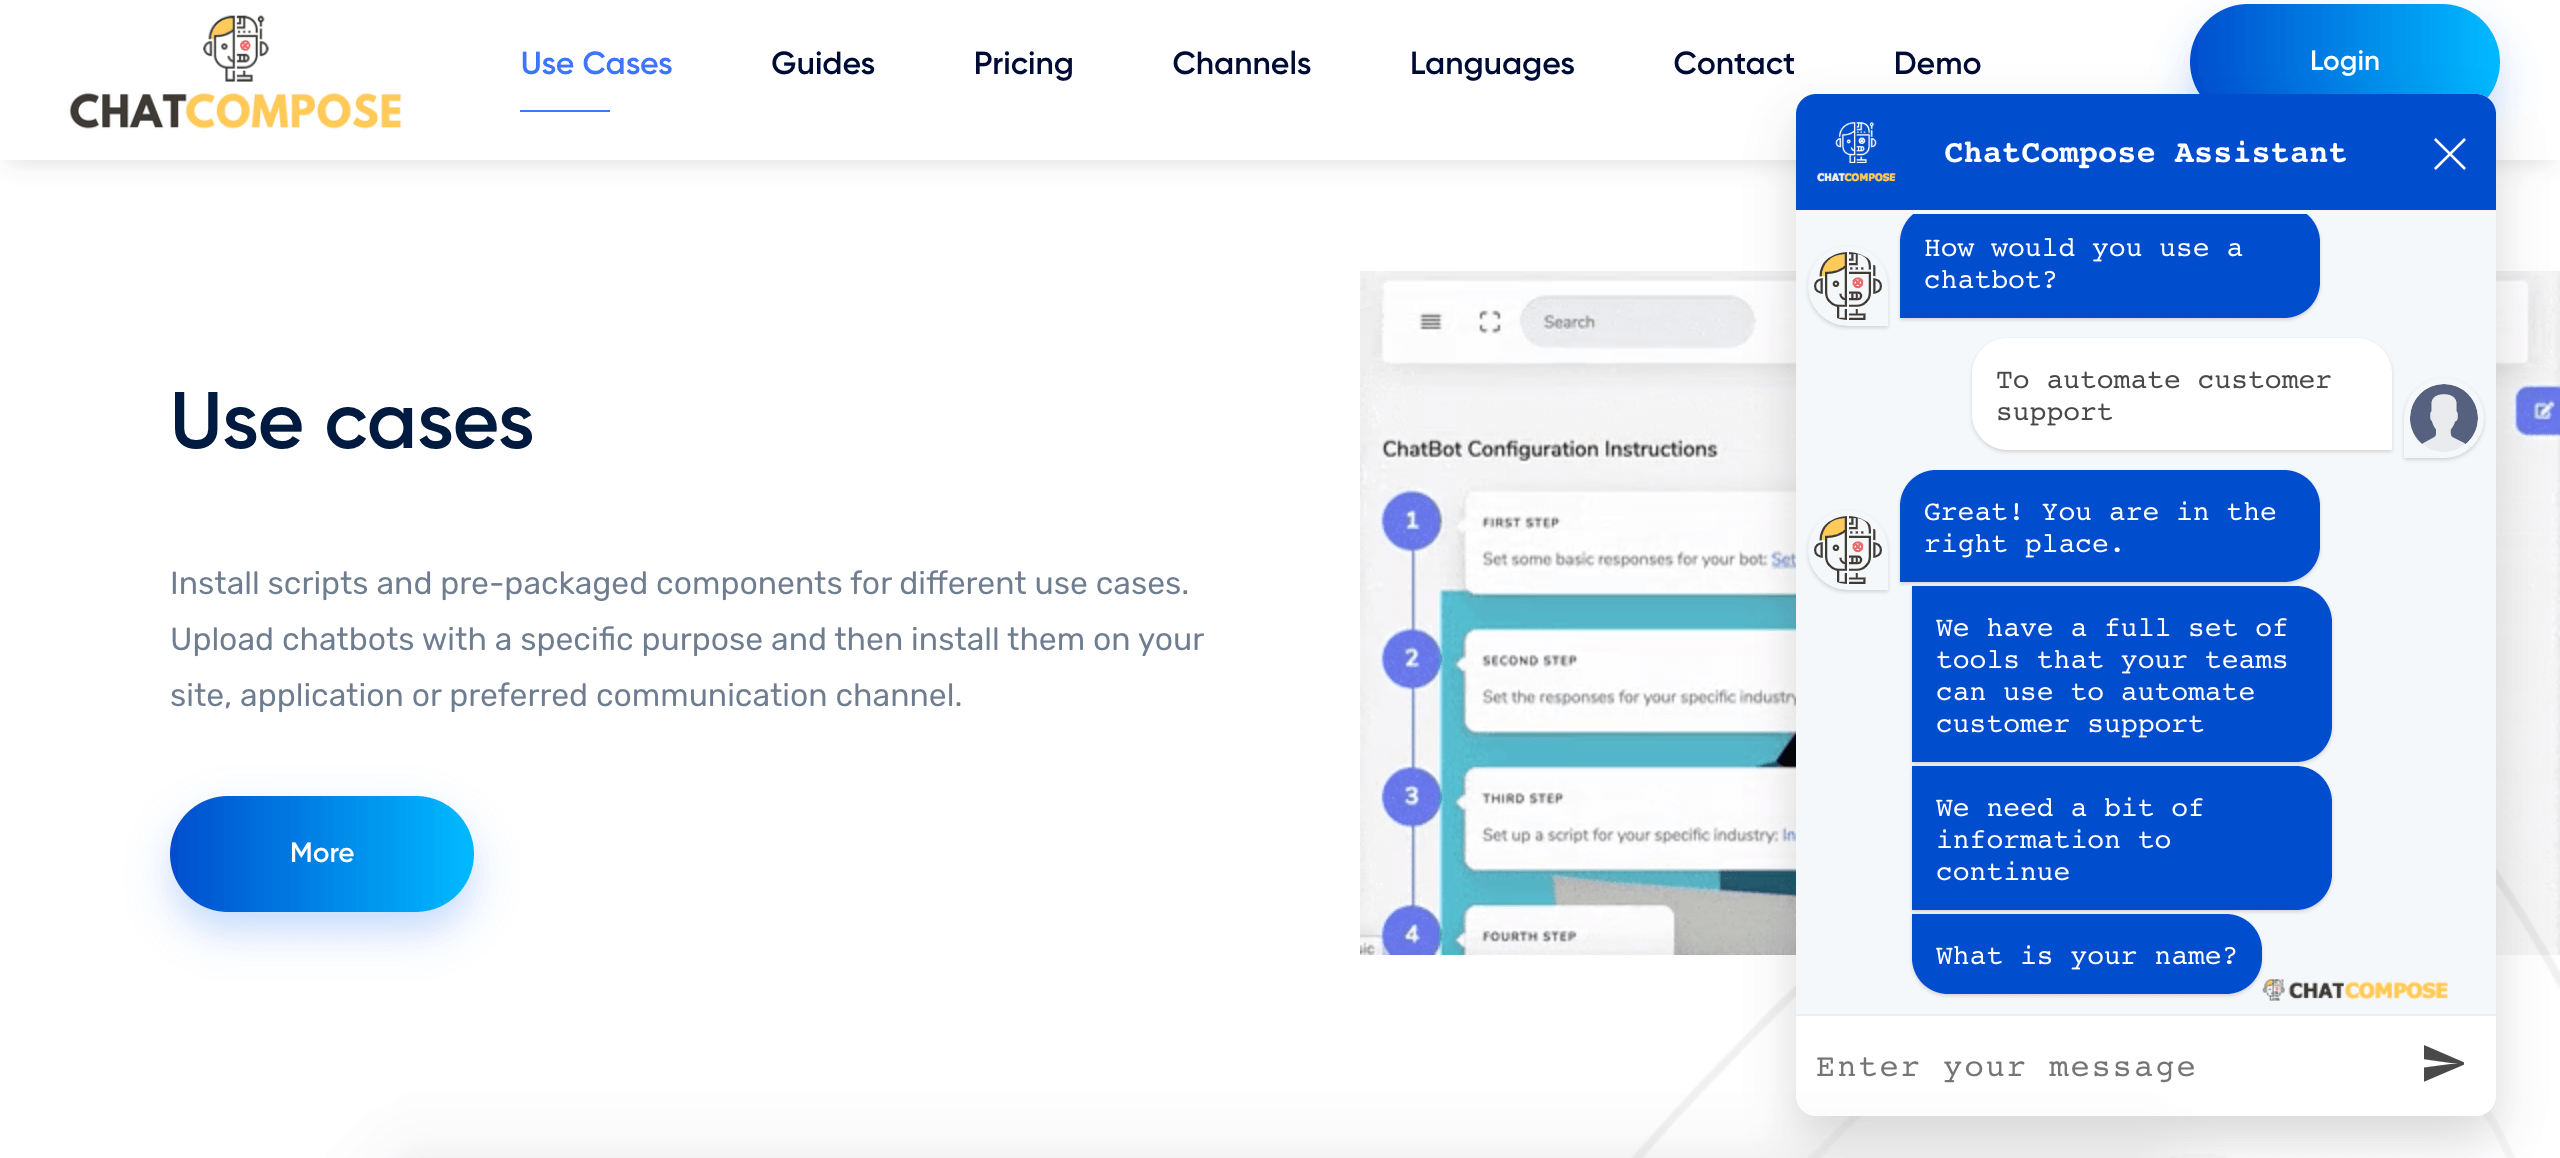
In the previous image, only very basic questions such as name and email are asked, however, ChatCompose lets you edit the scripts so you can ask the questions you need to obtain any relevant data.
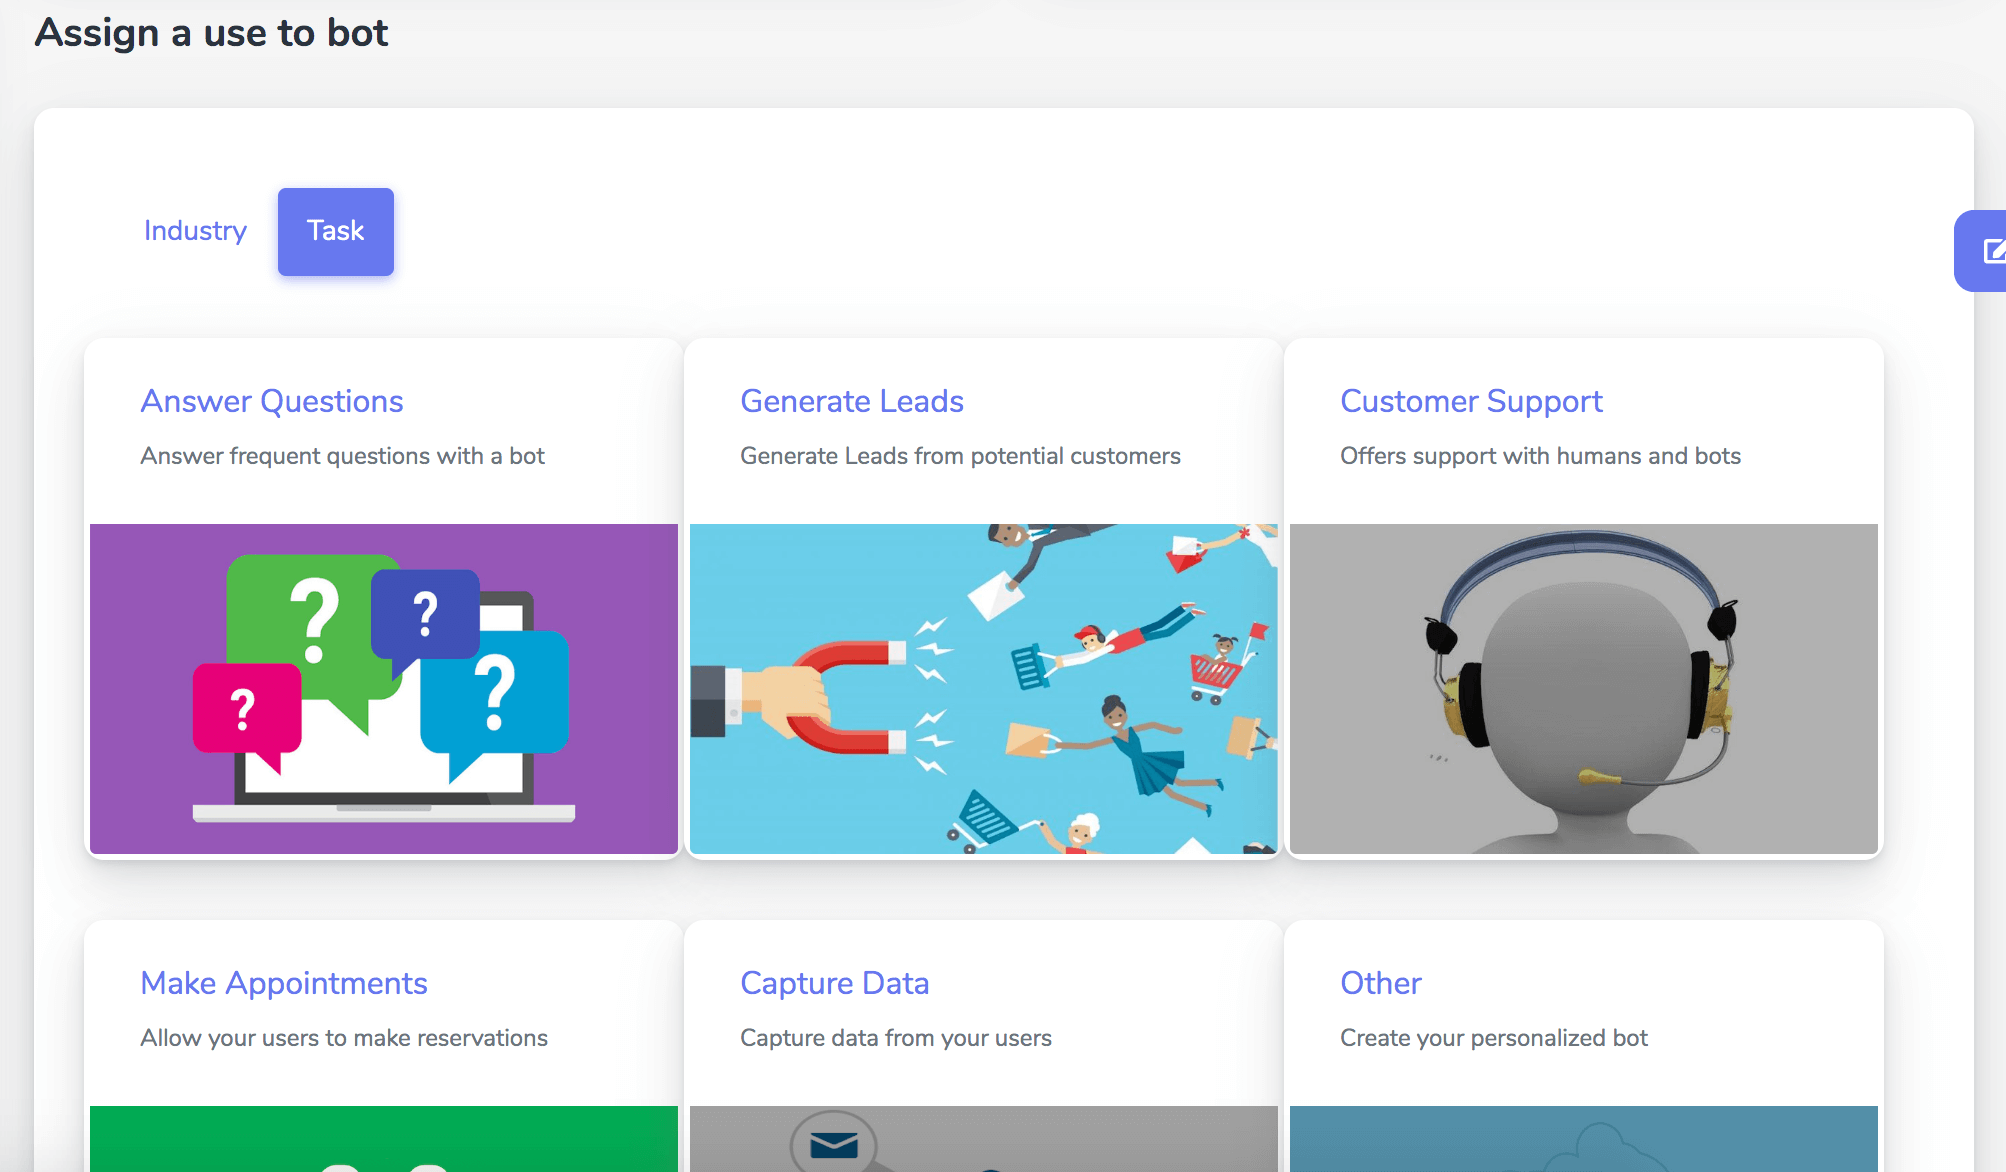
To assign this use case to your bot, you just have to go to Chatbots> Use Cases and on the Task button, find the option Capture of potential Clients or Data Capture, as appropriate. There you will find a default script that you can edit and adapt to the needs of your business.
A crucial task for businesses such as restaurants, health centers, clinics and beauty shops, is to automate reservations and appointments. Offering a convenient and hassle-free reservation process helps generate more efficient and faster reservations, increases the revenue coming from reservations and reduces the possibility of the customer abandoning the purchase or service.
The chatbot can handle each of your clients in simultaneously and without the need for supervision nor having to spend resources on an agent or secretary for it. Let's look at the following example:
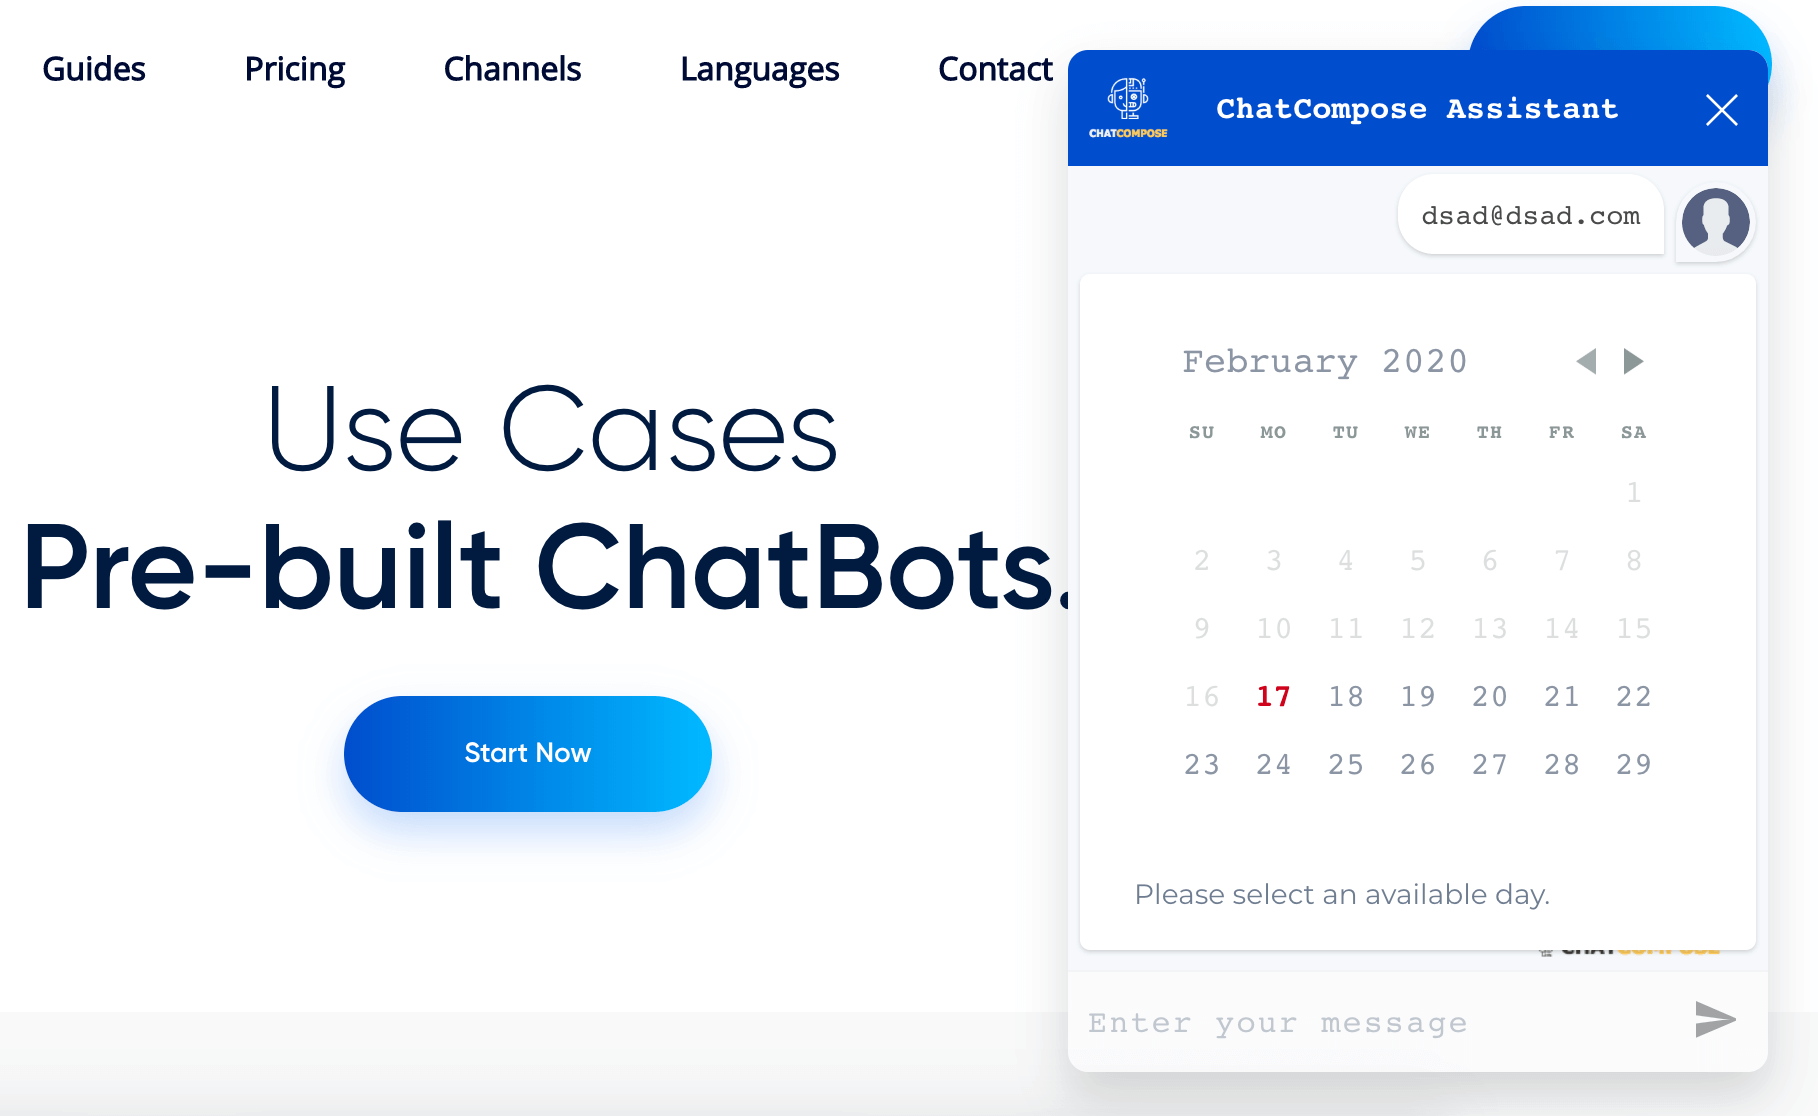
Within the ChatCompose platform you can find a default script for making Reservations or appointments in Chatbots> Use Cases, then selecting Tasks, and accessing Appointments.
Also in the Reservations / Appointments menu, you can customize your calendar according to the availability of your company or service.
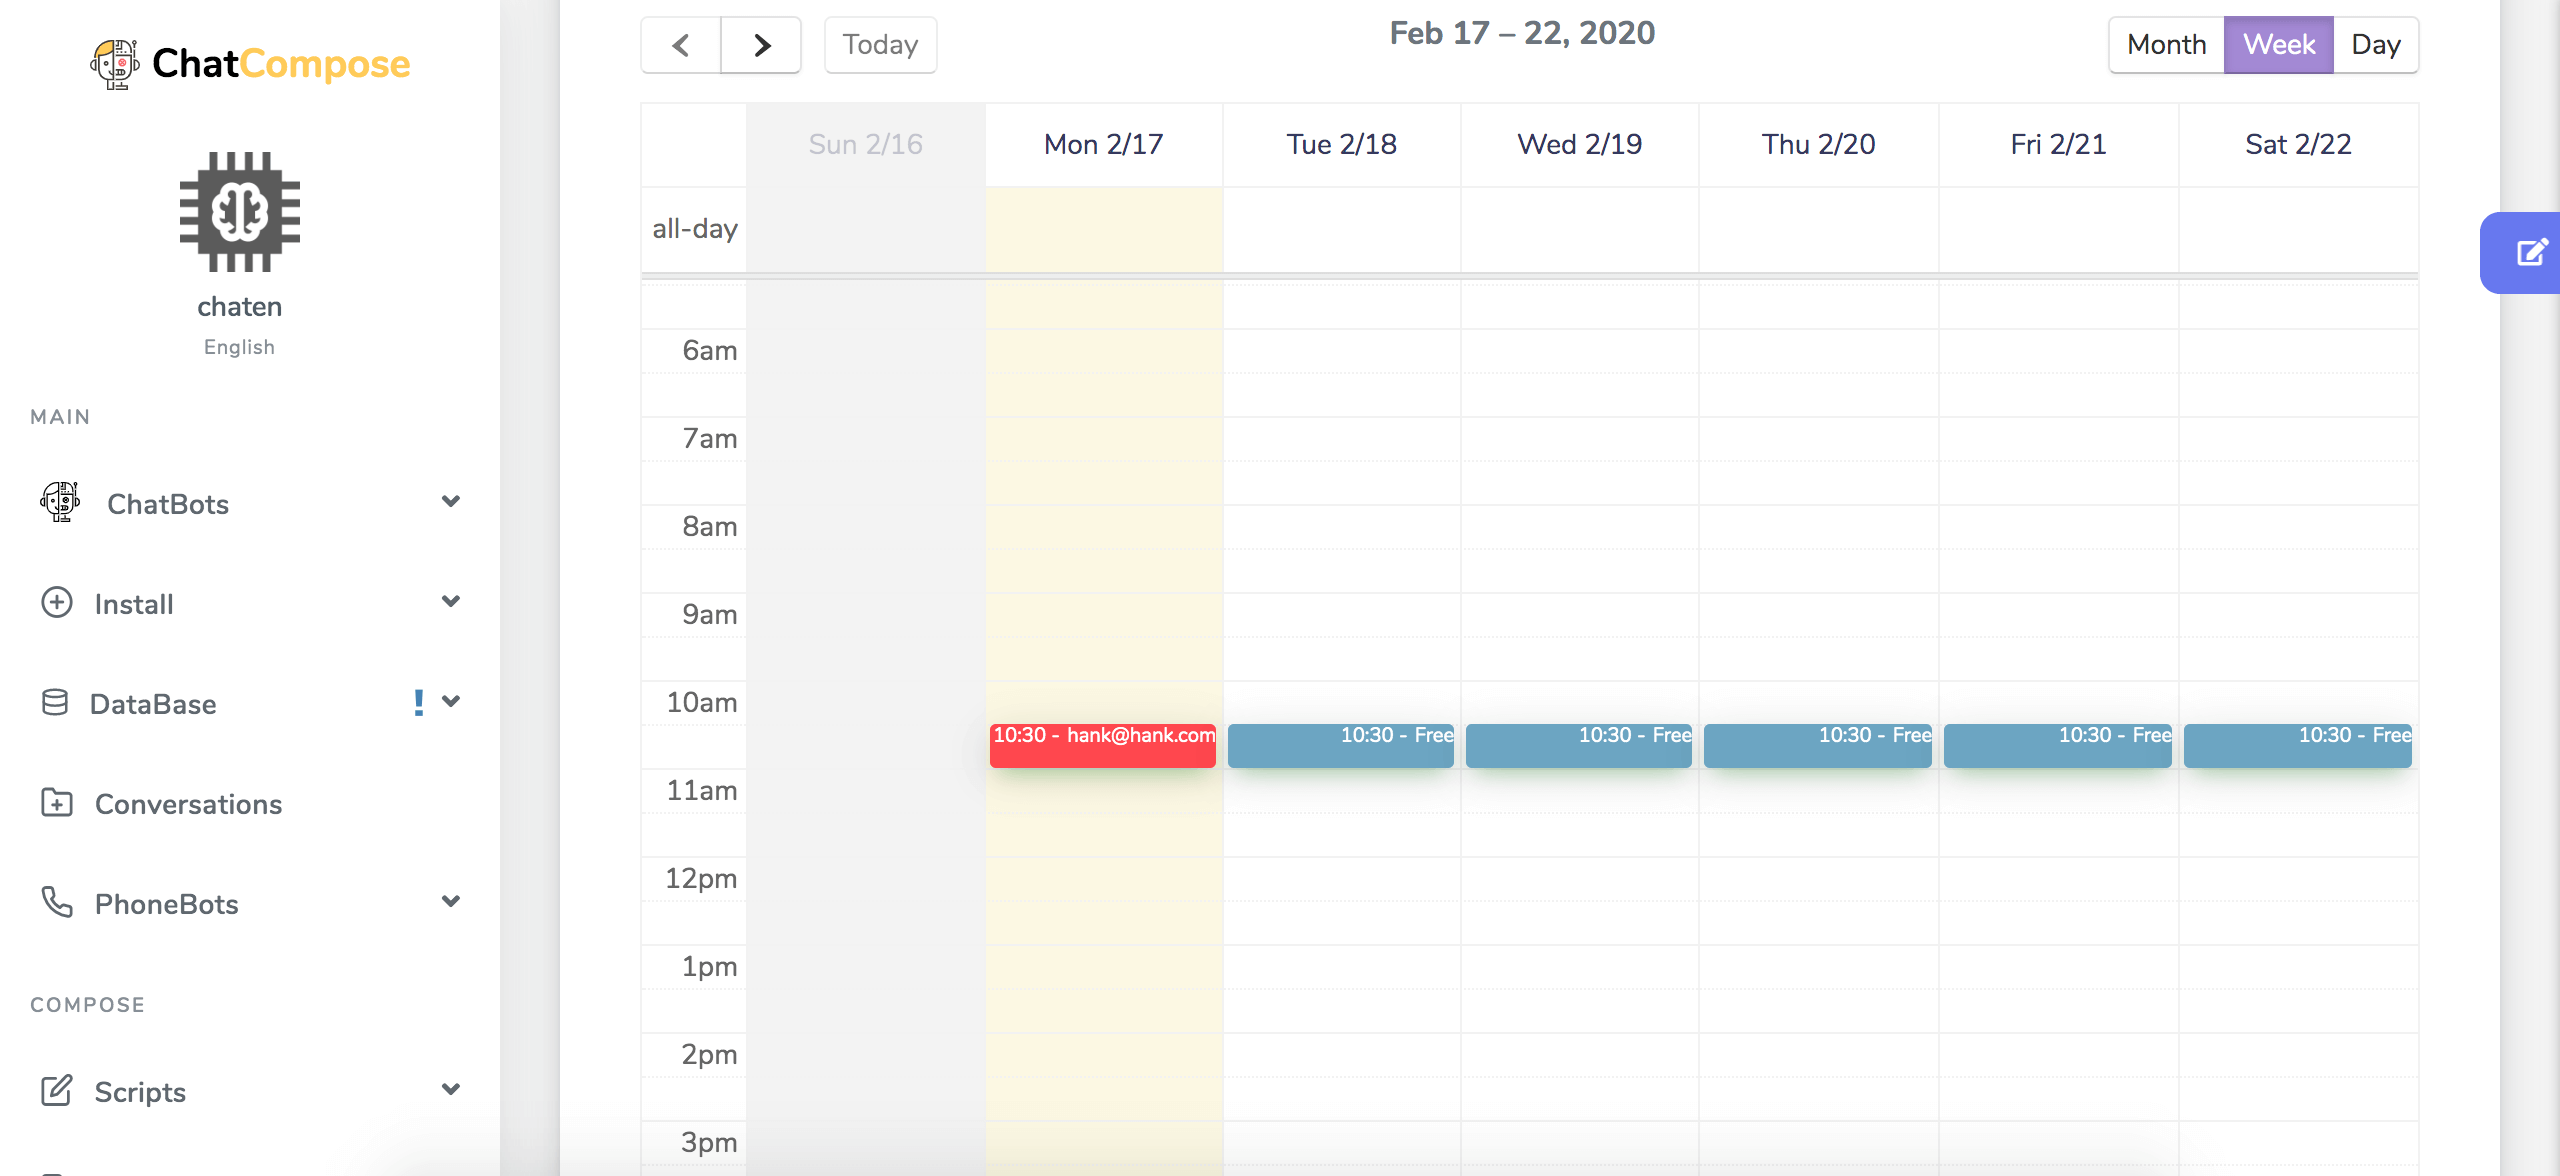
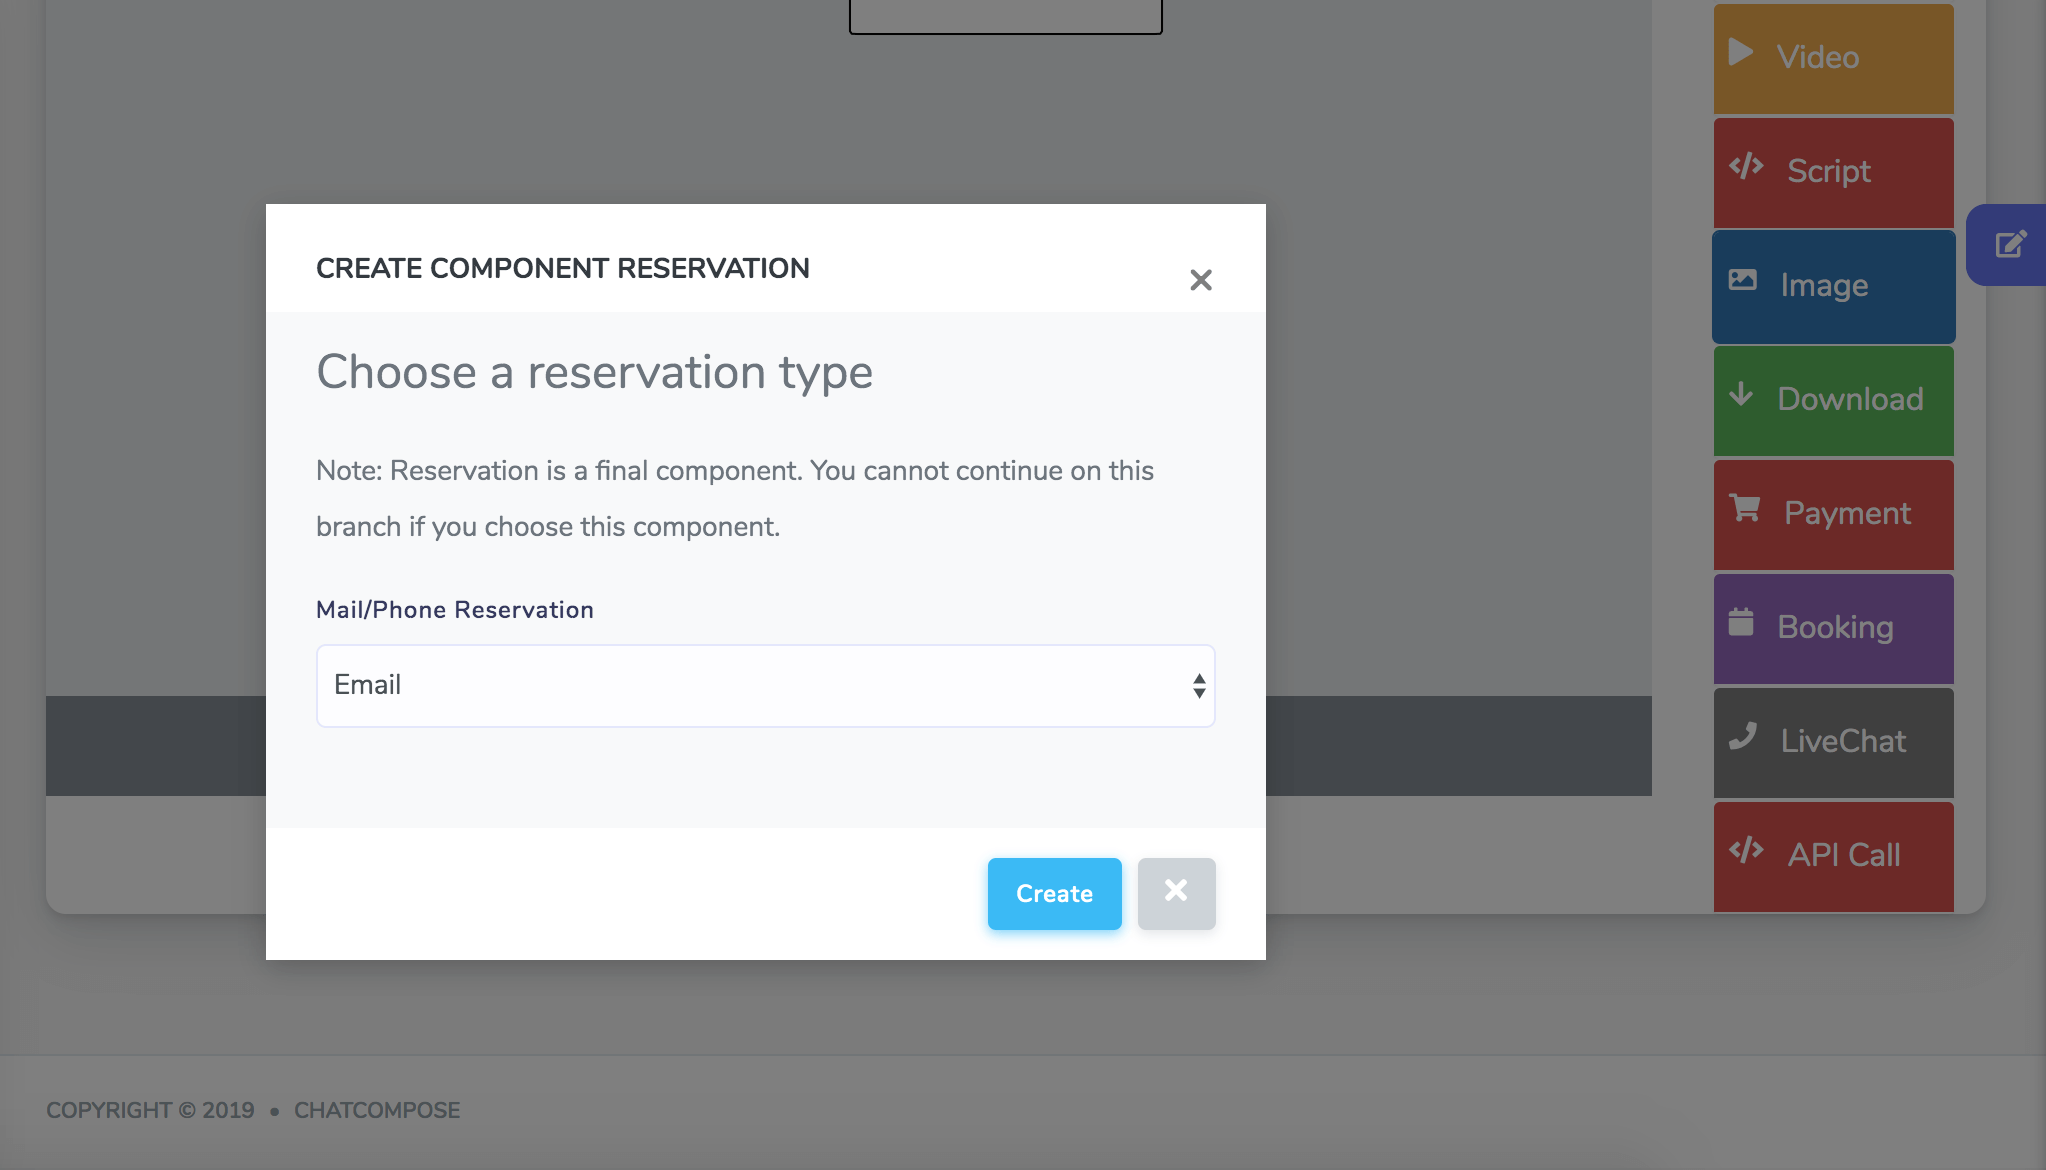
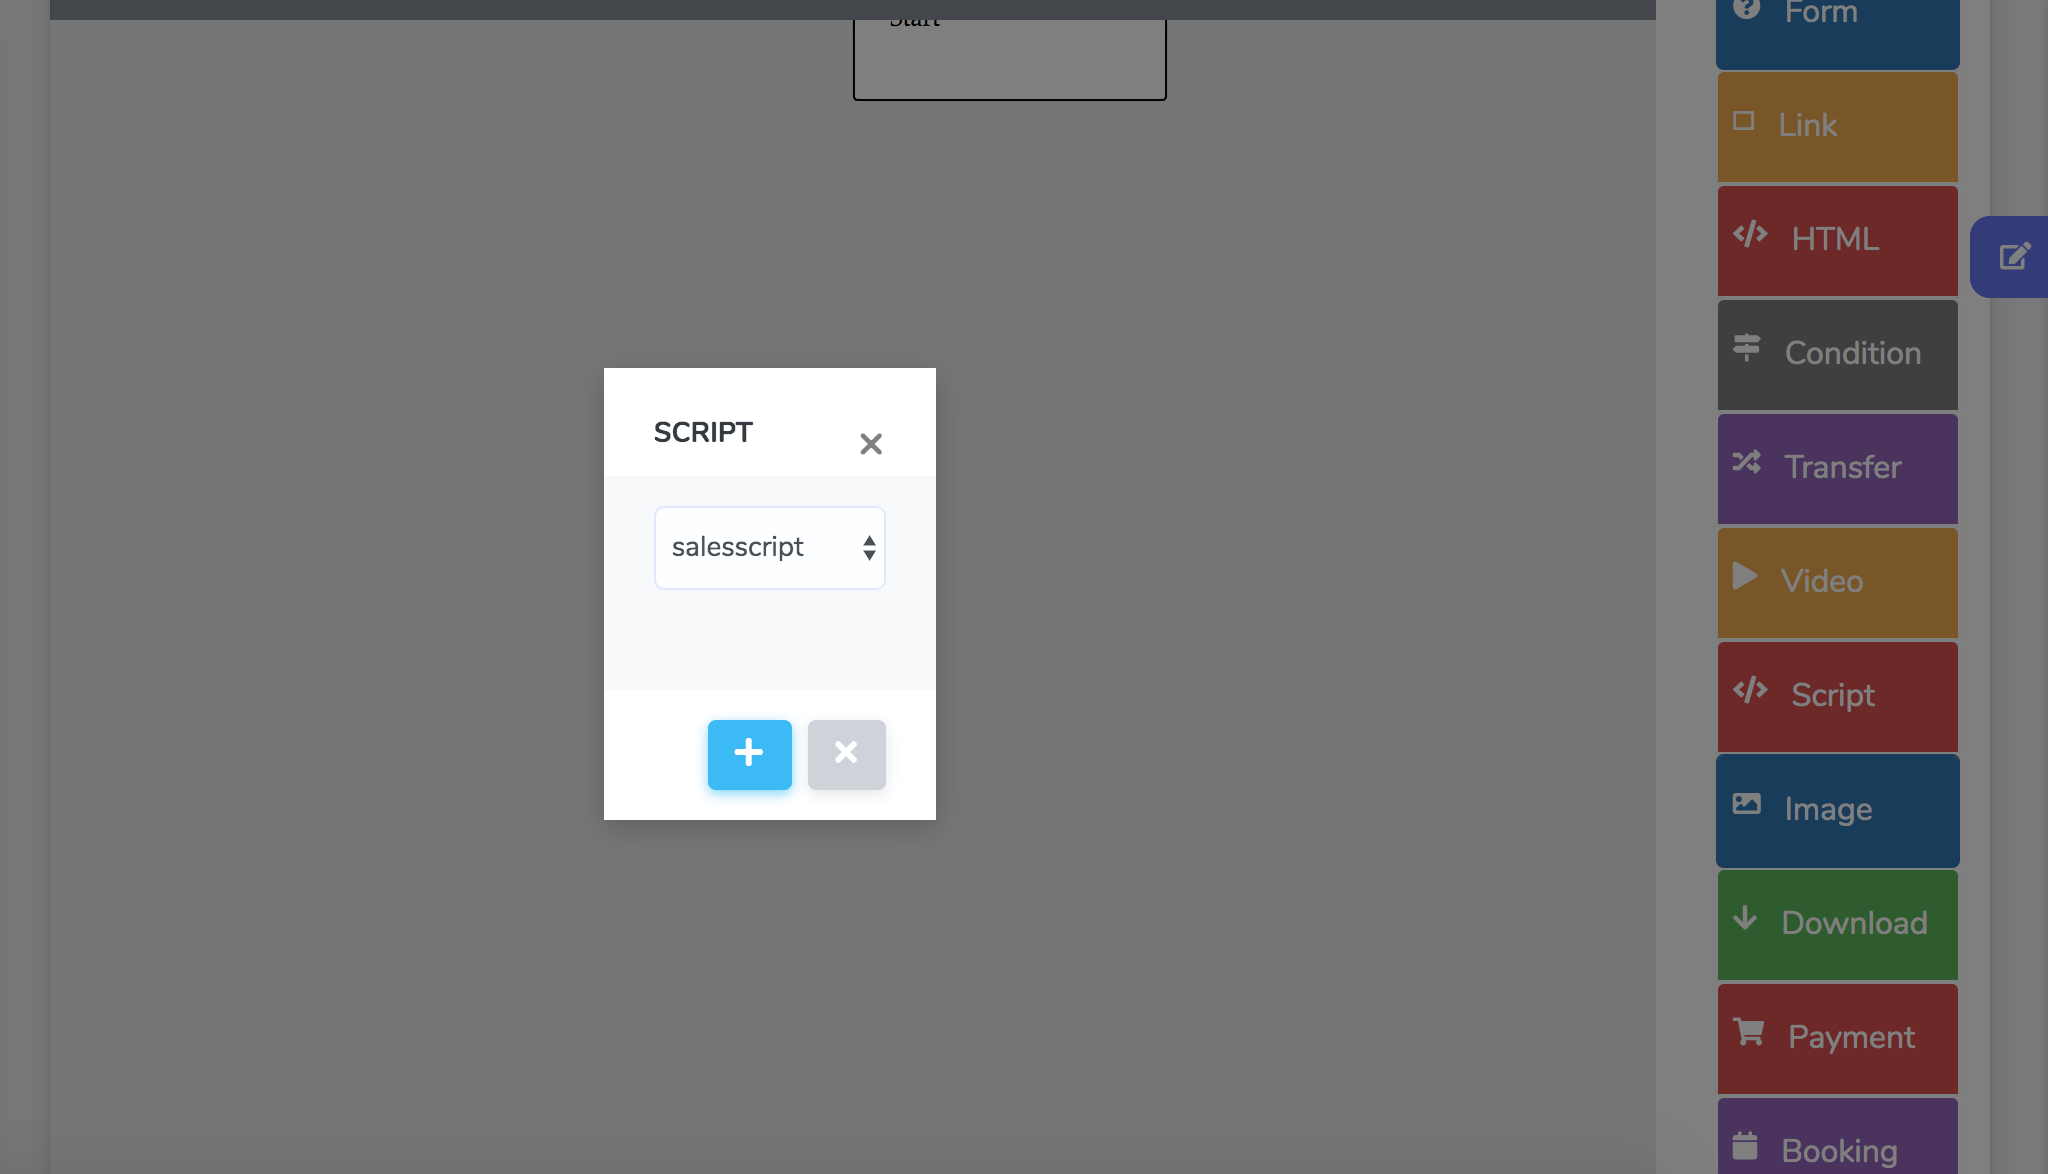
The script building interface allows you to enable the "Reserve" component for your bot while creating the scripts to start scheduling meetings with the times and dates that you have previously marked as available in this section.
While you are building your script you can add the Reservations component as you see in the image, so that the bot suggests reservation options to the user while conducting the conversation.
This way, your customers do not have to wait long waiting lists to contact someone on your team to assign an appointment. The system is responsible for automating this process and allowing your users choose their appointment or reservation according to their availability, and the dates and times you have marked as available. The chatbot will email you every time a new reservation is made.
A ChatBot can guide a client through a conversation flow that reduces the friction that is often encountered when making a reservation for any service. You can also answer customer questions related to the service, all in the same chat.
A chatbot trained to answers frequently asked questions is a great way to improve your customer's experience on your website. It allows the chatbot to answer the questions that are most commonly asked regarding your products or services.
To train your chatbot you have three options.
You can read the full guide on how to train your chatbot with answers here.
Remember that the key to meaningful answers lies in framing the questions just as the users ask them.
Making satisfaction surveys, getting product perspectives or customer impressions is increasingly difficult, and very few customers fill them, because it is inconvenient and usually requires following a link. A chatbot can help with that task by integrating a surey into the conversation.
The information you can collect through your surveys has a lot of value, helps you improve your products and services and prepares you to keep up with customers as an advantage over your competitors, better understanding business trends. But how to make a customer commit to us to the point of giving us their opinion? Easy, through chatbots.
Considering that most people to date are curious to interact with a bot and that it is extremely easy to communicate through these programs, it is feasible to install a survey component in our bot for customers to give their opinions. Let's see an example:
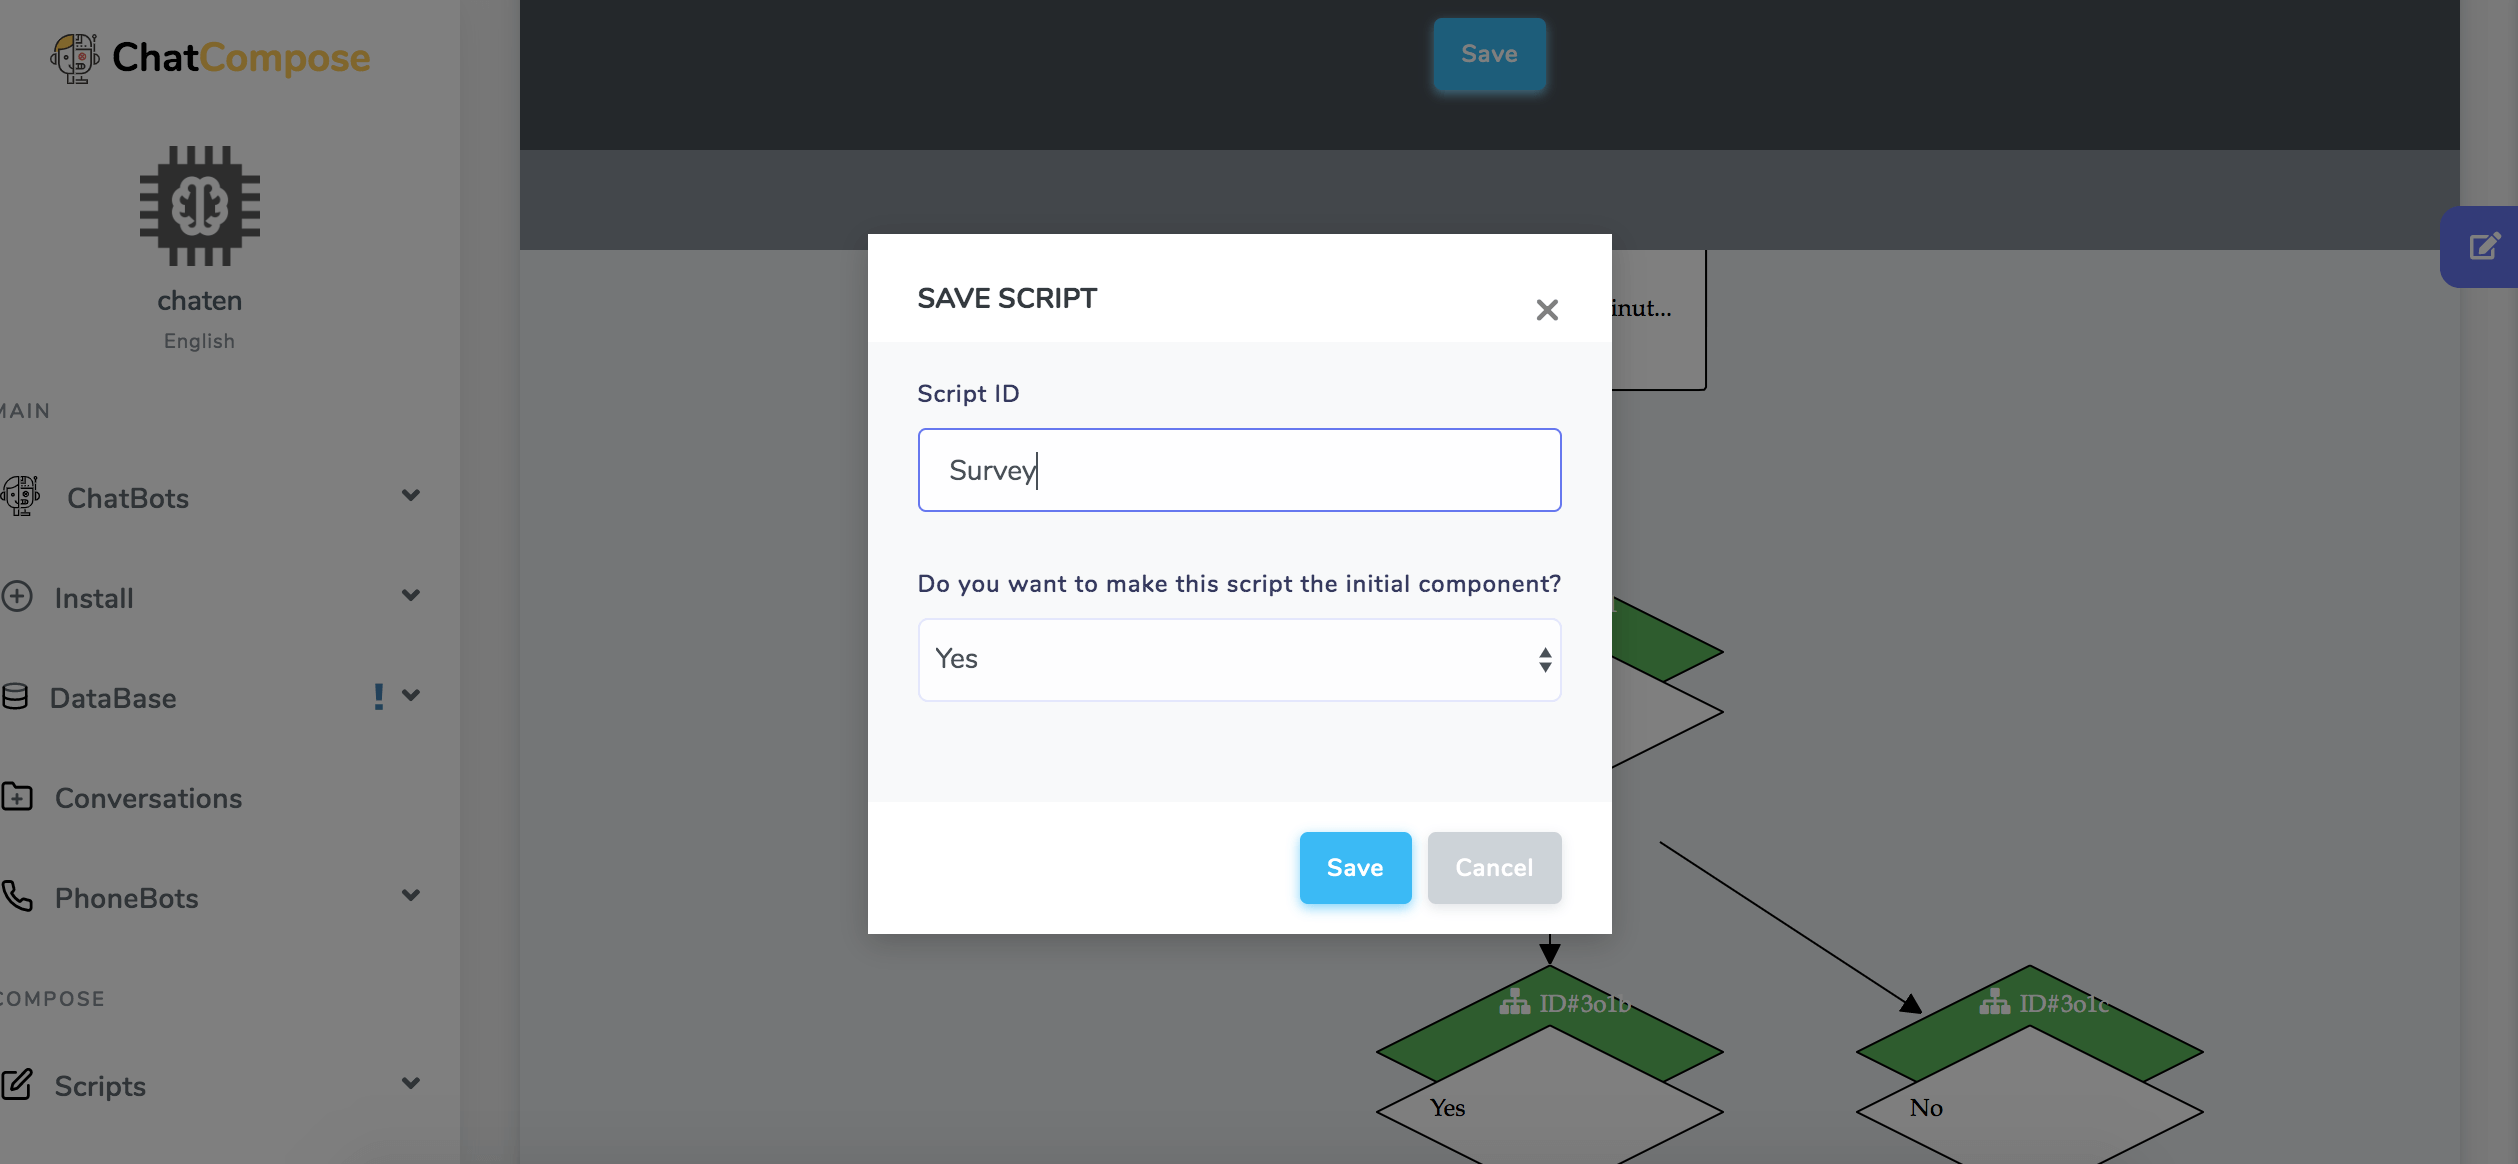
The image shows the spaces that should present the questions you want to ask your customers. For example, would you recommend our service? Or would you buy from us again? You can find this component in ChatBots> Use Cases, in Task and then Simple Survey.
There you can edit the script from default with the questions you want to ask your customers. Then you save the script with an ID and define whether or not it will be the default script with which your bot will work on the web.
If the survey is not the default script, but you just want it to be one of the tasks that your bot does, then while you are creating the flow of your main script, you can integrate the survey script by adding the </> Script component and select the survey script.
This step also applies to add the lead generation script to your main script.
This is how bots can become fully functional to do these tasks that in many cases can be repetitive and do not require the intervention of a human agent. Also remember that users do not want to be redirected to forms or other pages to resolve their requests.
The bot allows all processes to be performed automatically within your website, without having to go to any other address or landing page.
Setting up and installing your bot on your website is also very easy. It is a procedure that will take you only a few minutes. Let's start with the configuration.
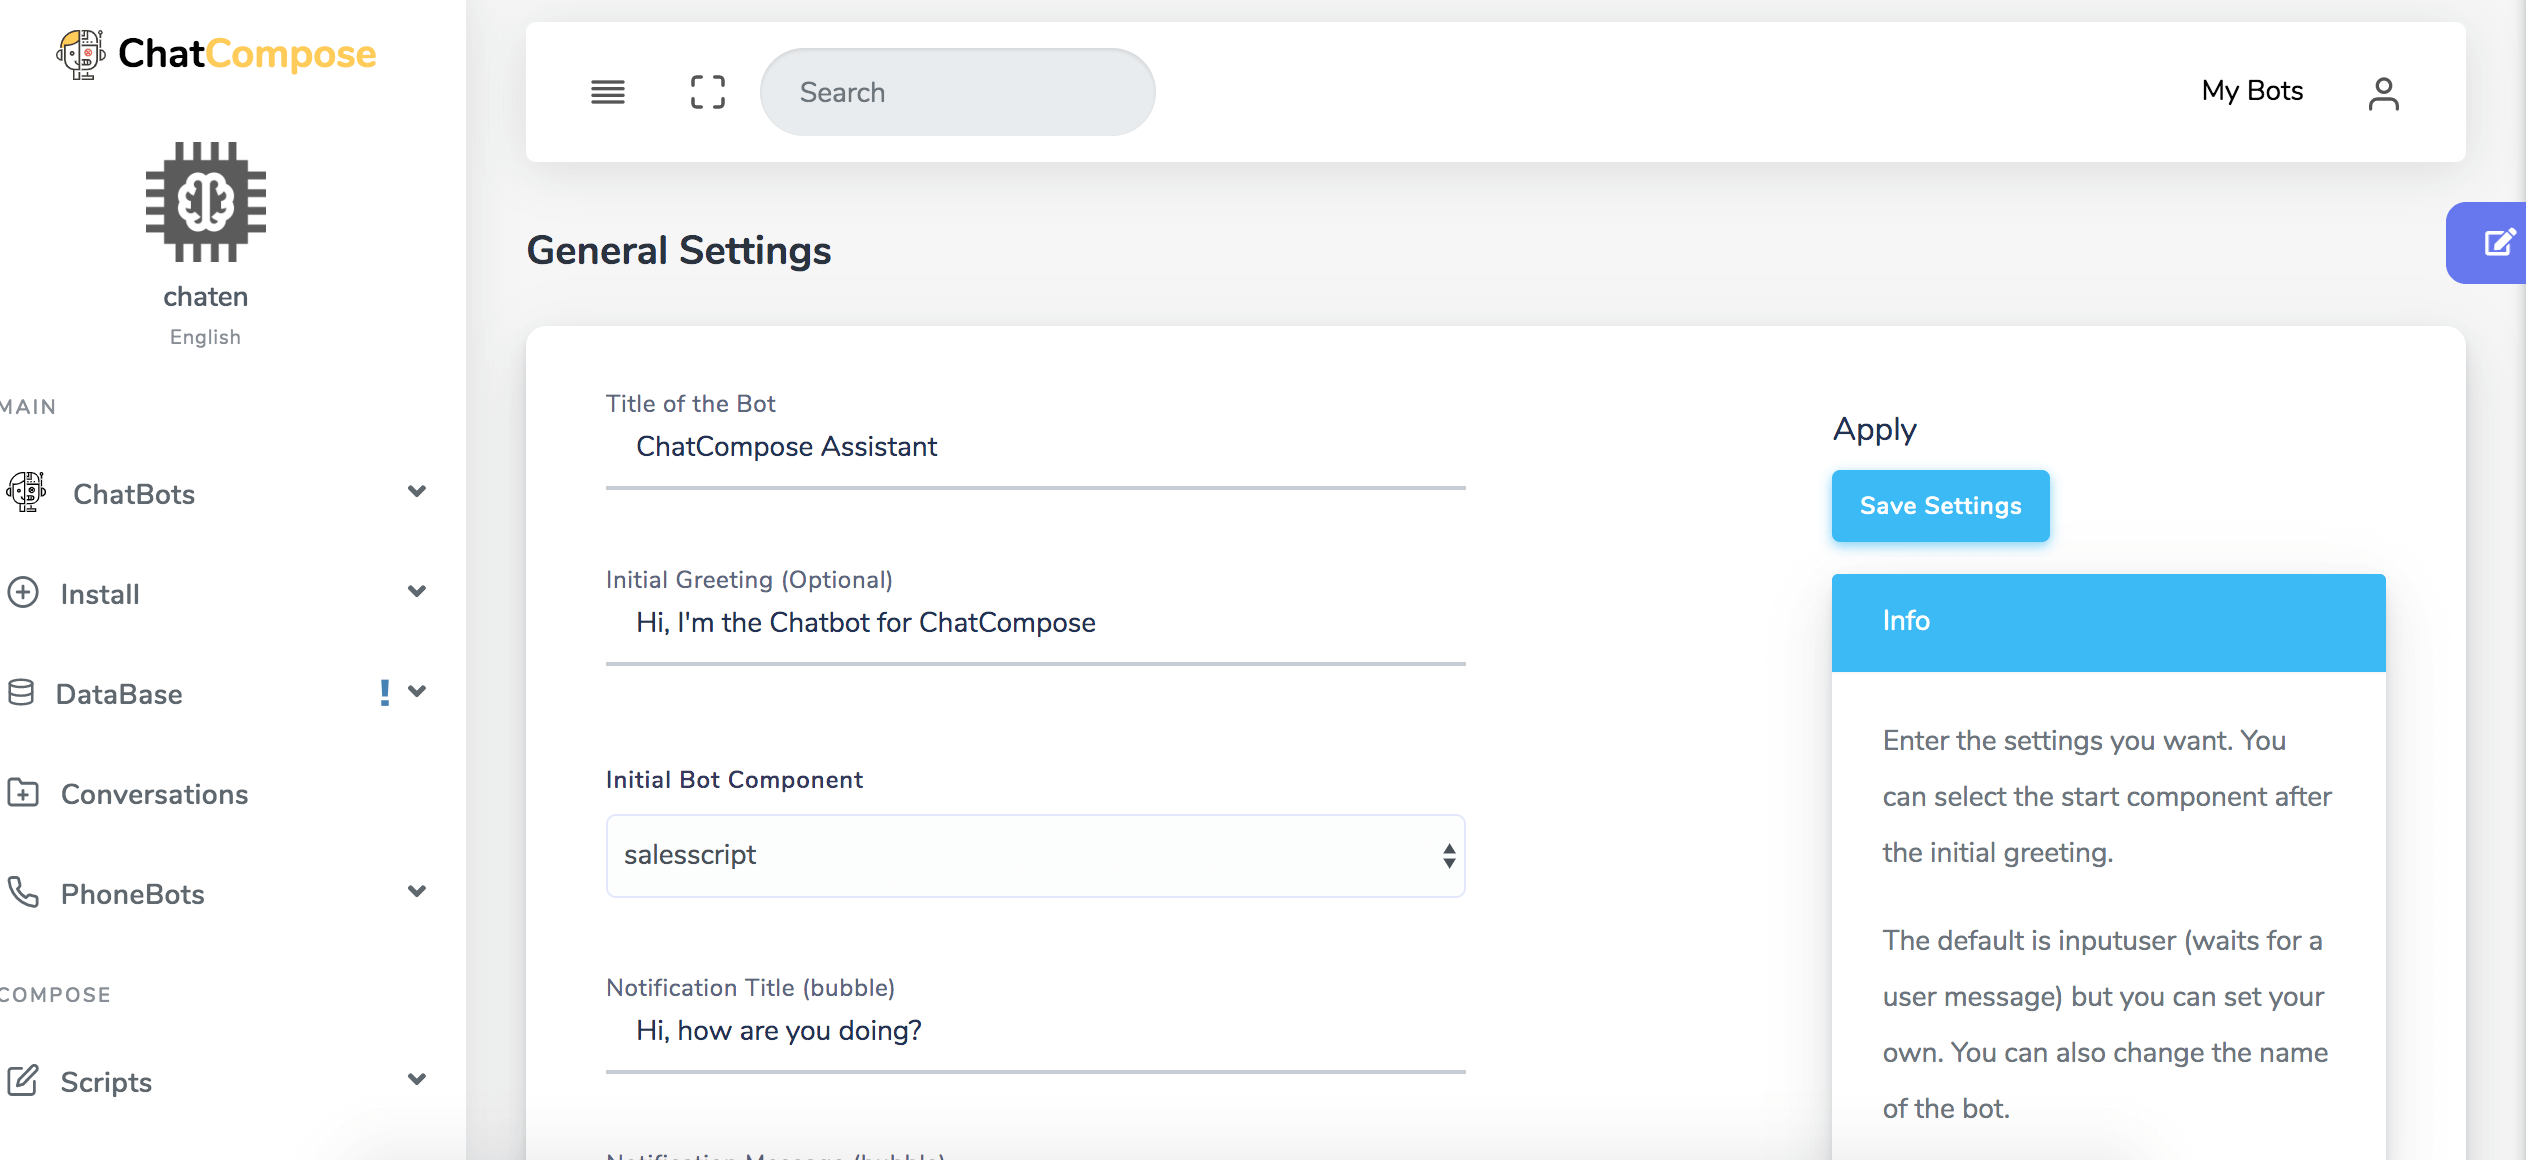
Within the platform, in Properties, there is precisely a section entitled Configurations. In Settings> General you are responsible for naming your bot, creating the initial message it will give users on your website and the title of the notification that will appear in the bubble.
But the most important thing is that you choose the Initial Component, which will be the name of the script you created to be reproduced in the conversation with the user. These settings can go more or less like this.
On the other hand, in Settings> Pages you can create a new configuration for a specific URL, in case you need bots for individual pages. In other words, this allows you to create settings on particular pages to display different messages and components / scripts.
Thus, you can display a sales script on product pages, a support script on the contact page, or a reservation script on the appointment page.
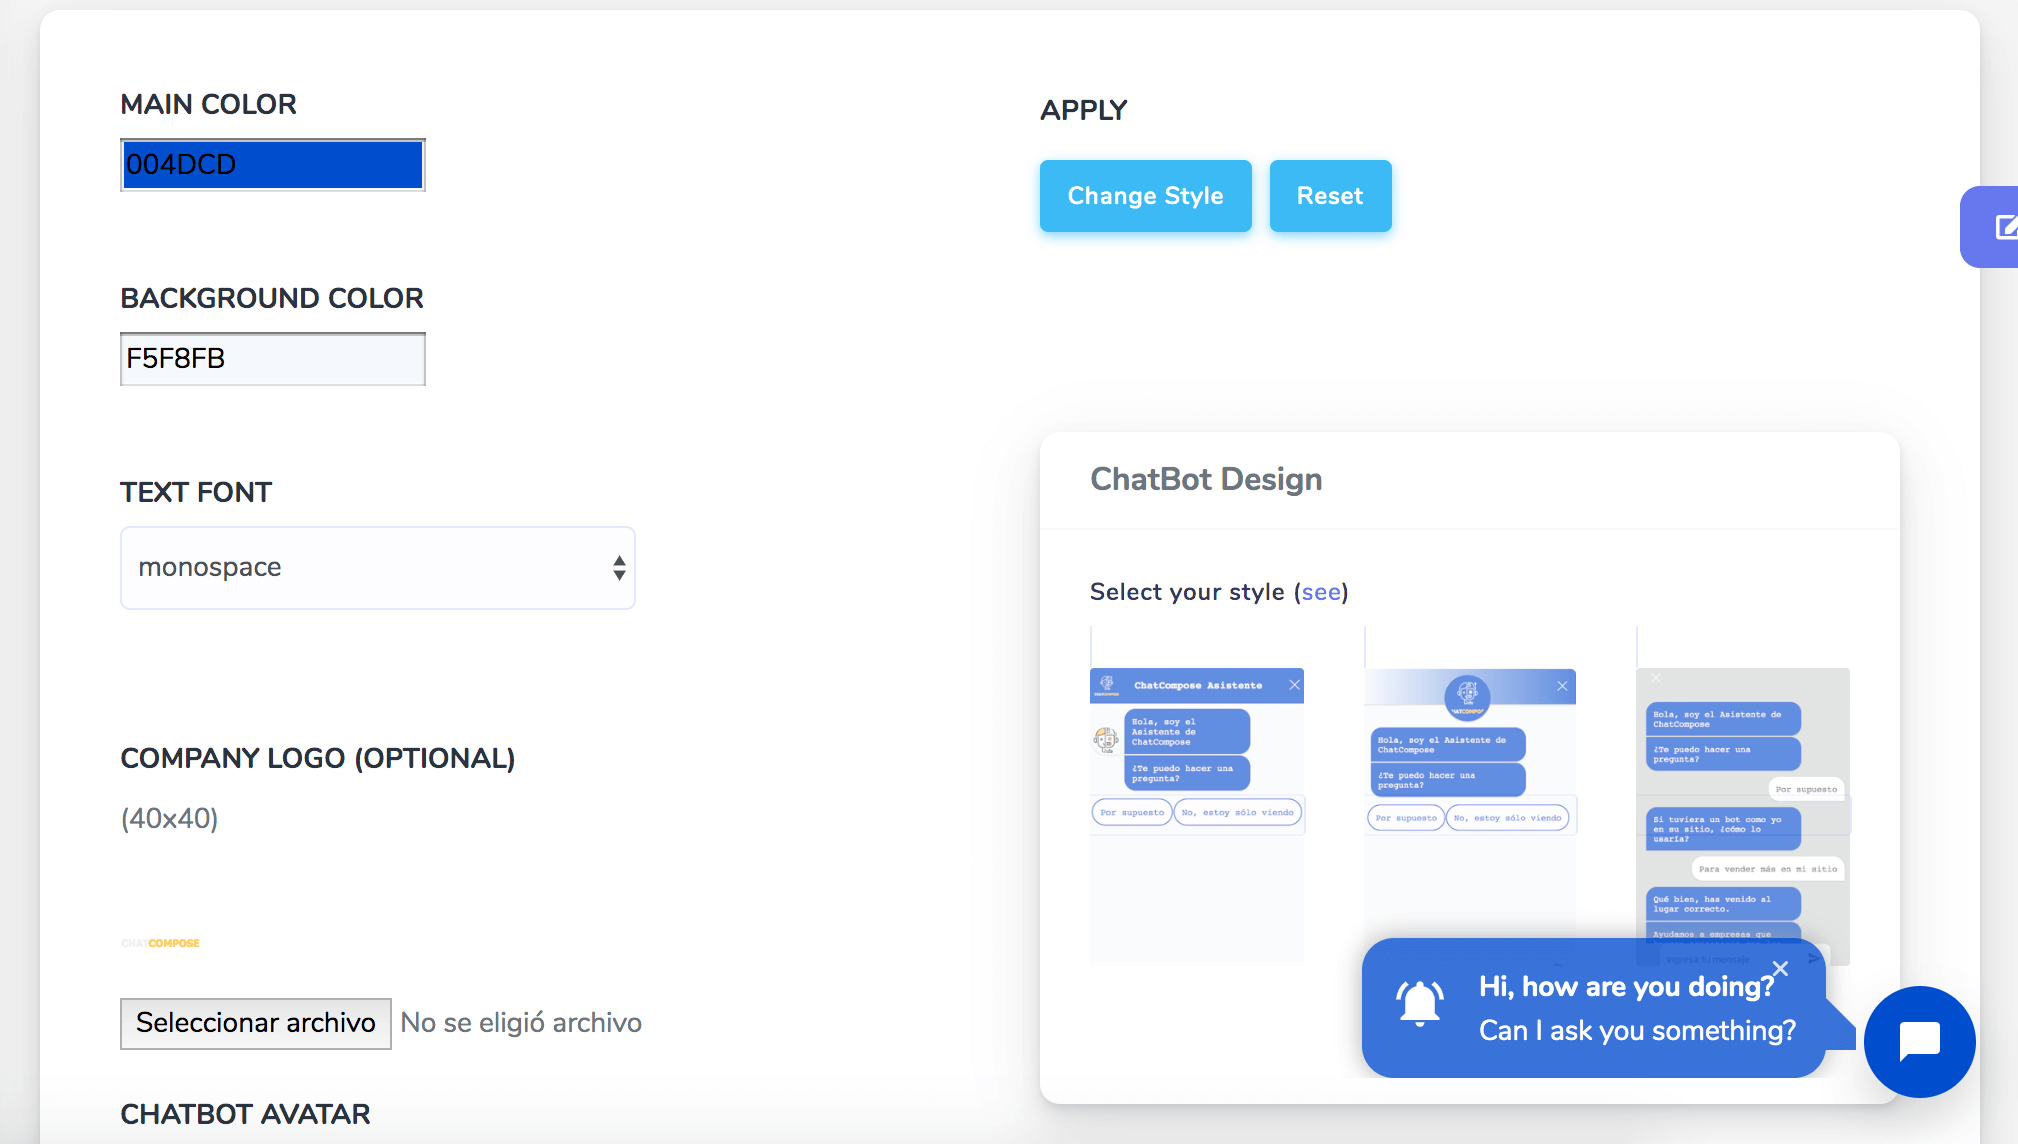
Finally, in Settings> Personalization you can find the design options of your bot. That is, you can define the main color, the background color, the type of font, and even your company logo if you wish. All changes are applied automatically.
Once the script is configured, the next thing is to know how to install it. The option is quite easy to find on the platform. In the left sidebar, in Main, you have the Install option and within it you can select the Web option.
Once you are in Installation> Web there are three options among which you have to choose the one that suits your case.
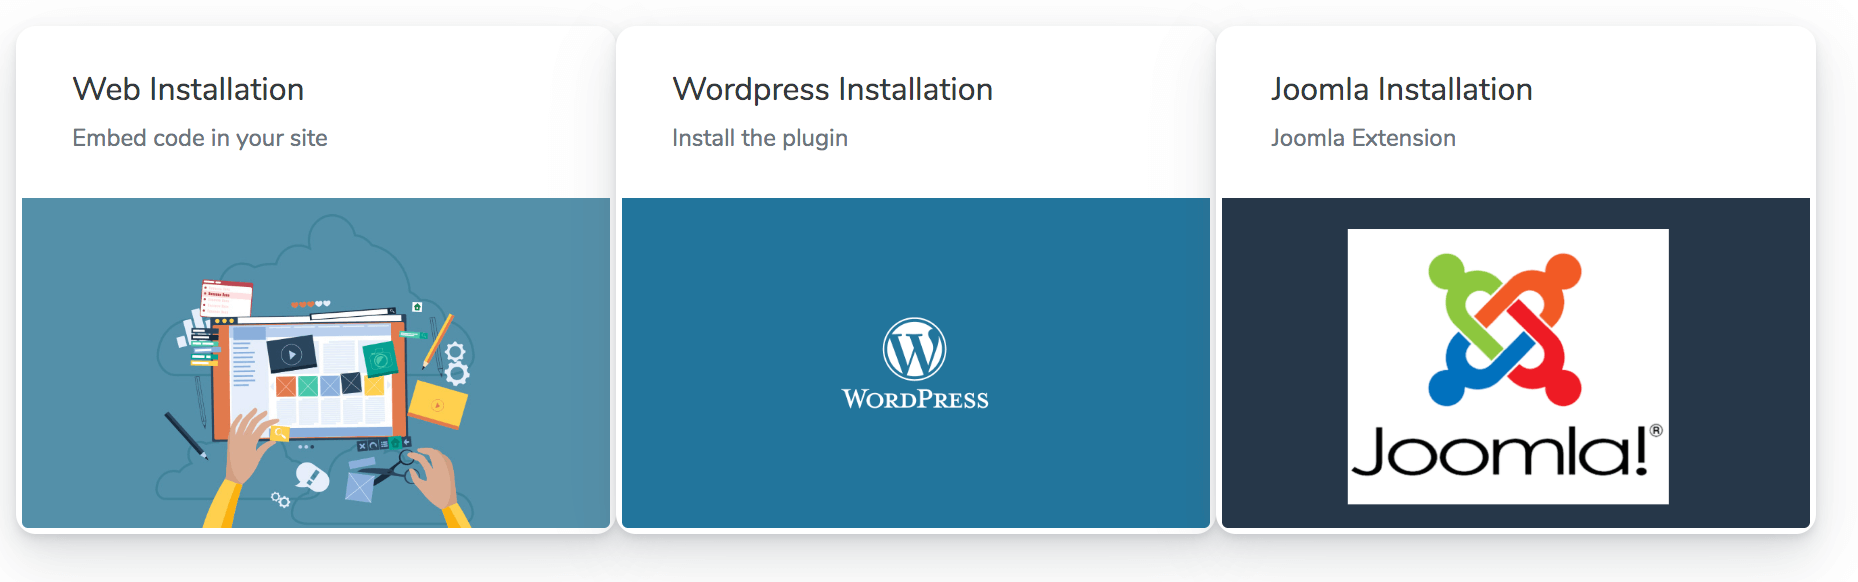
The first option is Web Installation. We provide you with a code that you can implement by adding it to the HTML of your page before closing your tag </head>: You will only see the changes on your site, once you have cleared the cache or while using incognito mode.
Then you have the WordPress Installation. All you have to do is install our pluguin on your website created with WordPress. To do this we share a plugin from our site, you will need to upload it in the Plugins> Add New> Upload Plugin section. Once the plugin is installed, you must provide your user ID, which means that you must have an active ChatCompose account. After entering the ID you save the changes and your chatbot should be visible on your website just as you installed it.
Finally there is the Joomla Installation option through an extension. This installation is also facilitated with a plugin. We provide the file for you to install on your Joomla site> Extensions> Manage> Install. Then you just have to navigate to Extensions> Plugin and search for "chat compose", there you can activate the plugin or edit it. Again, in order to activate the plugin you need to have an ID to then save the changes.
If you do not have a ChatCompose account you can create one here, as you will need to access our chatbots tools for your website. The bots at the moment cannot completely supplant human agents, but they can automate many repetitive or systematic processes that would cost you many resources, personnel and time.
These have only been three of the use cases most implemented by companies within their websites, but the results are scalable to the extent that you could automate even more complicated tasks.
Remember that most of your clients or users do not want to go through three different pages before arriving at the process they are finally looking for. The bots get users to connect with what they want without leaving your website, only within the conversation interface.
It is a very useful service, especially considering that most people visit websites from their smartphones. If these Smartphone users had to navigate your site too much to find the option you are looking for, you will most likely lose them along the way.
We hope this tutorial has been helpful so you don't lose more leads with boring forms, your customers make their reservations faster and easier and you can do surveys more subtly and effectively. All with the help of a Chatbot.