According to eMarketer, more than a quarter of the world will use messaging applications by the end of 2019.
People are more interested in using chatbots to answer simple questions, solve a problem, make a reservation or pay a bill, although there are still many people (43% in the United States according to Stream Creative) who prefer to talk to a human agent instead of a bot.
However, these people could change their minds if they only had good experience with bots and the secret to this is in creating scripts with meaningful answers.
In this class, we explain how to use the ChatCompose script creation interface, how to add and edit components and more.
The scripts must direct the user to specific objectives. Therefore, when creating one, you must follow certain parameters so that its use is effective for both the user and your business.
Consider the following points for effective use:
Remember your goals
While writing the script think about the user experience, have clear goals in mind that improve that experience.
Clarity about the context
Do not think of an unknown target audience while writing the script, but a specific person. Define who you are talking to, and most importantly, how that person wants to talk to you.
Stay consistent
Stay within the parameters of your brand, you can create a personality for your bot, but make sure you stay in that character. That means that the bot must be consistent in his speaking style, vocabulary and tone of voice.
Be concise
Each message should not exceed three lines of text on mobile devices (60 to 90 characters). Like any content these days, users don't like to read long blocks of text and every additional line you add runs the risk of not being read.
The best thing is to divide your message into several responses, as if it were a real conversation.
Close the conversation successfully
At the end of the conversation, try to add a "thank you" or wish the user a good day, that will add positive points to the experience.
That said, you can use your bots to answer questions, generate and rate leads, offer customer support, conduct surveys, reservations, capture data, place orders, etc. implement them through different channels such as Web, CMS (Wordpress, Joomla, Shopify etc.), Mobile Applications, Facebook, Slack, Whatsapp, CRM, Telegram and Telephony (voice).
As long as you take into account the above parameters, you can take advantage of these small assistants to achieve your goals.
This is the ChatCompose script creation interface:
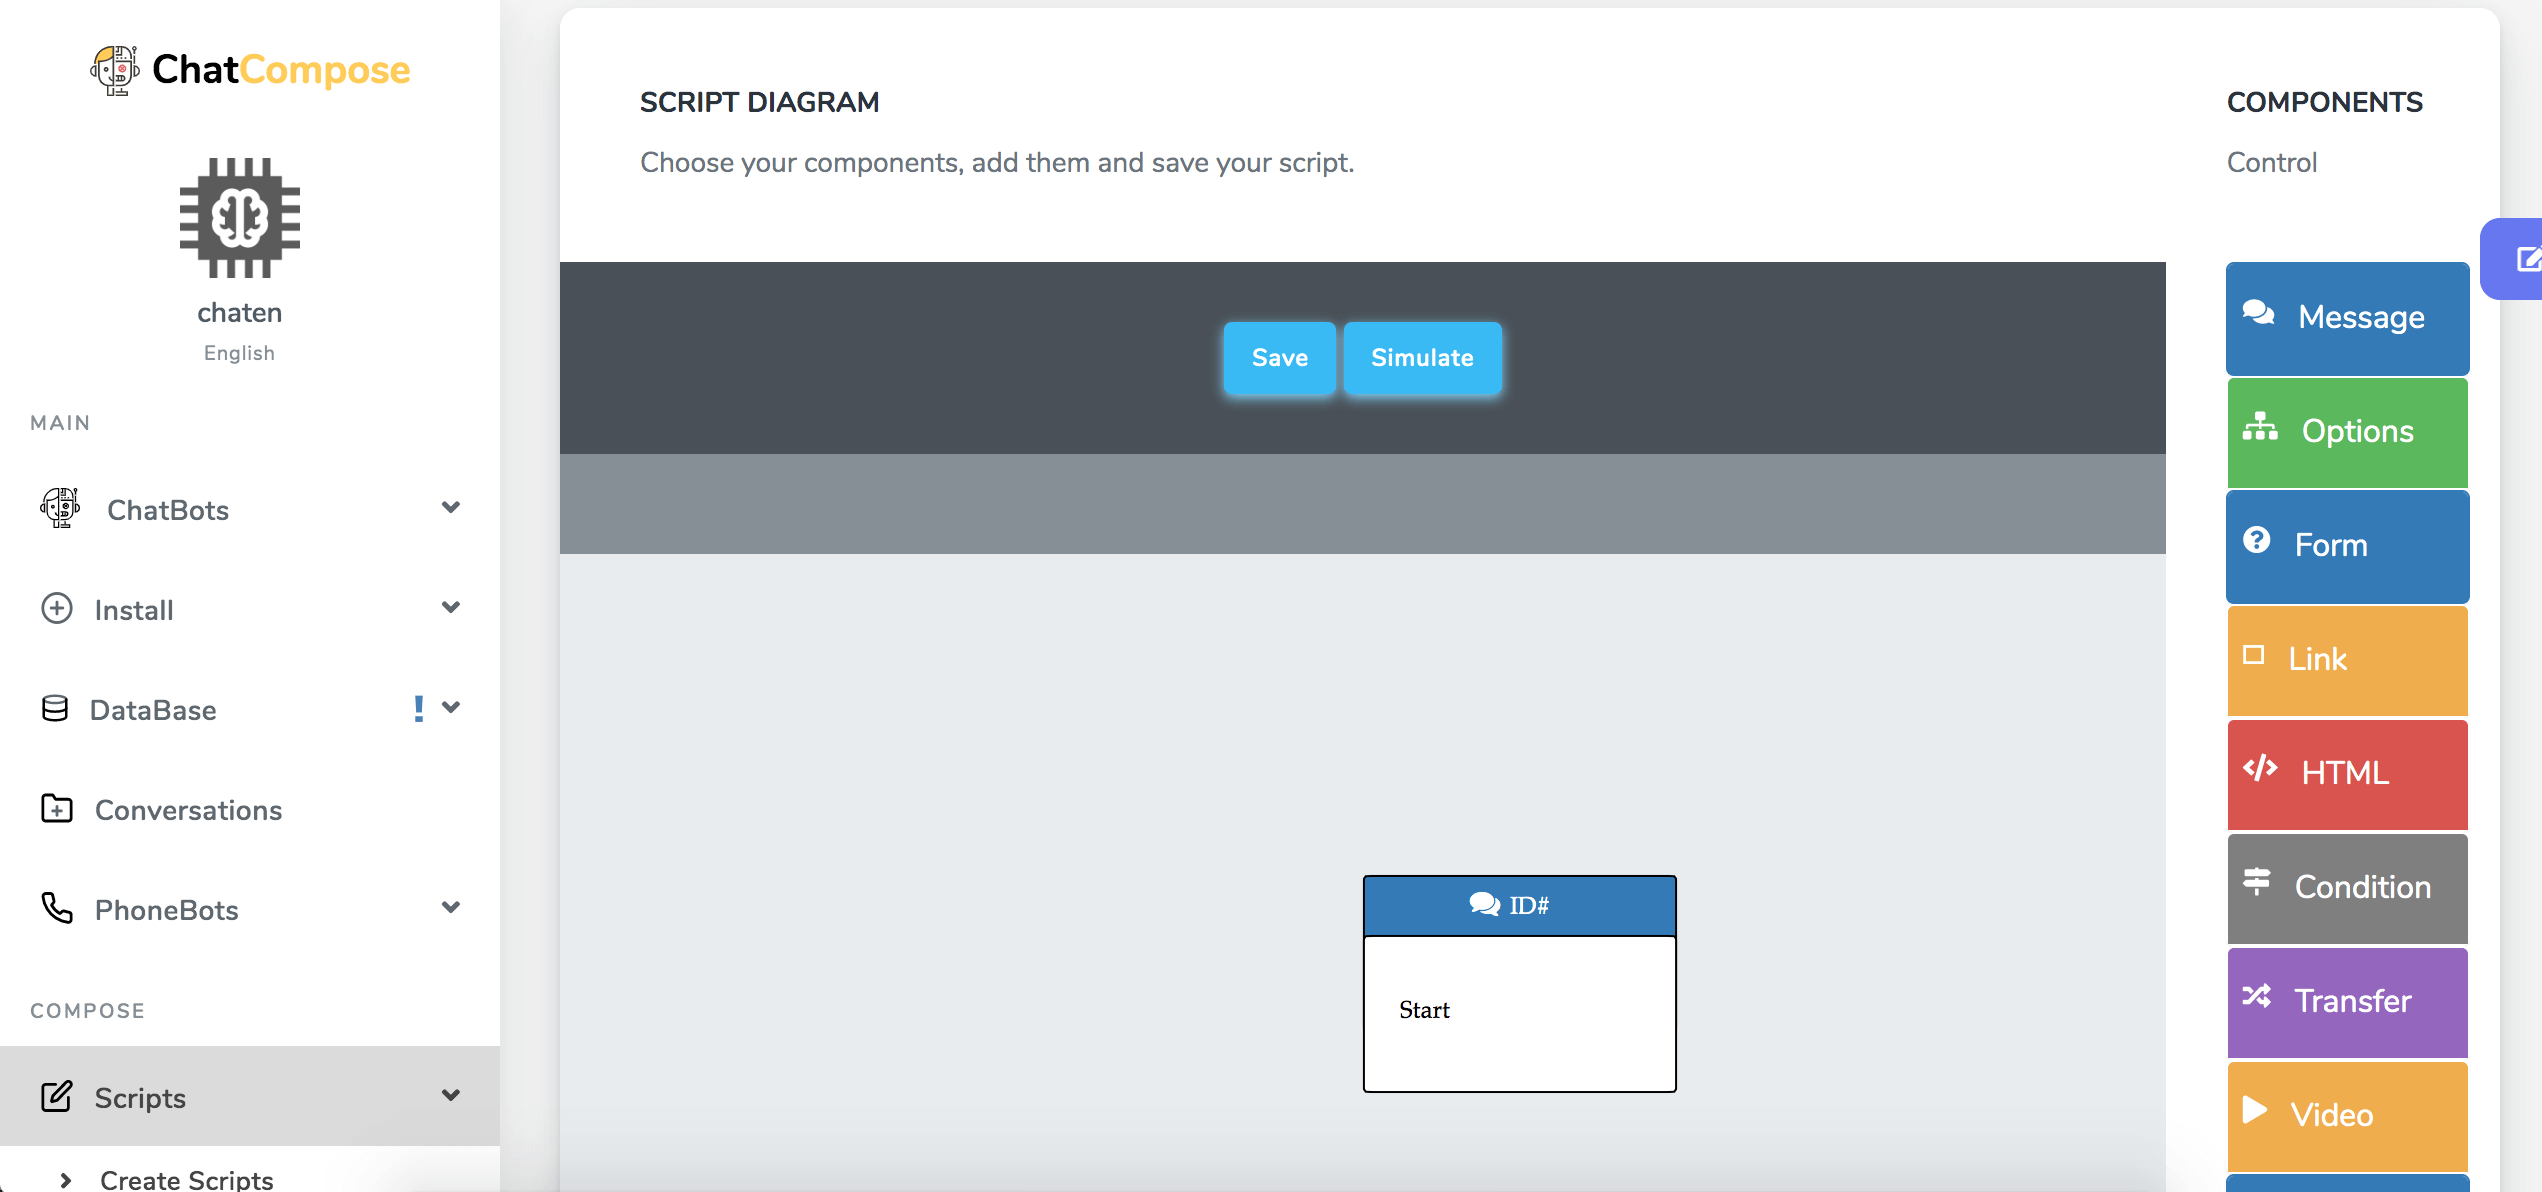
To get to it, within your control panel, you just have to go to Scripts> Create Scripts.
After giving your new script a name and description, you can start creating a conversation from a series of available components, as you can see in the picture above, are displayed on the right side.
These are the reusable components that you find in the script creation interface:
Message: Shows a simple text message to the user. It may be the welcome message or a specific question. Example: "How can I help you?"
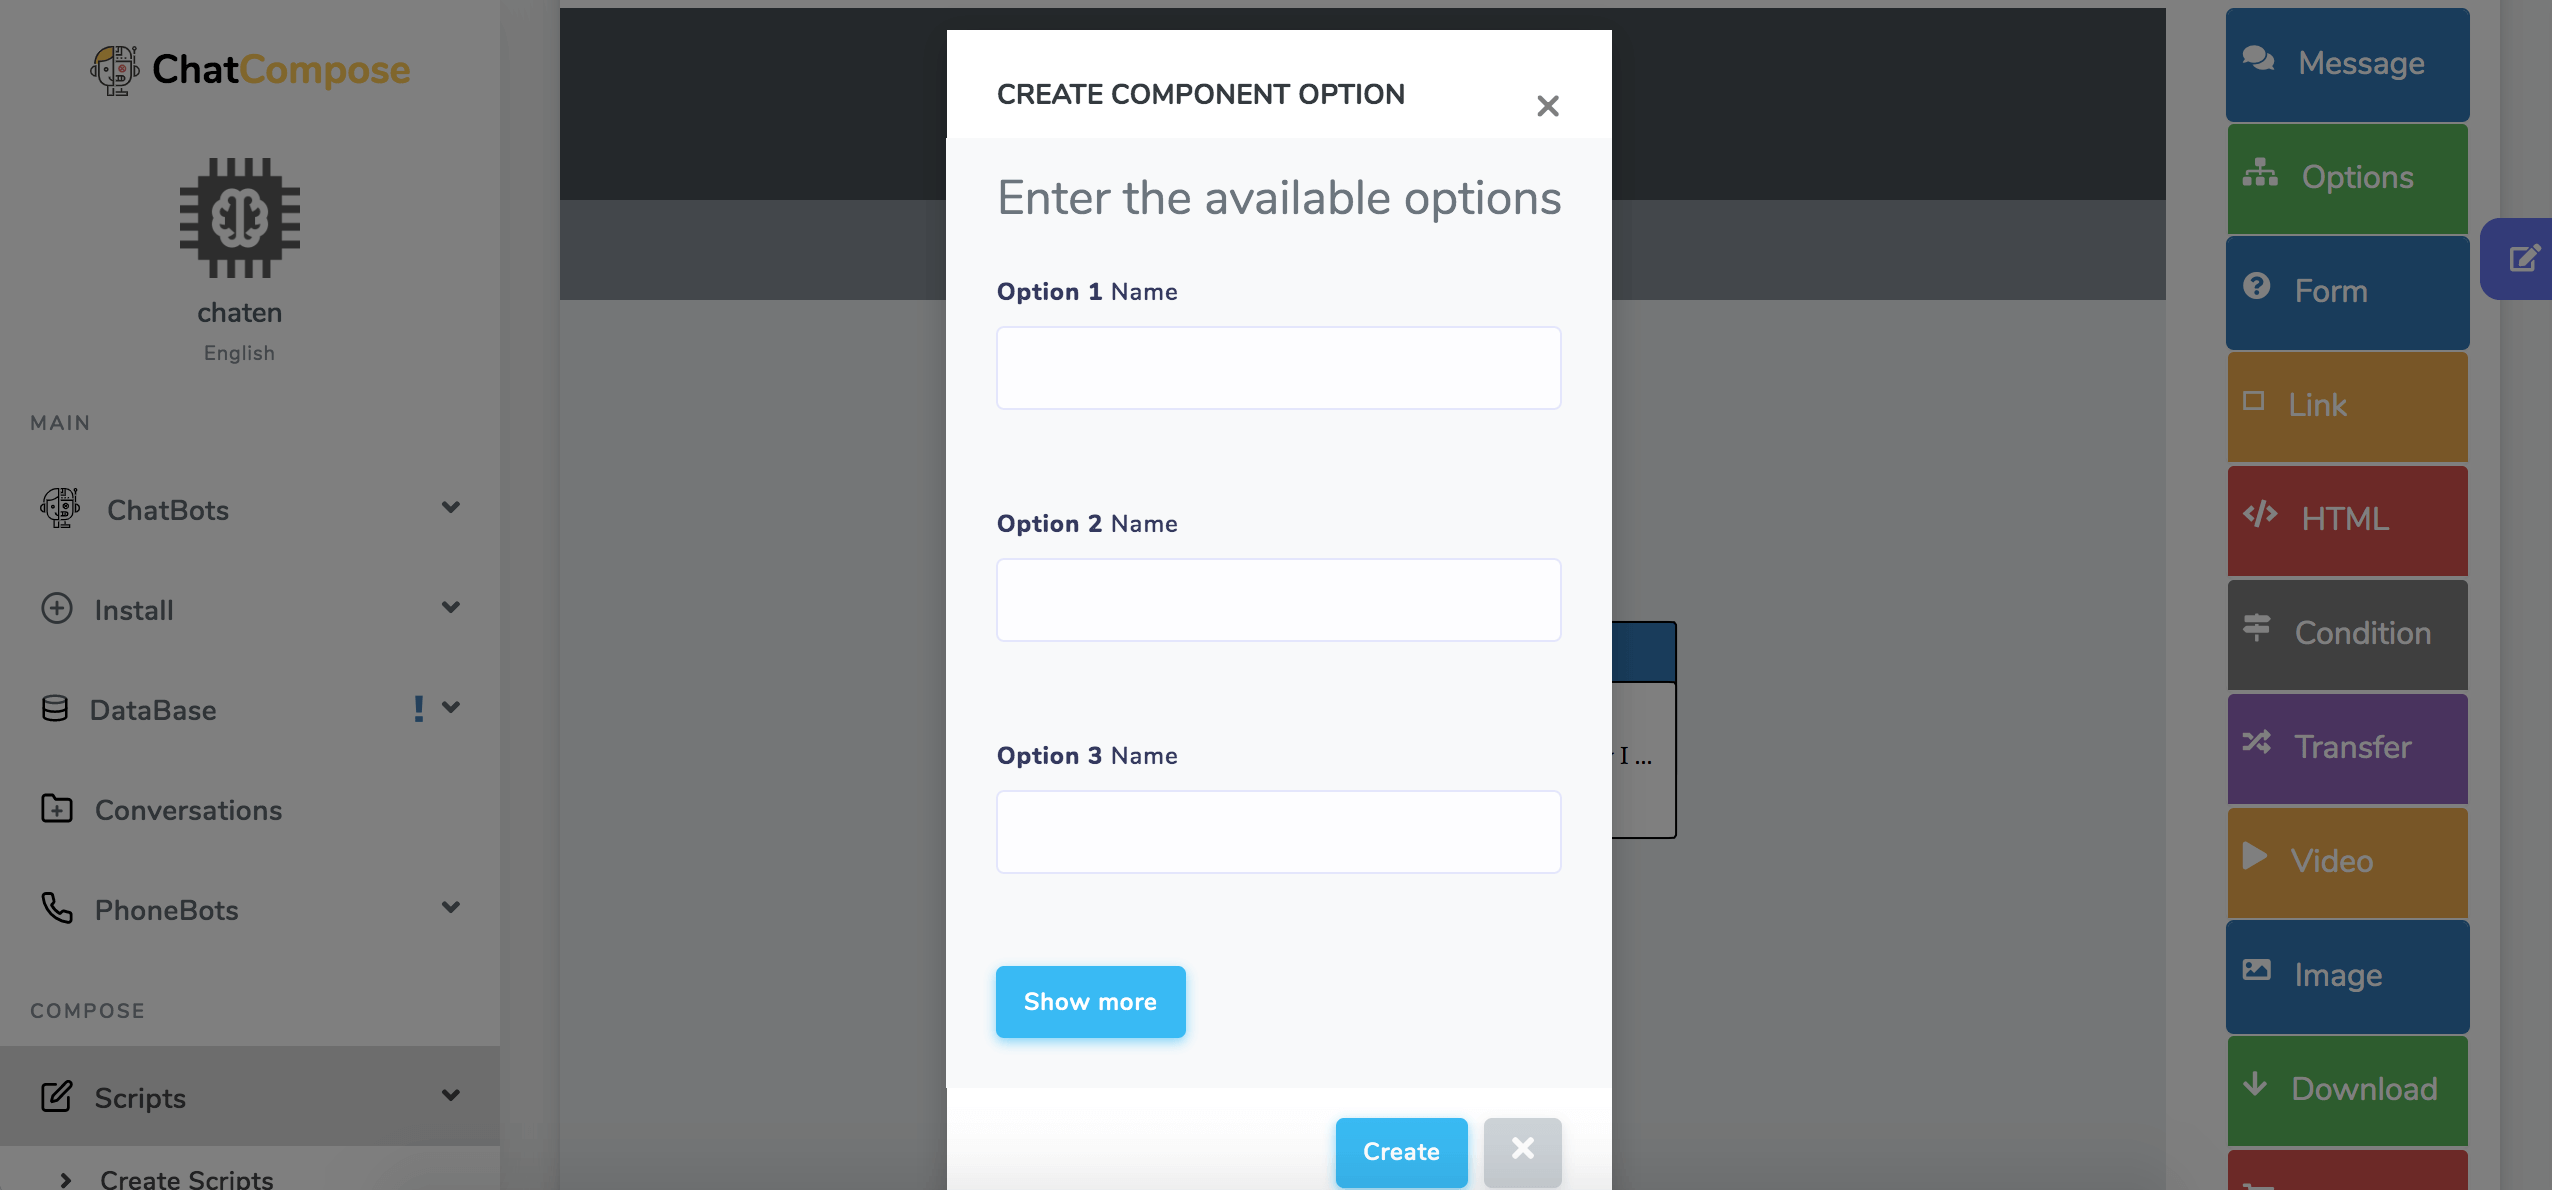
Option: To show user selectable options. The user directs the conversation by selecting what he wants, for example, among several types of products you are trying to sell.
Form: To capture important data from your users. By using pairs of questions and answers you can collect any data you want.
Link: To redirect the user to a specific place on your site.
HTML: To display elements designed by you.
Condition: This component can be used to filter or direct the conversation between two directions. In the case that the condition is True or False.
Transfer: Transfer the conversation to another service. It can be the WhatsApp, Telegram, Telephone or e-Mail service.
Video: Send videos to your users. They can be tutorials, product tests, destinations, services and more.
Photos: Send photos to your users. For example, a clothing store can use this component a lot in its scripts to show garments, color variations, prints, etc.
Download: If you need your users to download a file, you just have to enter its url as a component and the bot will deliver it within the framework of the conversation script.
Payment: Allows you to create a payment format for your users (with PayPal). It is very useful, since many people need the help of a bot to make their purchases or payments online step by step.
Reservations: Show your availability for your users to make a reservation. It is a final component so it cannot be continued in the layout.
Livechat: Talk to your users Live.
API Call: You can create an api component in the Components> API section, then select it and insert it into your script.
The components are entered sequentially and in order, so you have to decide in advance how you are going to design the script. Adding the components is very easy, as long as you are clear about the order of the conversation you want to propose.
You can start with a welcome message, ask the user what he wants to do on your site or what he needs and give him the answer. Look at the following example:
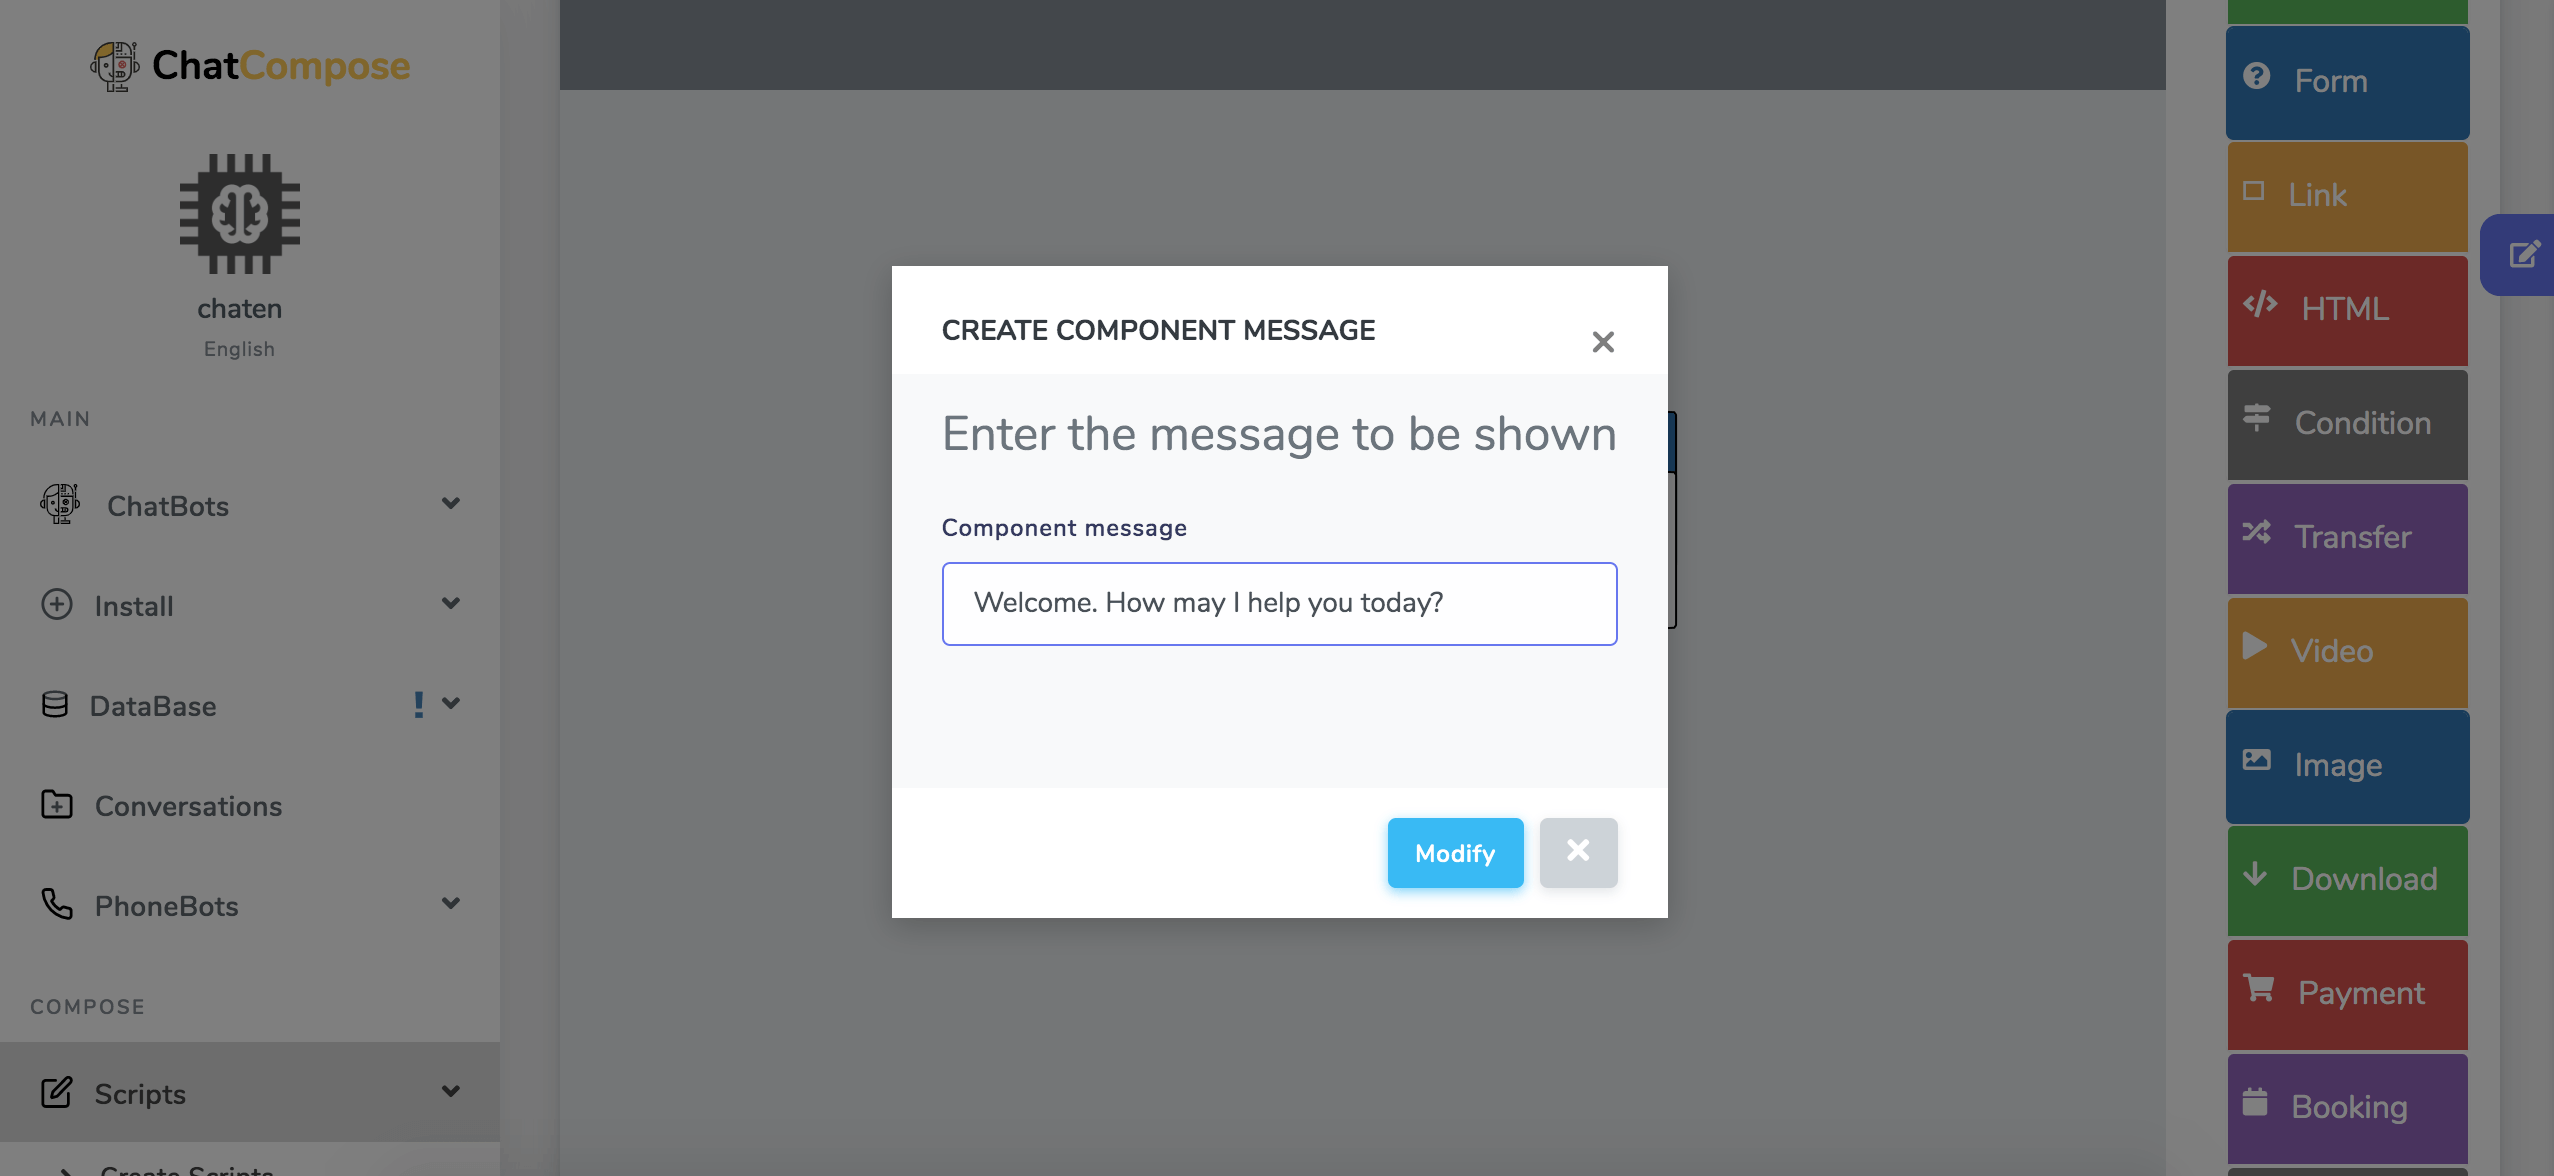
This is the welcome message, you immediately enter the support options that you want to offer to the users.
You just have to click on the Options tab and you will be presented with this pop-up window to write your options.
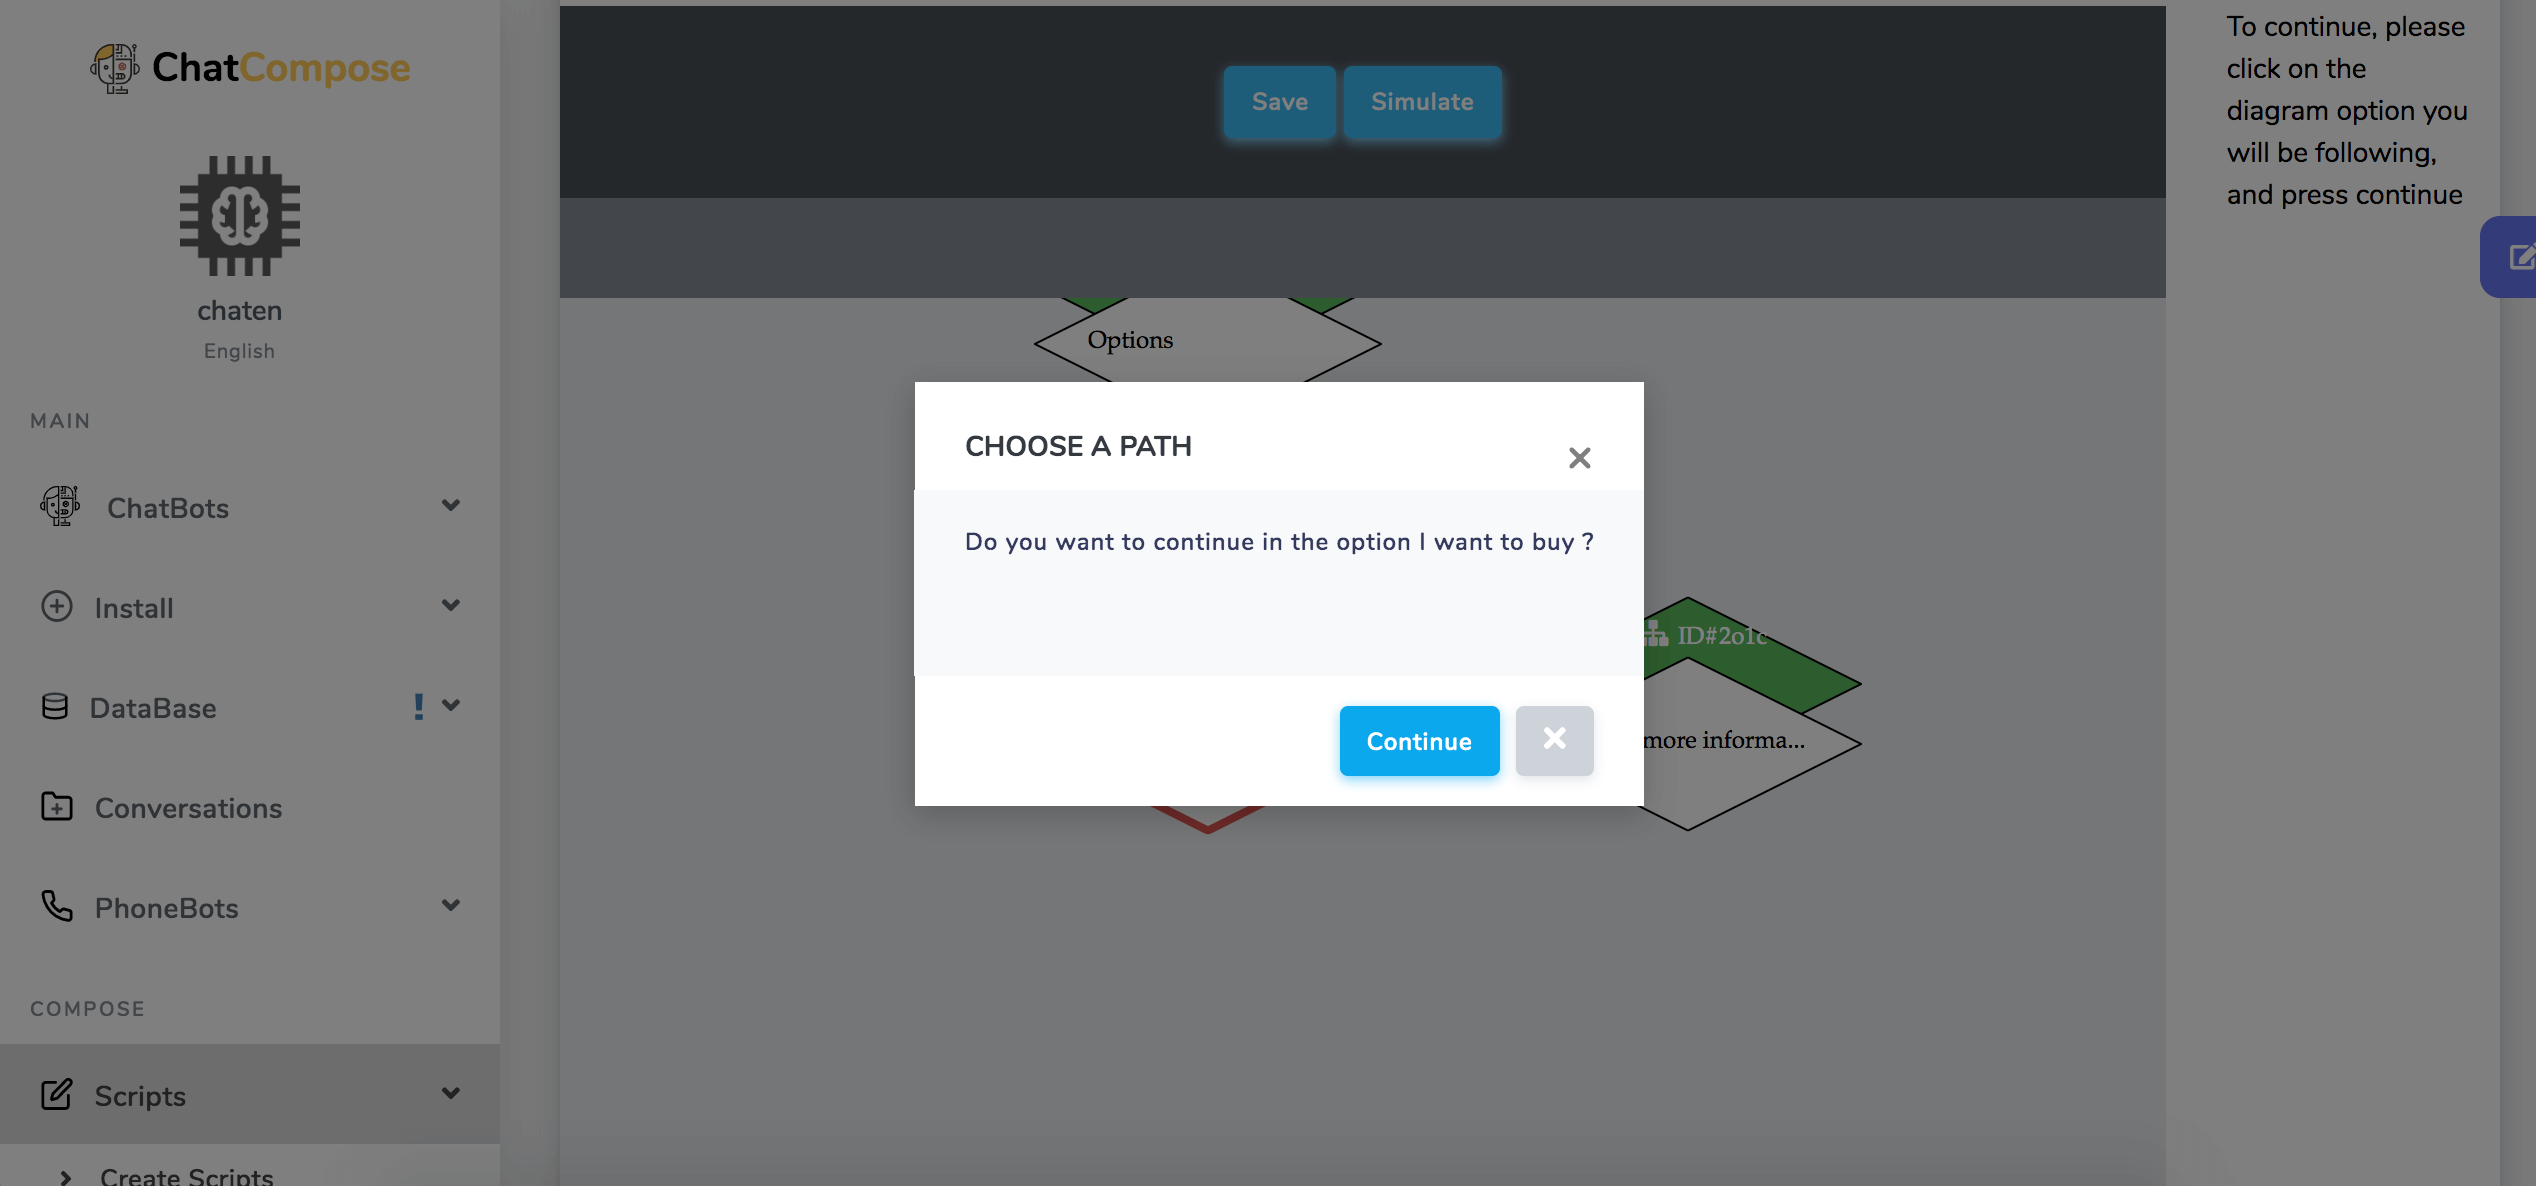
In the diagram, the options will be presented as follows:
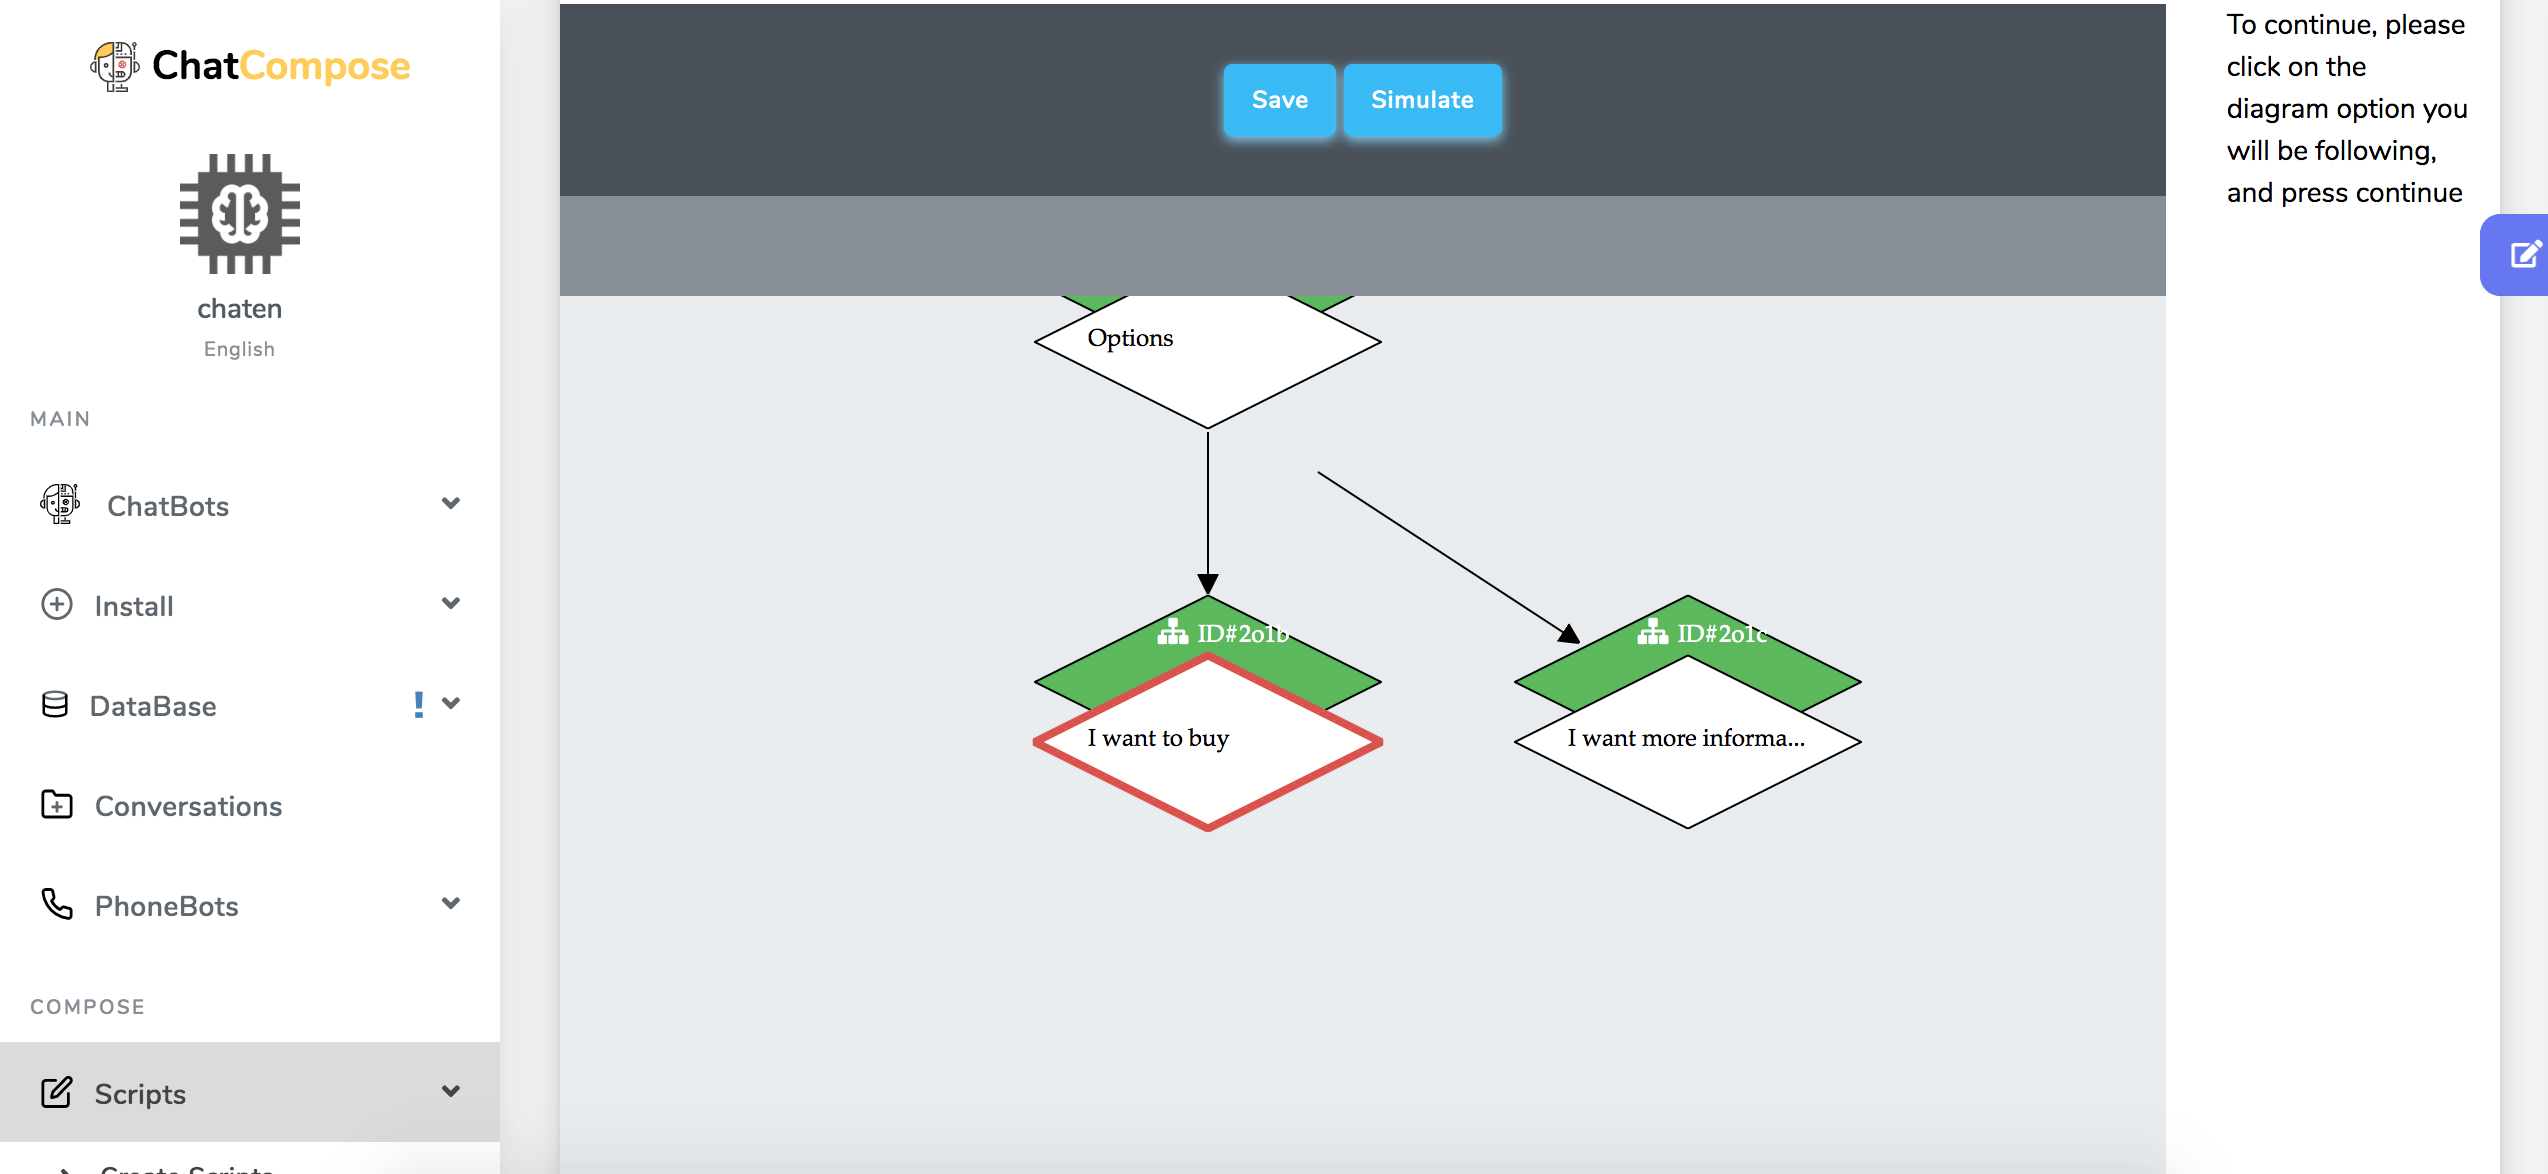
And as the message indicates, you must click on one of the options to continue the conversation. When you click on the option, it will turn red and the interface will show you the message: Do you want to continue with the option…? ”. If this is the case, you must click on the "Continue" button.
After that, add the corresponding component to respond to the user's requirement.
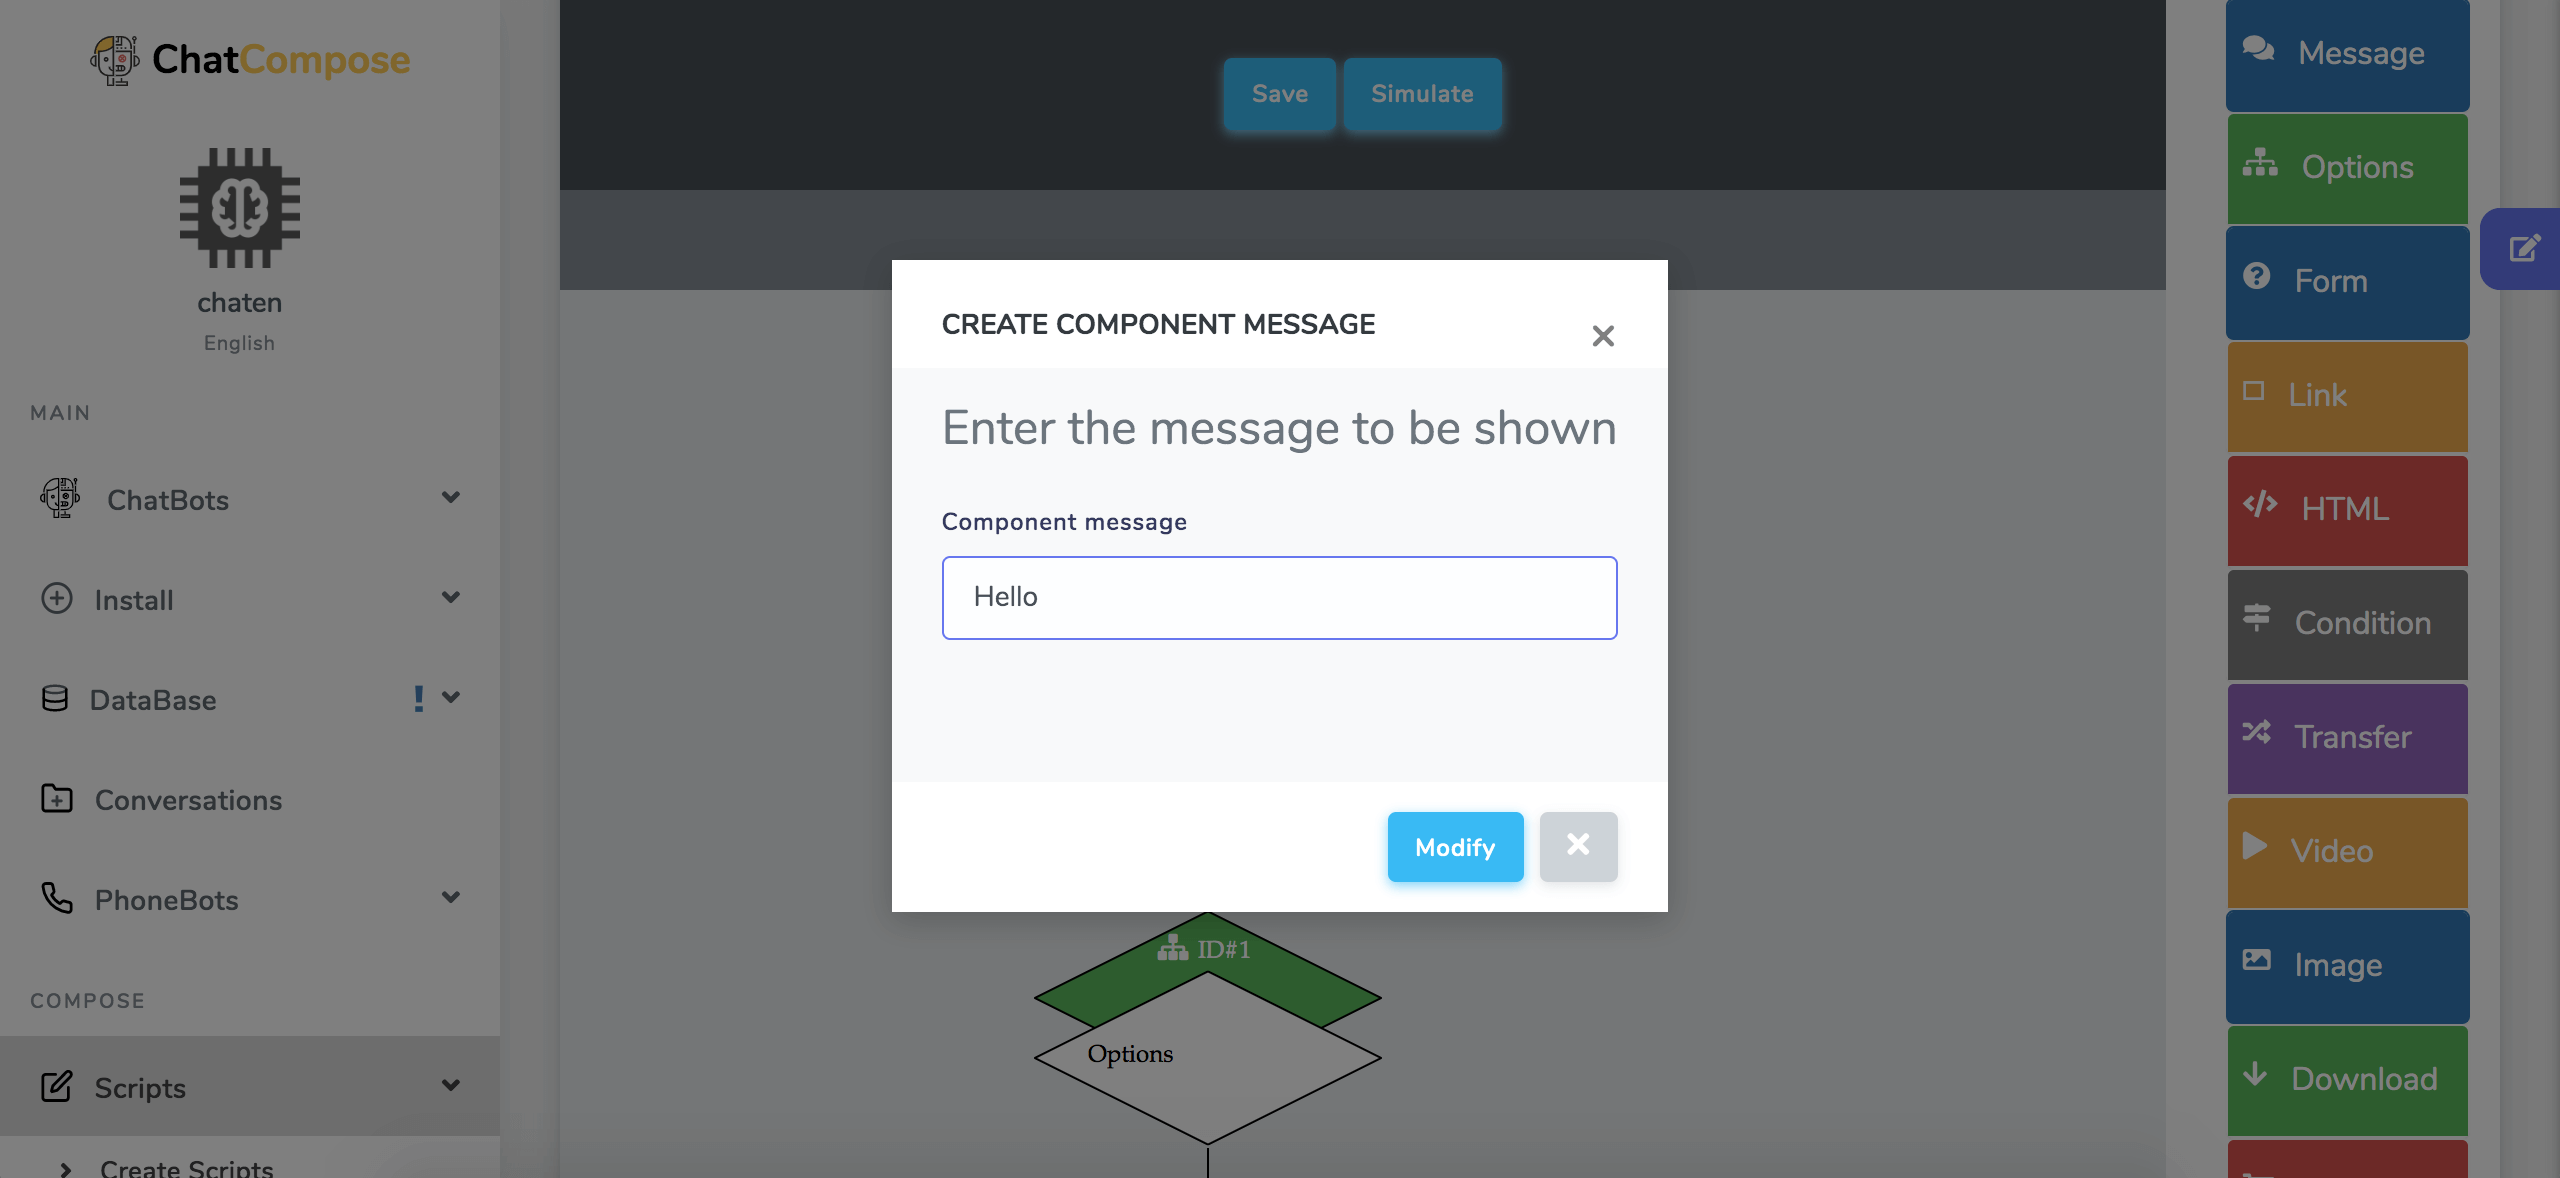
For example, if the user selected the option "I want to know more" in the bot, you can show him in response a message, where you concisely indicate what you are offering.
In that case, to give a text response, you just have to select the Message tab in the Components control panel.
In this way, you can continue expanding each of the options by adding the corresponding components until you finish your script. It is important then that you have a clear idea of where you want to direct your users, what kind of answers you want to give them and what is the purpose of your chatbot. That way, you will add components consistently.
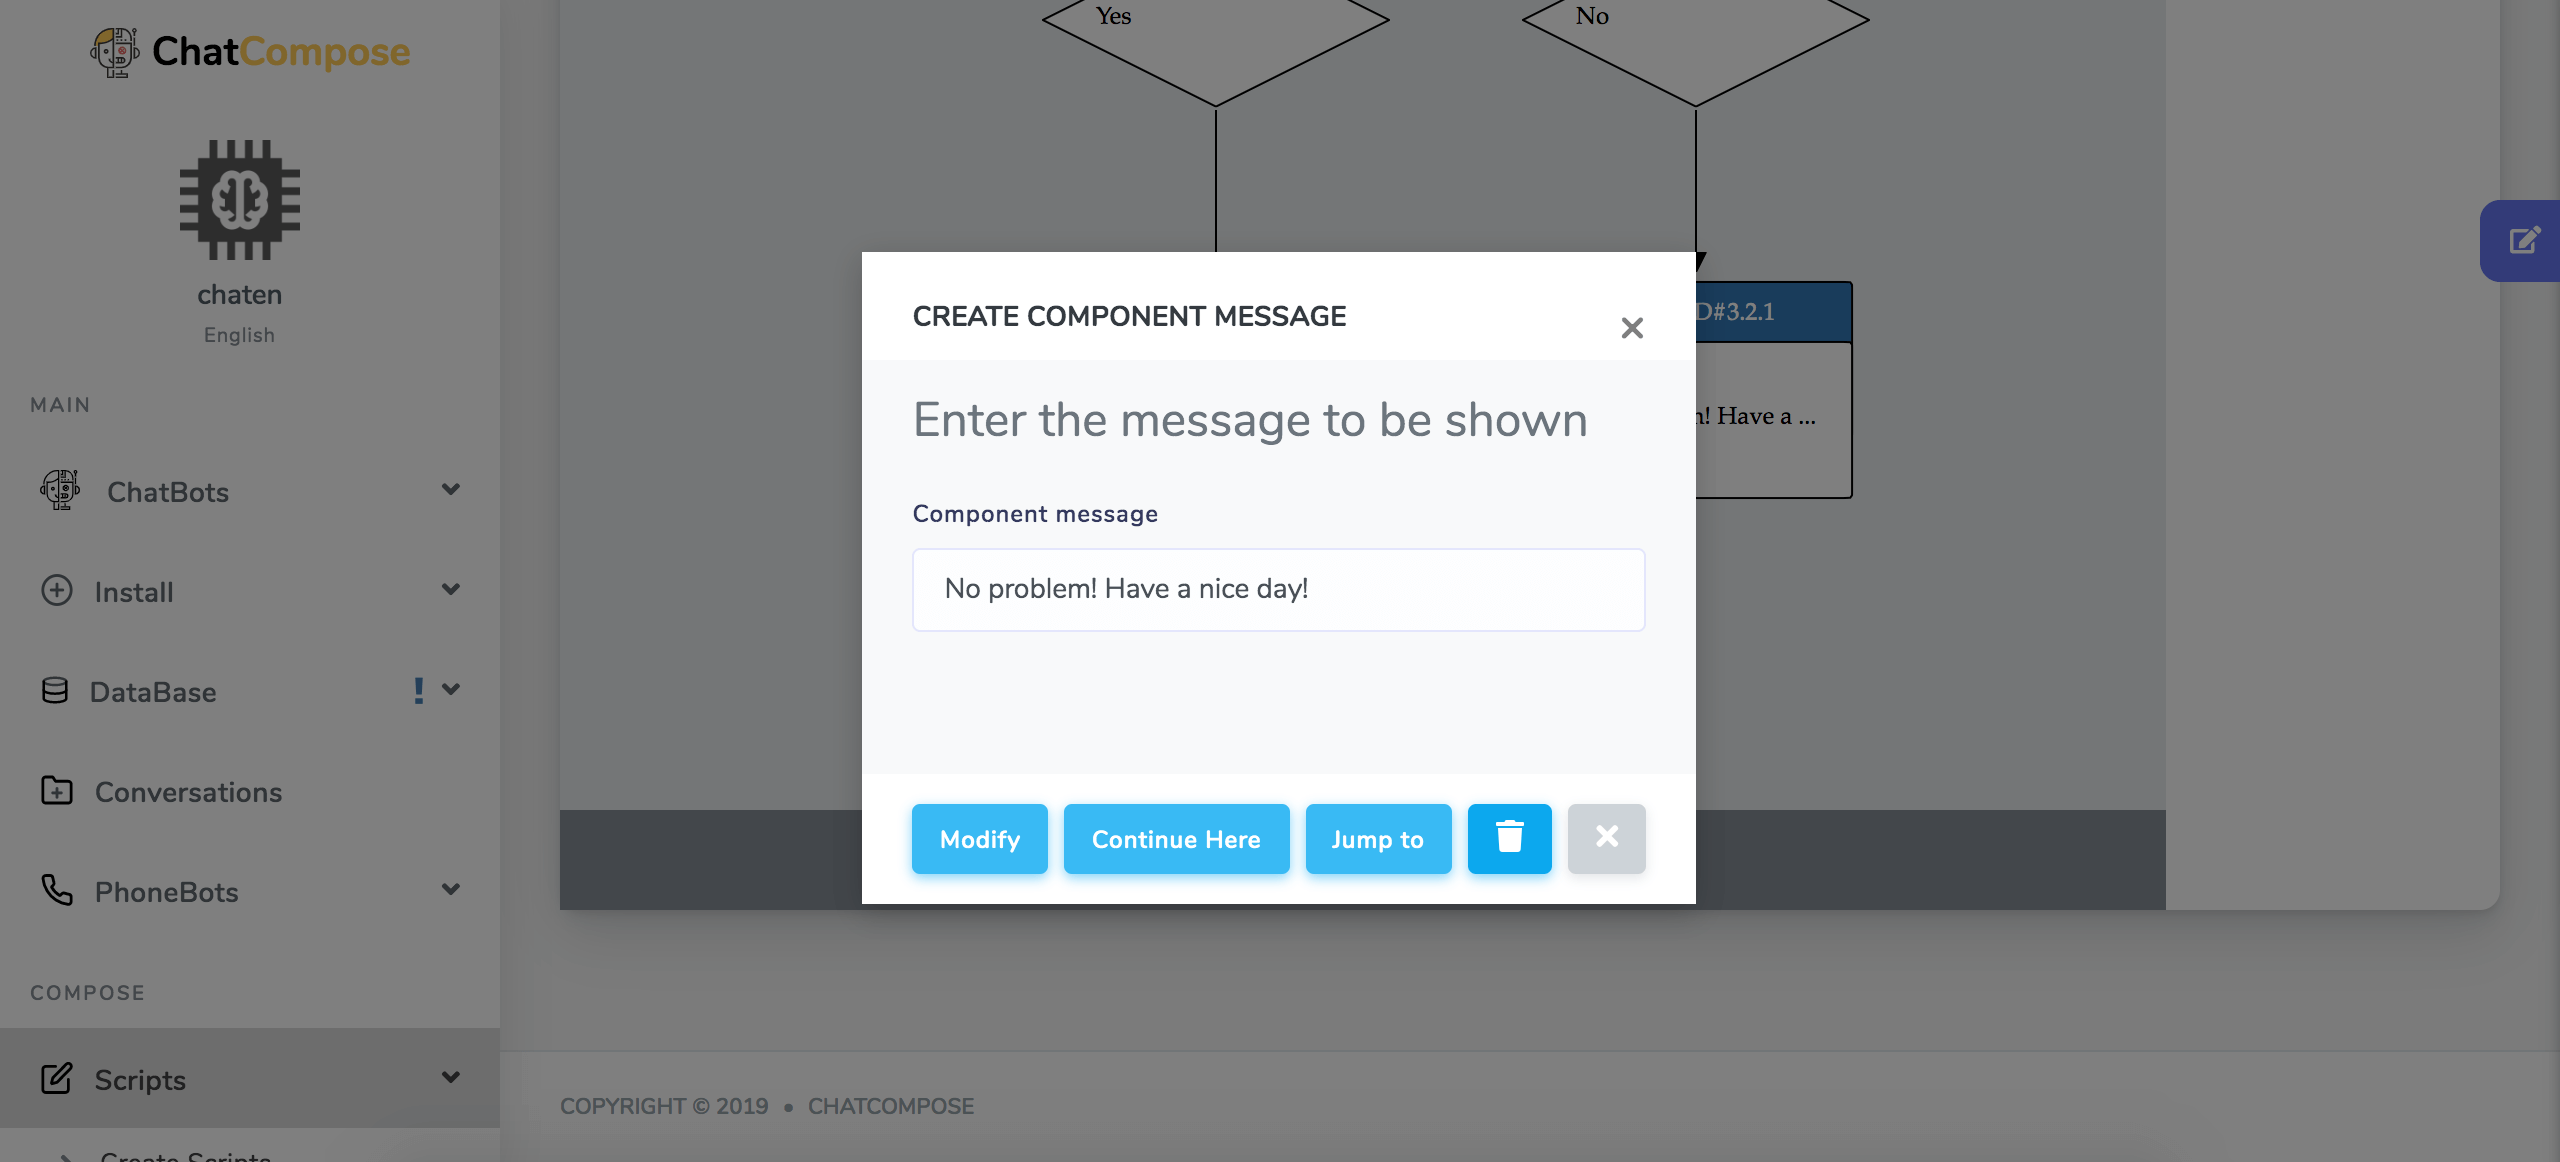
To edit the components you just have to click on the component in question in the diagram. Suppose you no longer want the welcome message to be: "Welcome! How can I help you?" And instead you want a: "Hello!".
Well, you just have to click on the message and you will be allowed to edit it. Then you have to click on the "Modify" button and voila.
The same applies to modify options, forms, links, photos, videos, etc.
Chatbots with effective scripts are based on flows that build a decision tree for the user to take a route. In our script we must ask a mother question from which the whole diagram and different nodes will derive from it.
Nodes (children) are components associated with a parent, for example: "Do you want to buy" Or "Do you want more information" will create two different branches. Users will select or give the answer according to their preferences and in that way they will take the different route or branch.
In the ChatCompose script creation interface, componentes are hierarchical and tree based, where the first component serves as the the Mother and the following ones are the child (or children, if option or condition component is used).
Example
Suppose you are an online cupcake shop. From the beginning of the dialog of your bot, after the greeting you can insert the options you offer:
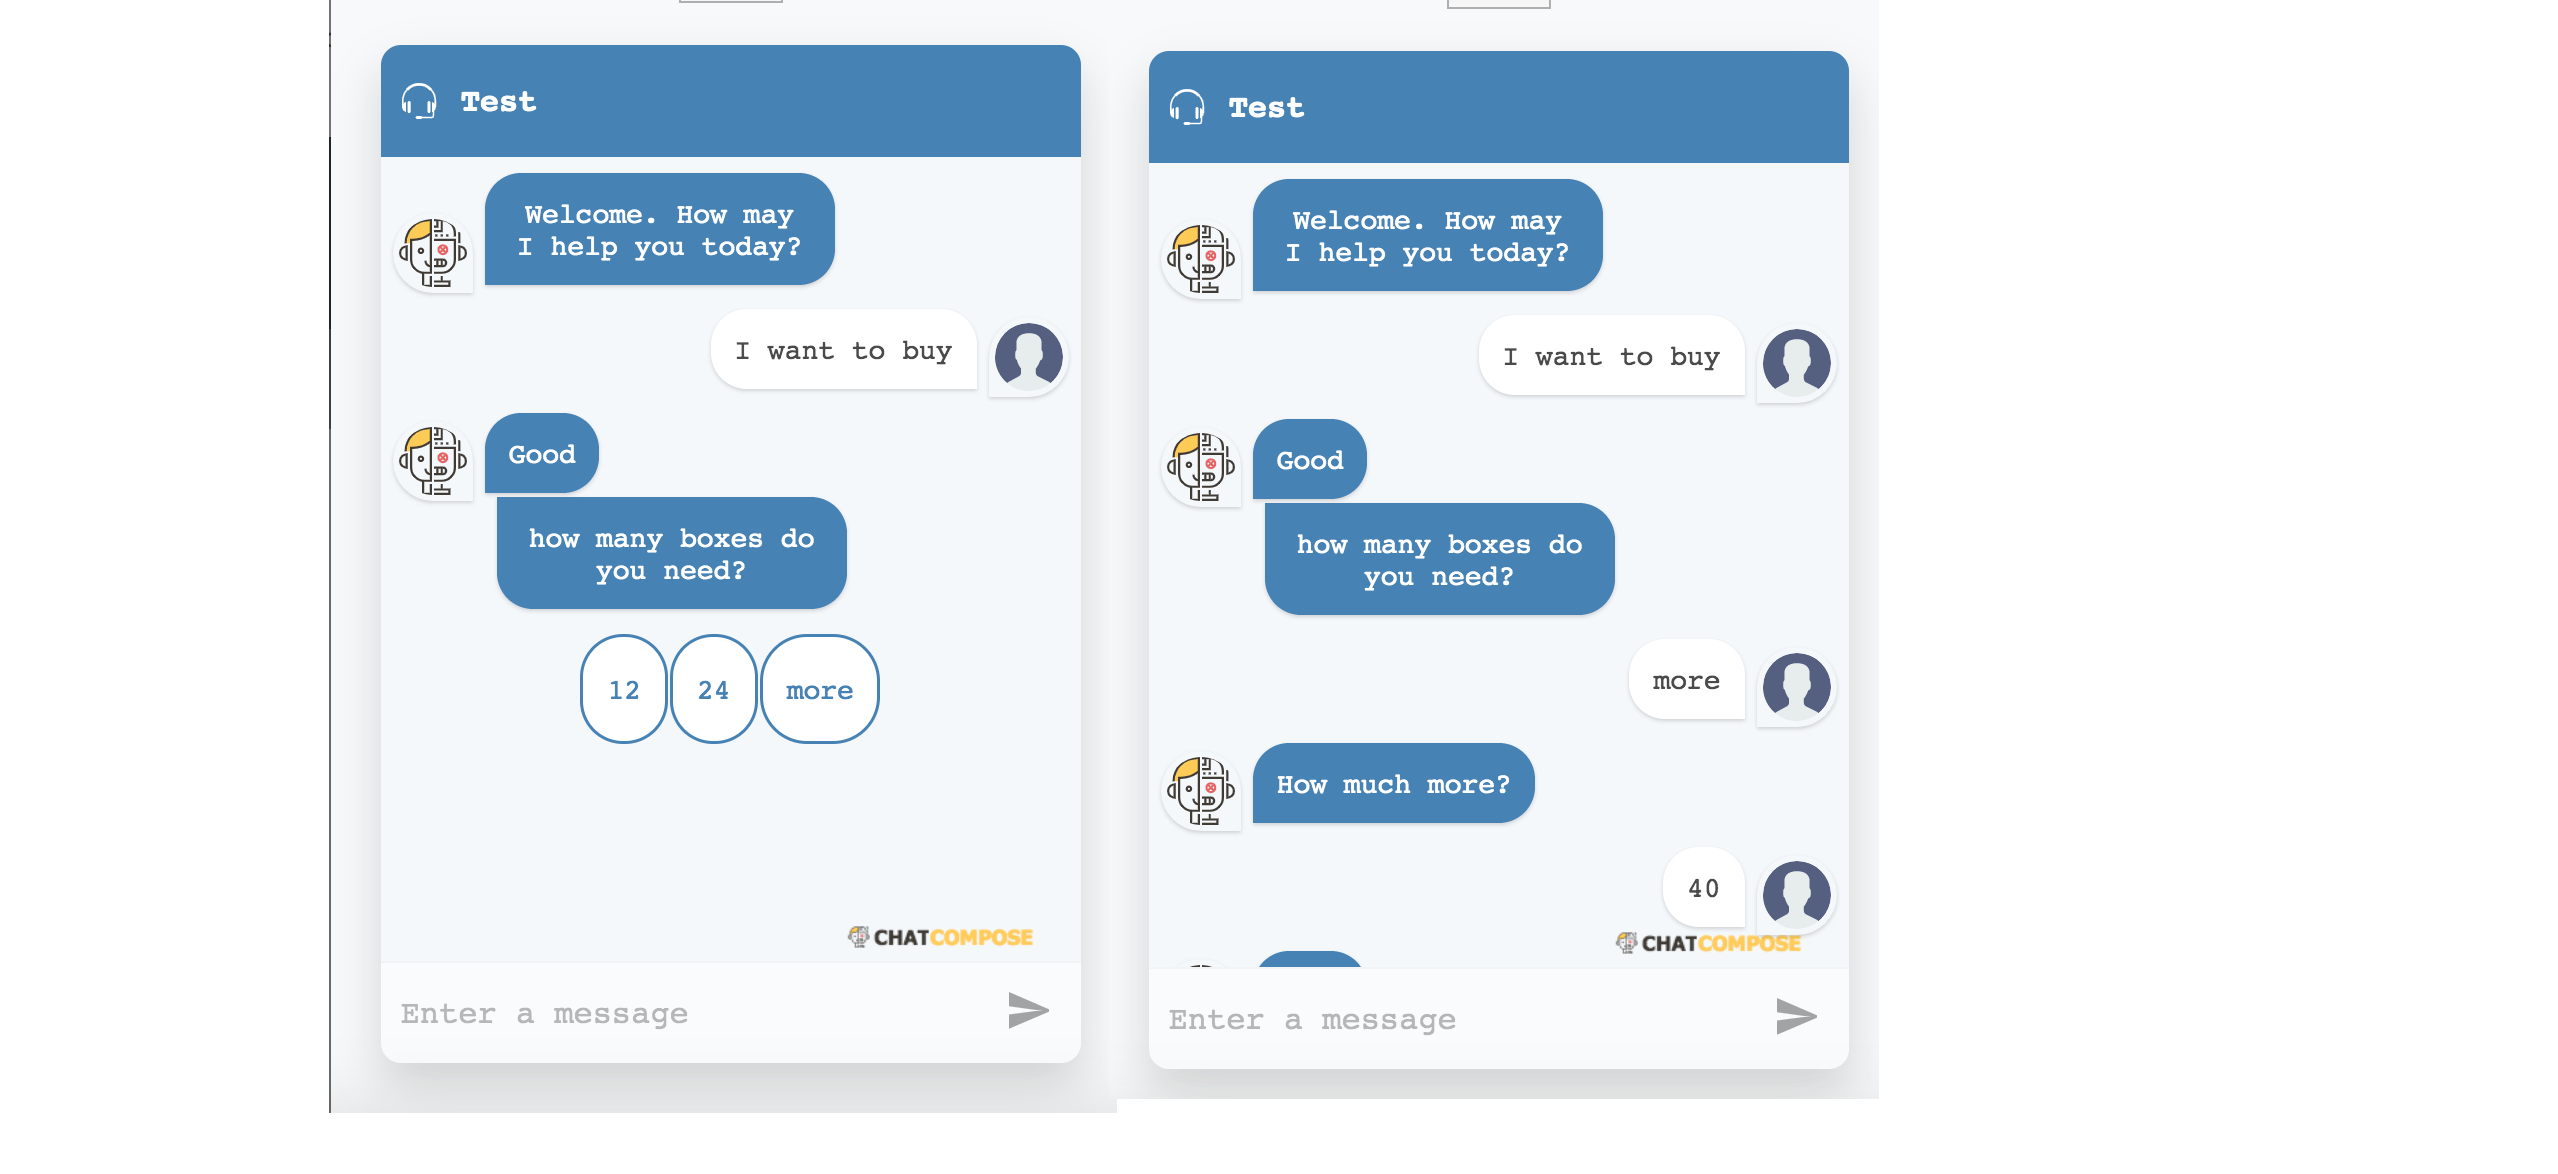
In this case, the user wants to place an order. So, you ask through the Message component, how many boxes do you need? And you add the options (with the Options component) which in this case will be 12, 24 or more.
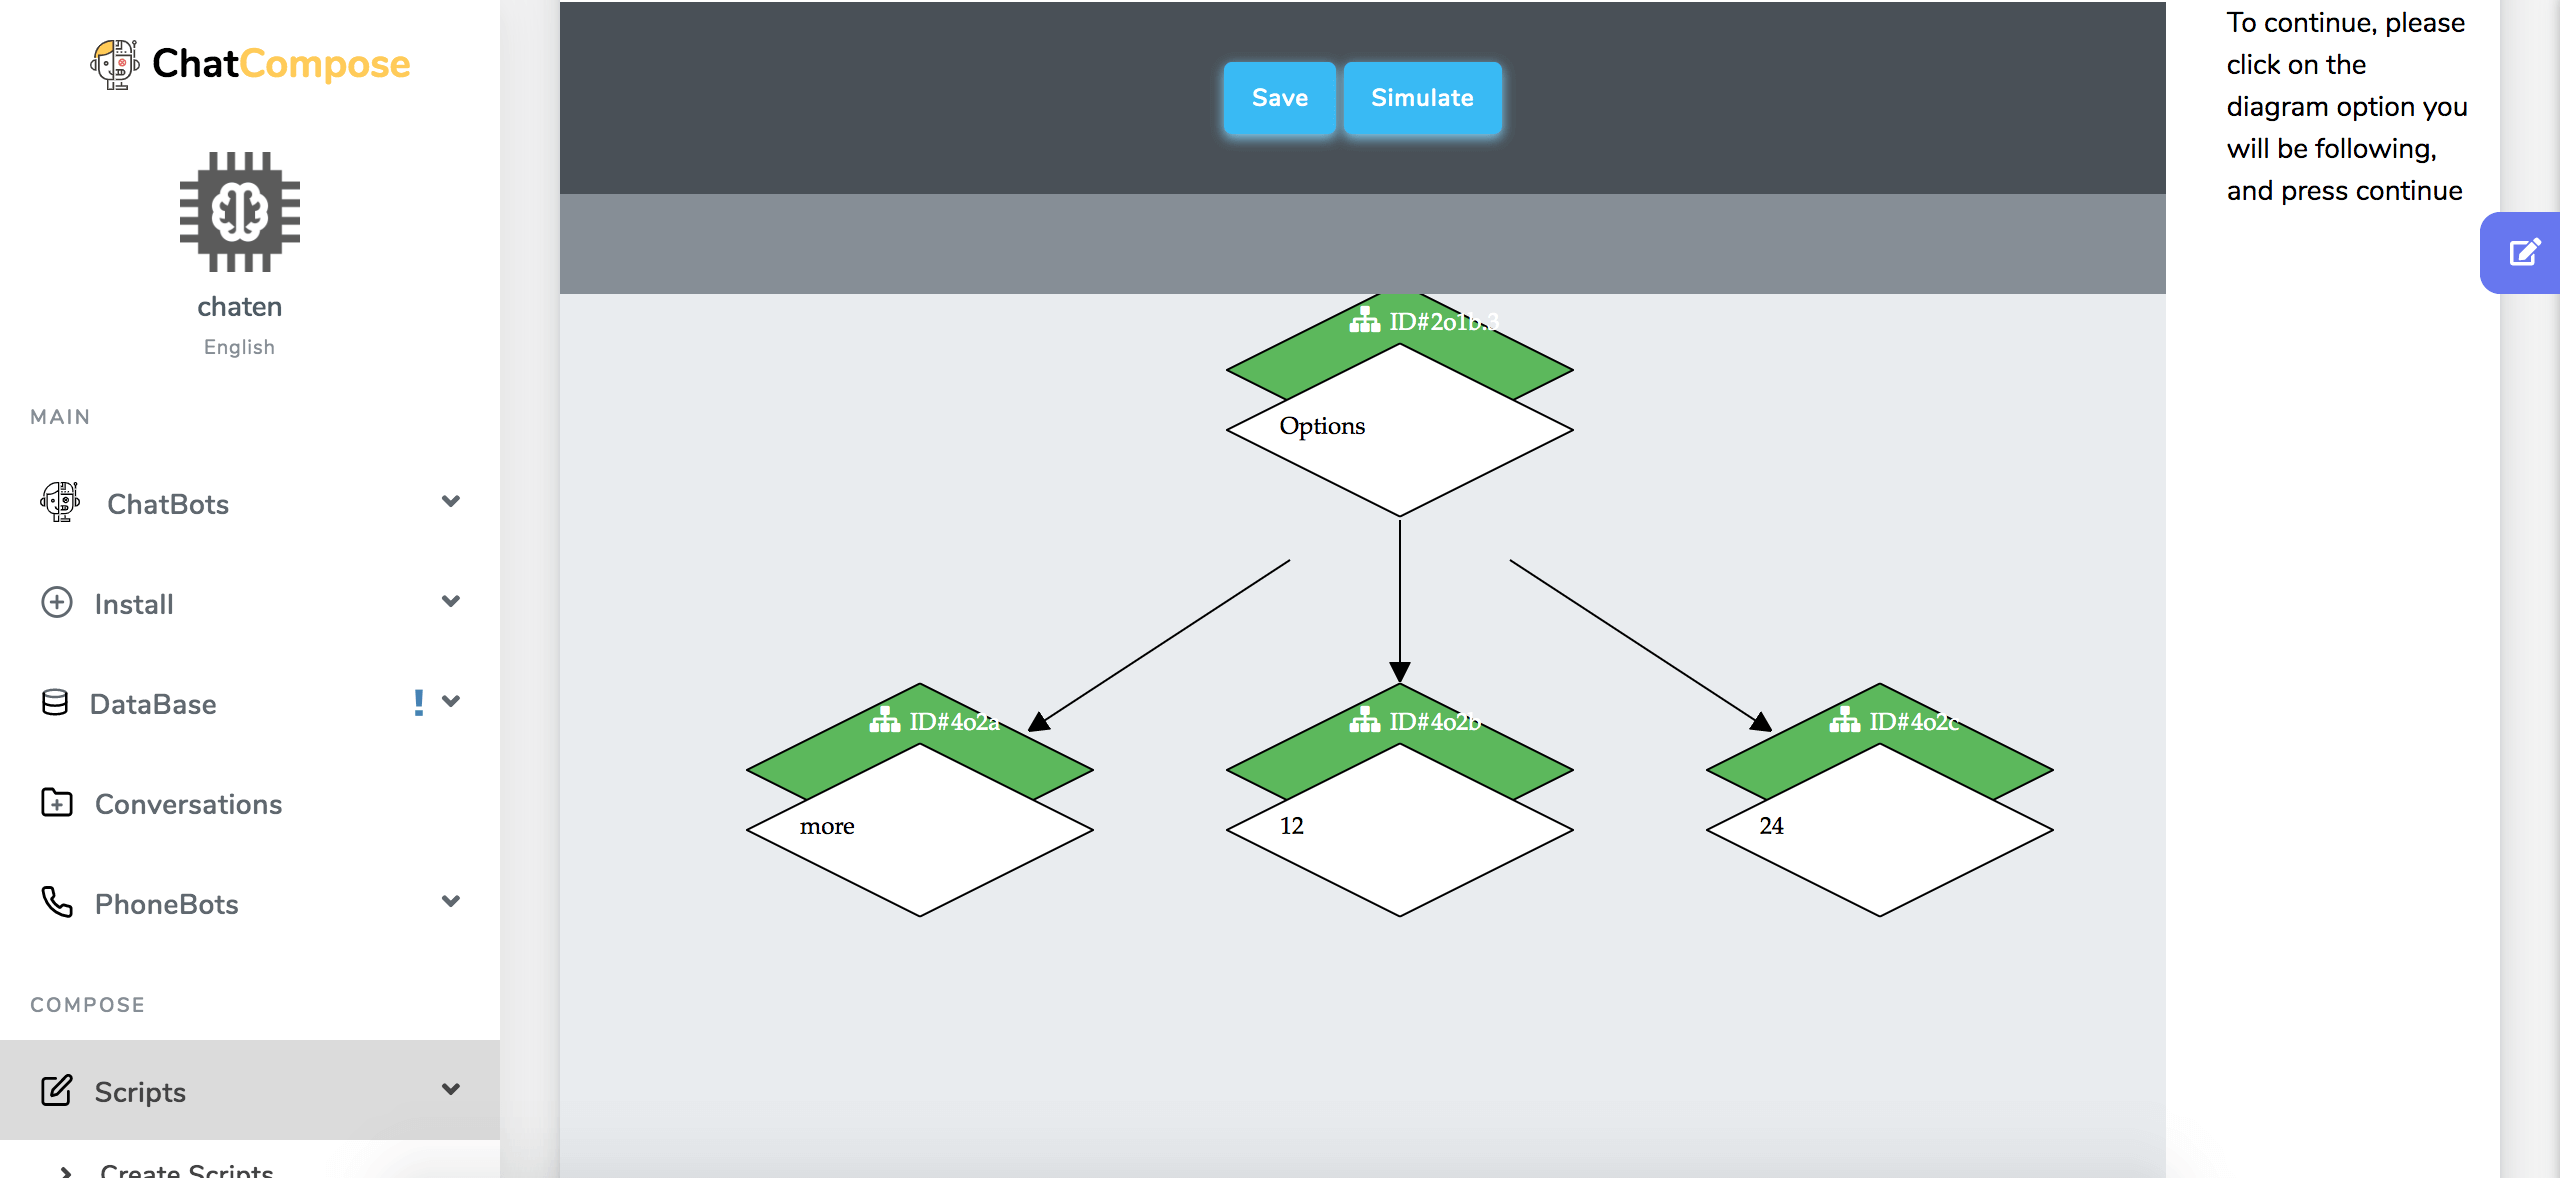
Suppose the user needs 35 boxes. In that case he will select the "more" option.
Here the conversational flow can be continued through the Condition component. We can allow the user to indicate how many boxes he needs in particular and based on his response guide him in two directions.
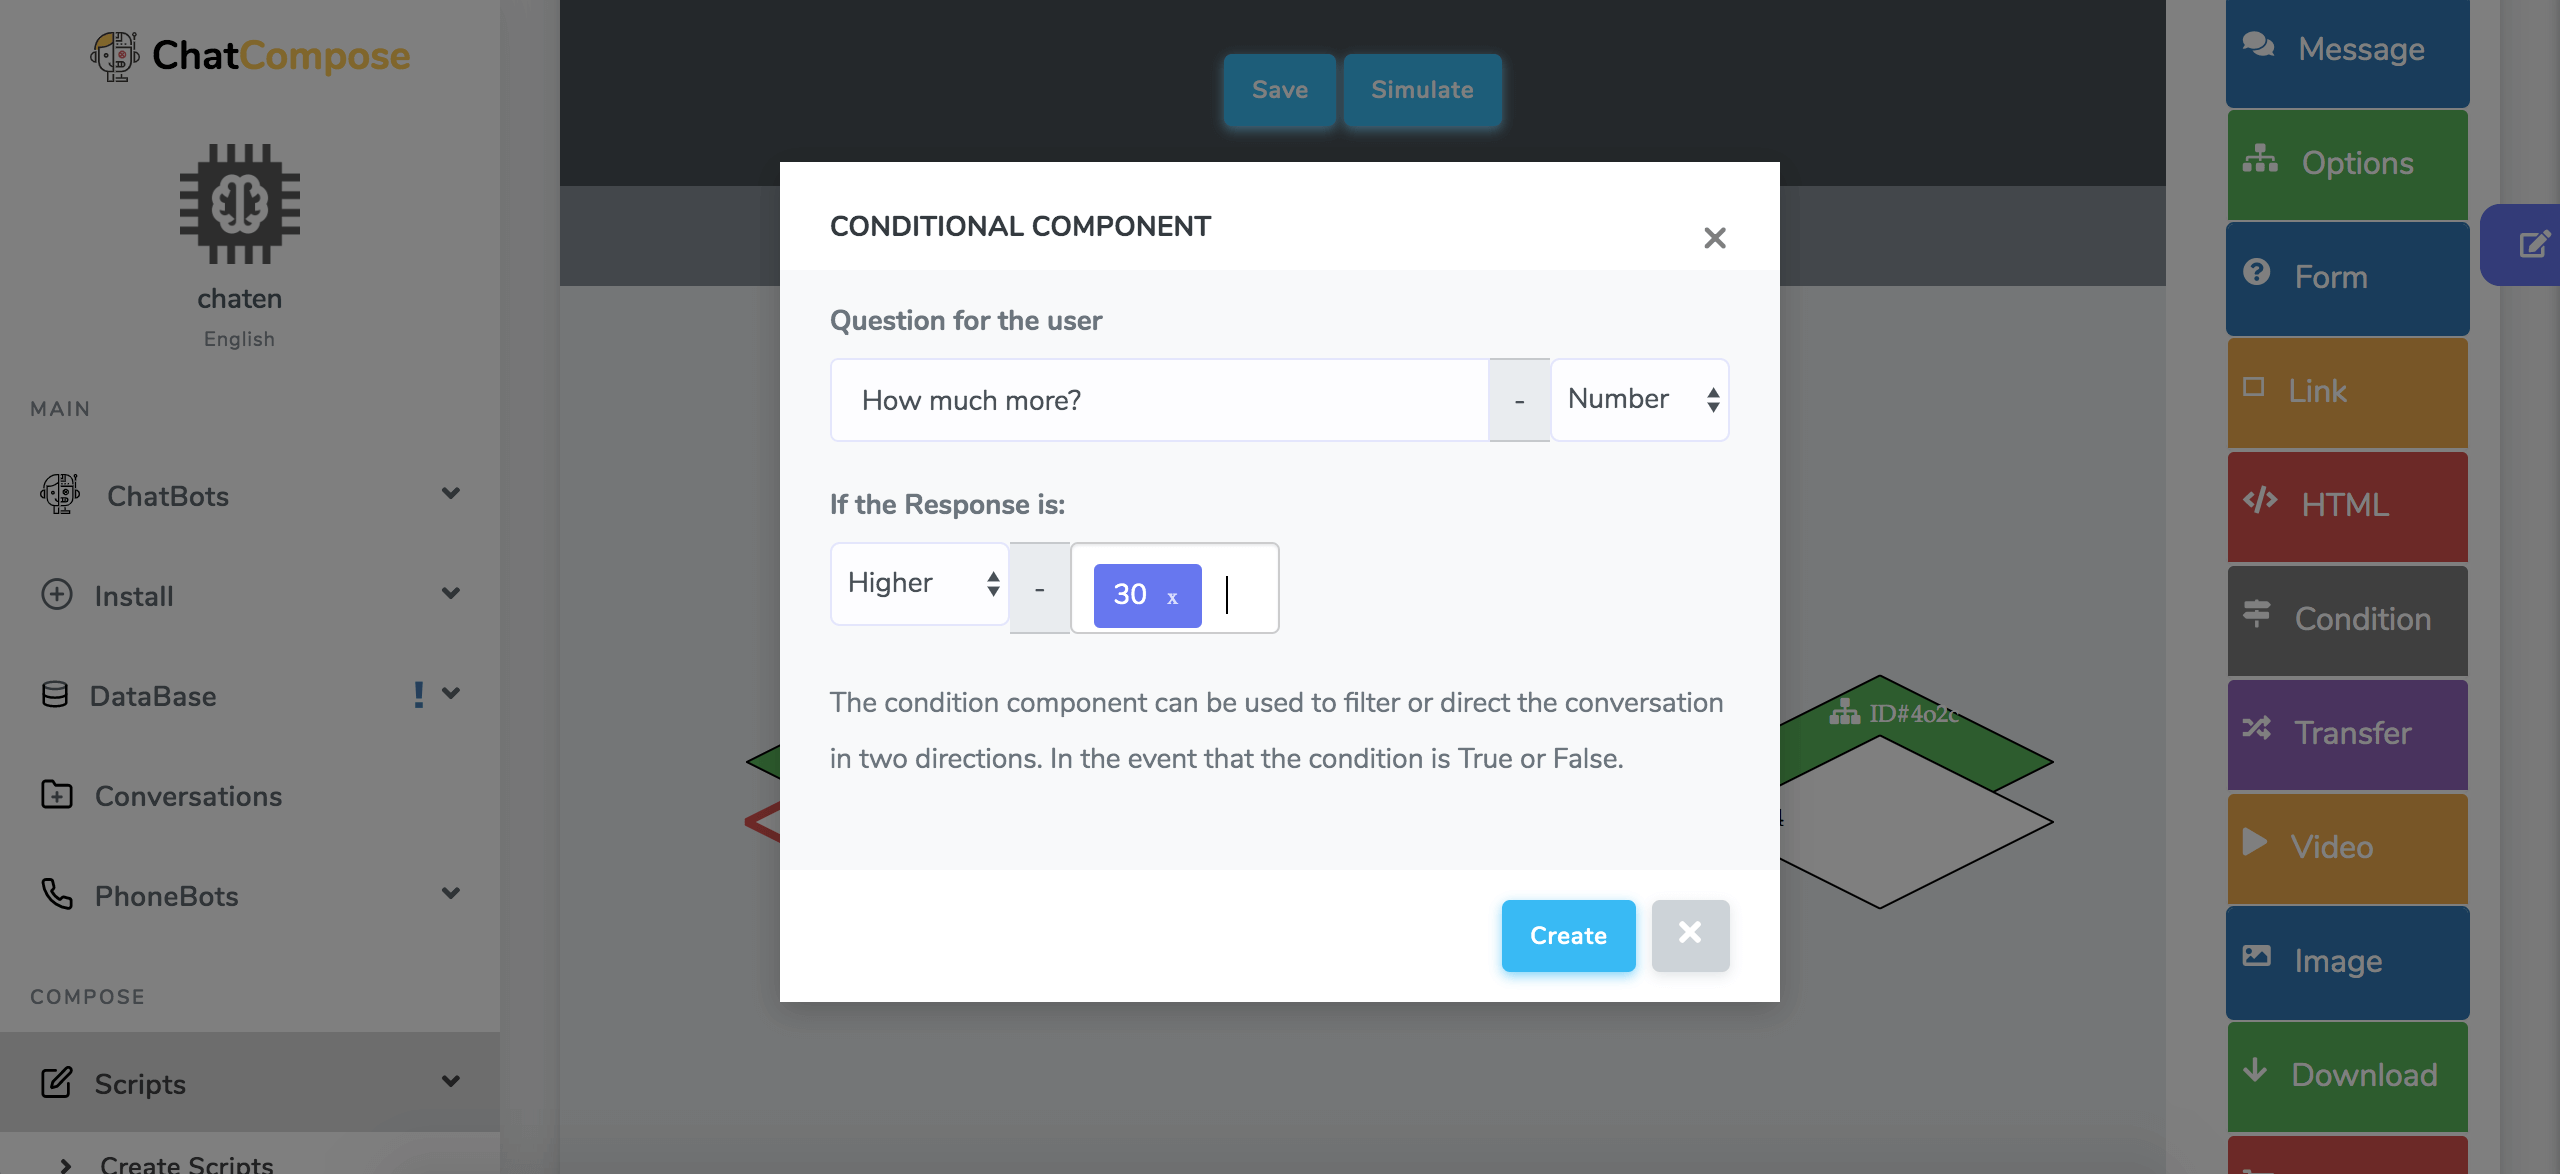
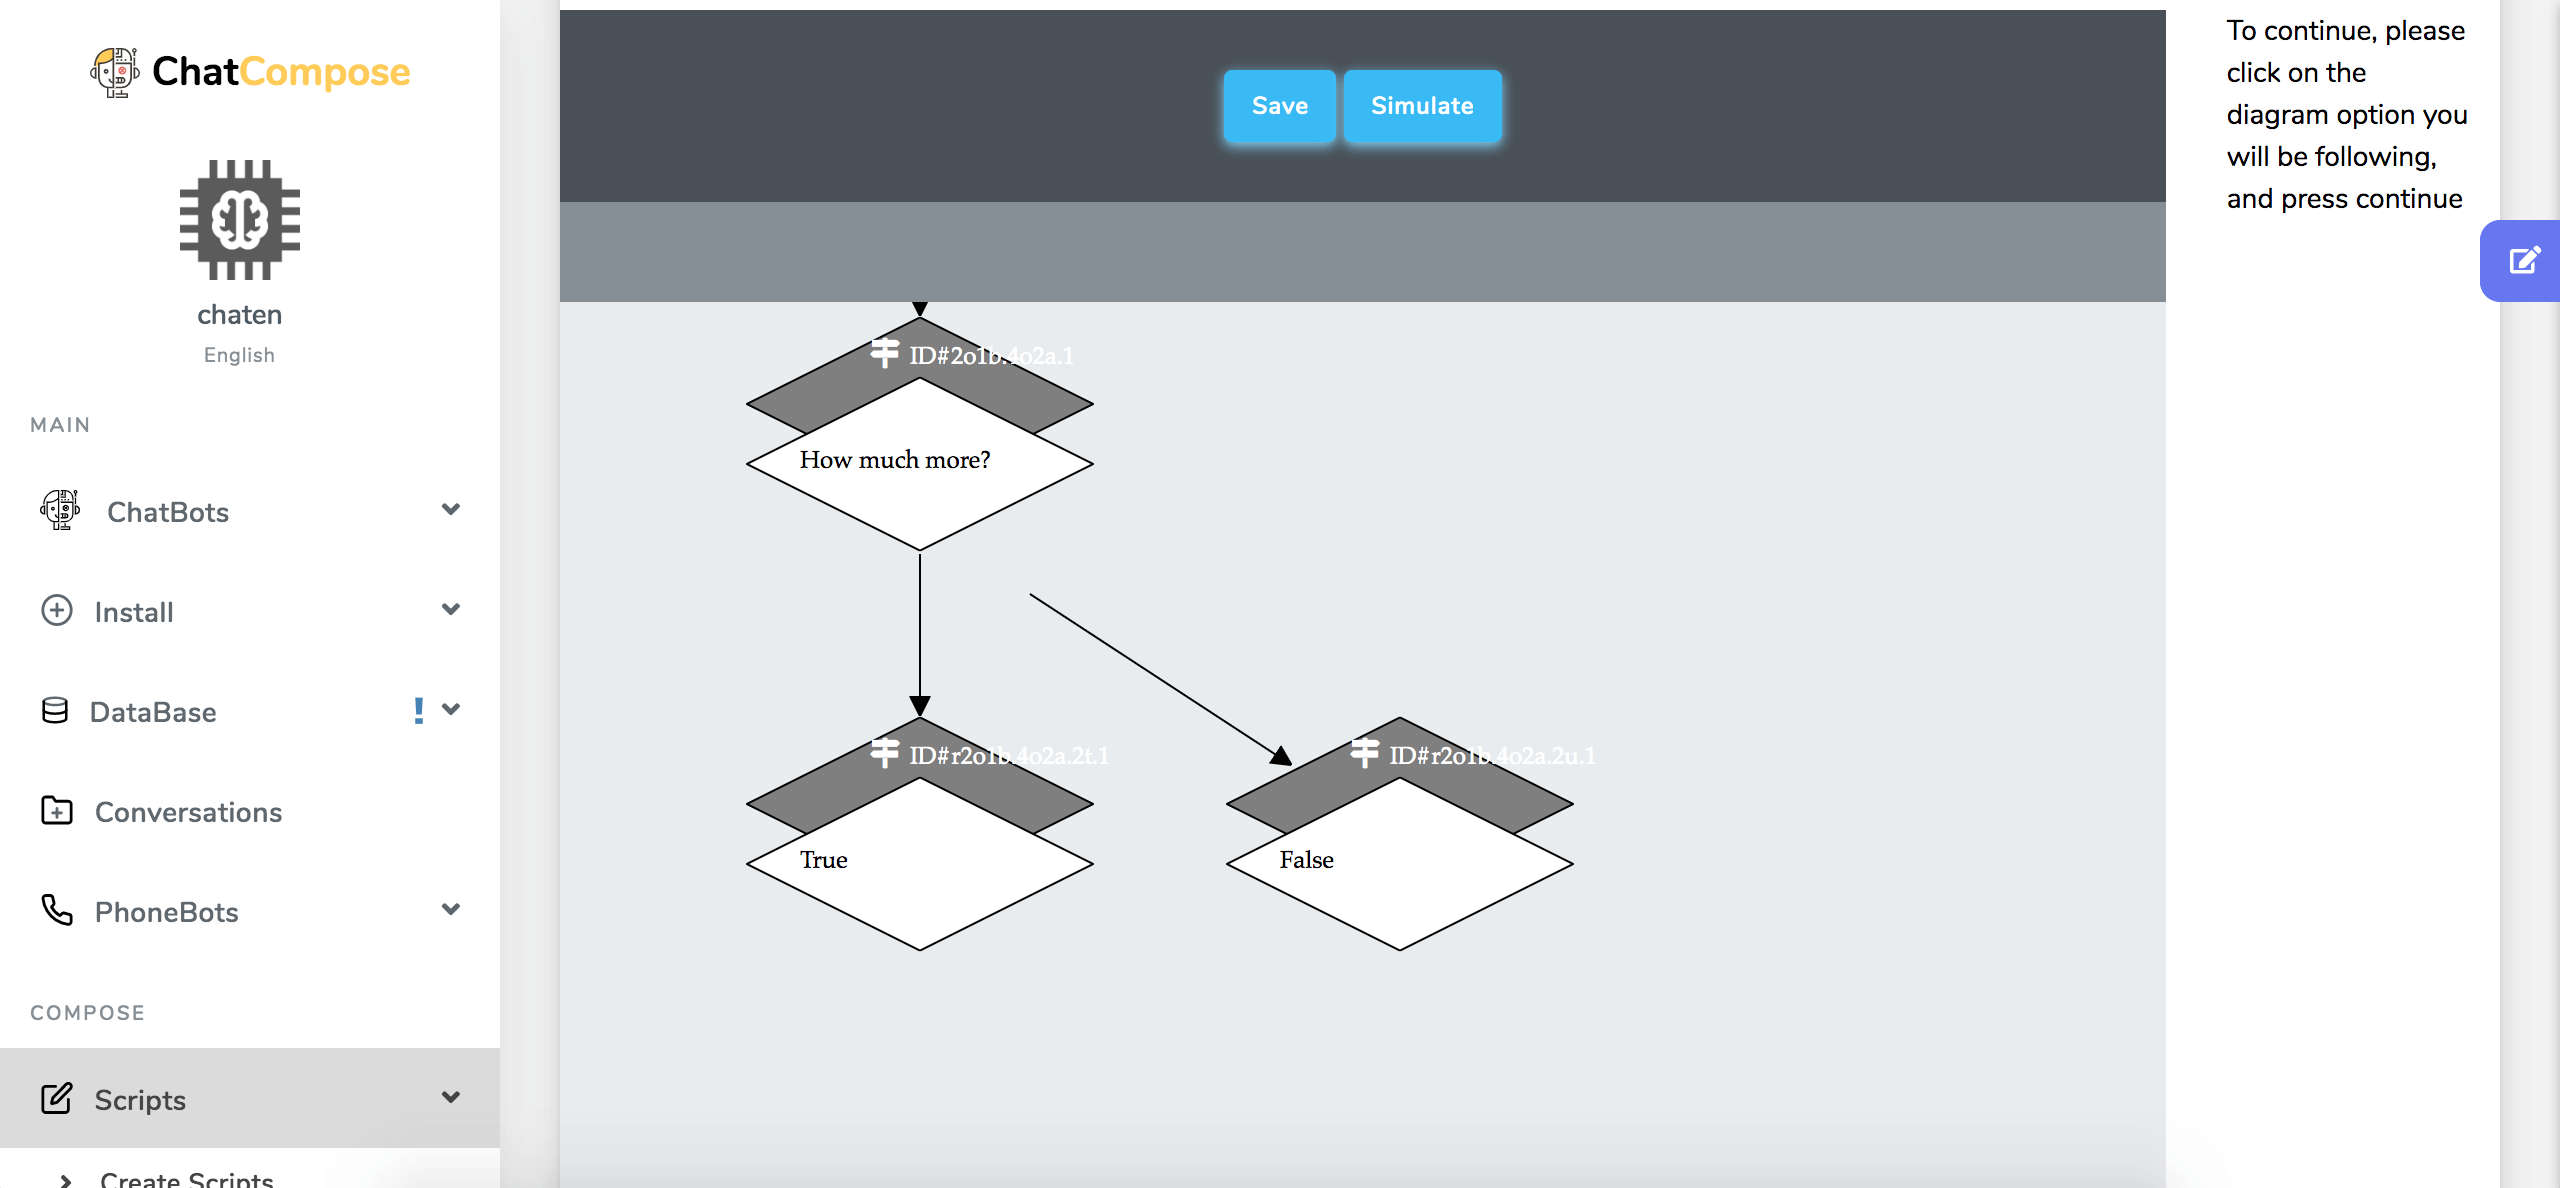
In this case, we have established a True flow if the user indicates that he needs more than 30 boxes. But in case he needs 22, the direction of the flow would go into False.
True directs the user to a contact form. While the False delivers a link to complete the order. The flow can be seen through the Simulation> Start button:
When you have added all the components, do not forget to click on the “Save” button.
To implement the script we have the option to enter it:
In this opportunity we will establish it as the initial component of the ChatBot.
After saving the settings, you can go to ChatBots>Test Url. There you can see how your script will work within the chatbot.
Up to this point you have a general notion of how to create conversational scripts in ChatCompose. But you will surely find something that you are not completely satisfied with, and you need to change it. Learn how to do it.
To load and edit your scripts navigate to Scripts> Load Scripts. In Load Script select your script from the drop-down list and click on the homonymous button.
You can edit the contents of your scripts by clicking on the components and changing the text within them. To add or delete components you need to do it through the final components of your script (without children).
By clicking on the final components you can start adding more components in your script or delete the ones you no longer want to have. But if you are looking to delete or add components above the script you need to remove the components of that branch until you reach the point where you want to continue.
Deleting a component is very easy. You just have to click on it and instead of editing, you navigate directly to the button where the trashcan icon is. This way you can remove components and modify your scripts as you like.
In this class we learned how to use the ChatCompose script creation interface, how the components work and how to create a dialogue flow to meet the objectives of the conversation. Check the following videos for additional information.
Advanced Scripts