The creation and maintenance of a contact list is one of the most important tasks in any marketing strategy. Basically, the results of your campaigns will depend on the quality of your contact list, so it is necessary that you dedicate time to this task.
In general, a contact list contains all the people who were sold a product (or service) or who showed interest in those services.
Once you have a reasonable number of people in your database, you can build a contact list and start spreading your message, with the initial goal of building brand awareness and then generating leads or making sales.
Any user that interacts with your chatbot can be added into your contact list.
This contact list can then be used to send notifications and promotional content to a group of contacts. Currently, we support these types of notifications.
You should never forget that you need the authorization of the contact to be able to send them messages and store their personal data. There are many ways to get this information, but in all cases, make sure your product or service is relevant to the recipient.
The main reason to maintain contact lists is so that they can become future clients. To achieve this, they must be people who are interested in your brand, product or service and thus you can offer them valuable content that encourages them to buy your products and build loyalty towards your brand.
You can add individual contacts by approving them from your chatbot conversations or by adding them manually.
To approve new contacts go to DataBase>Contacts. There you can switch between your list, approve and import.

To approve new contacts, mark them as approved from the list. To edit the contact information, click on an item, and then approve.
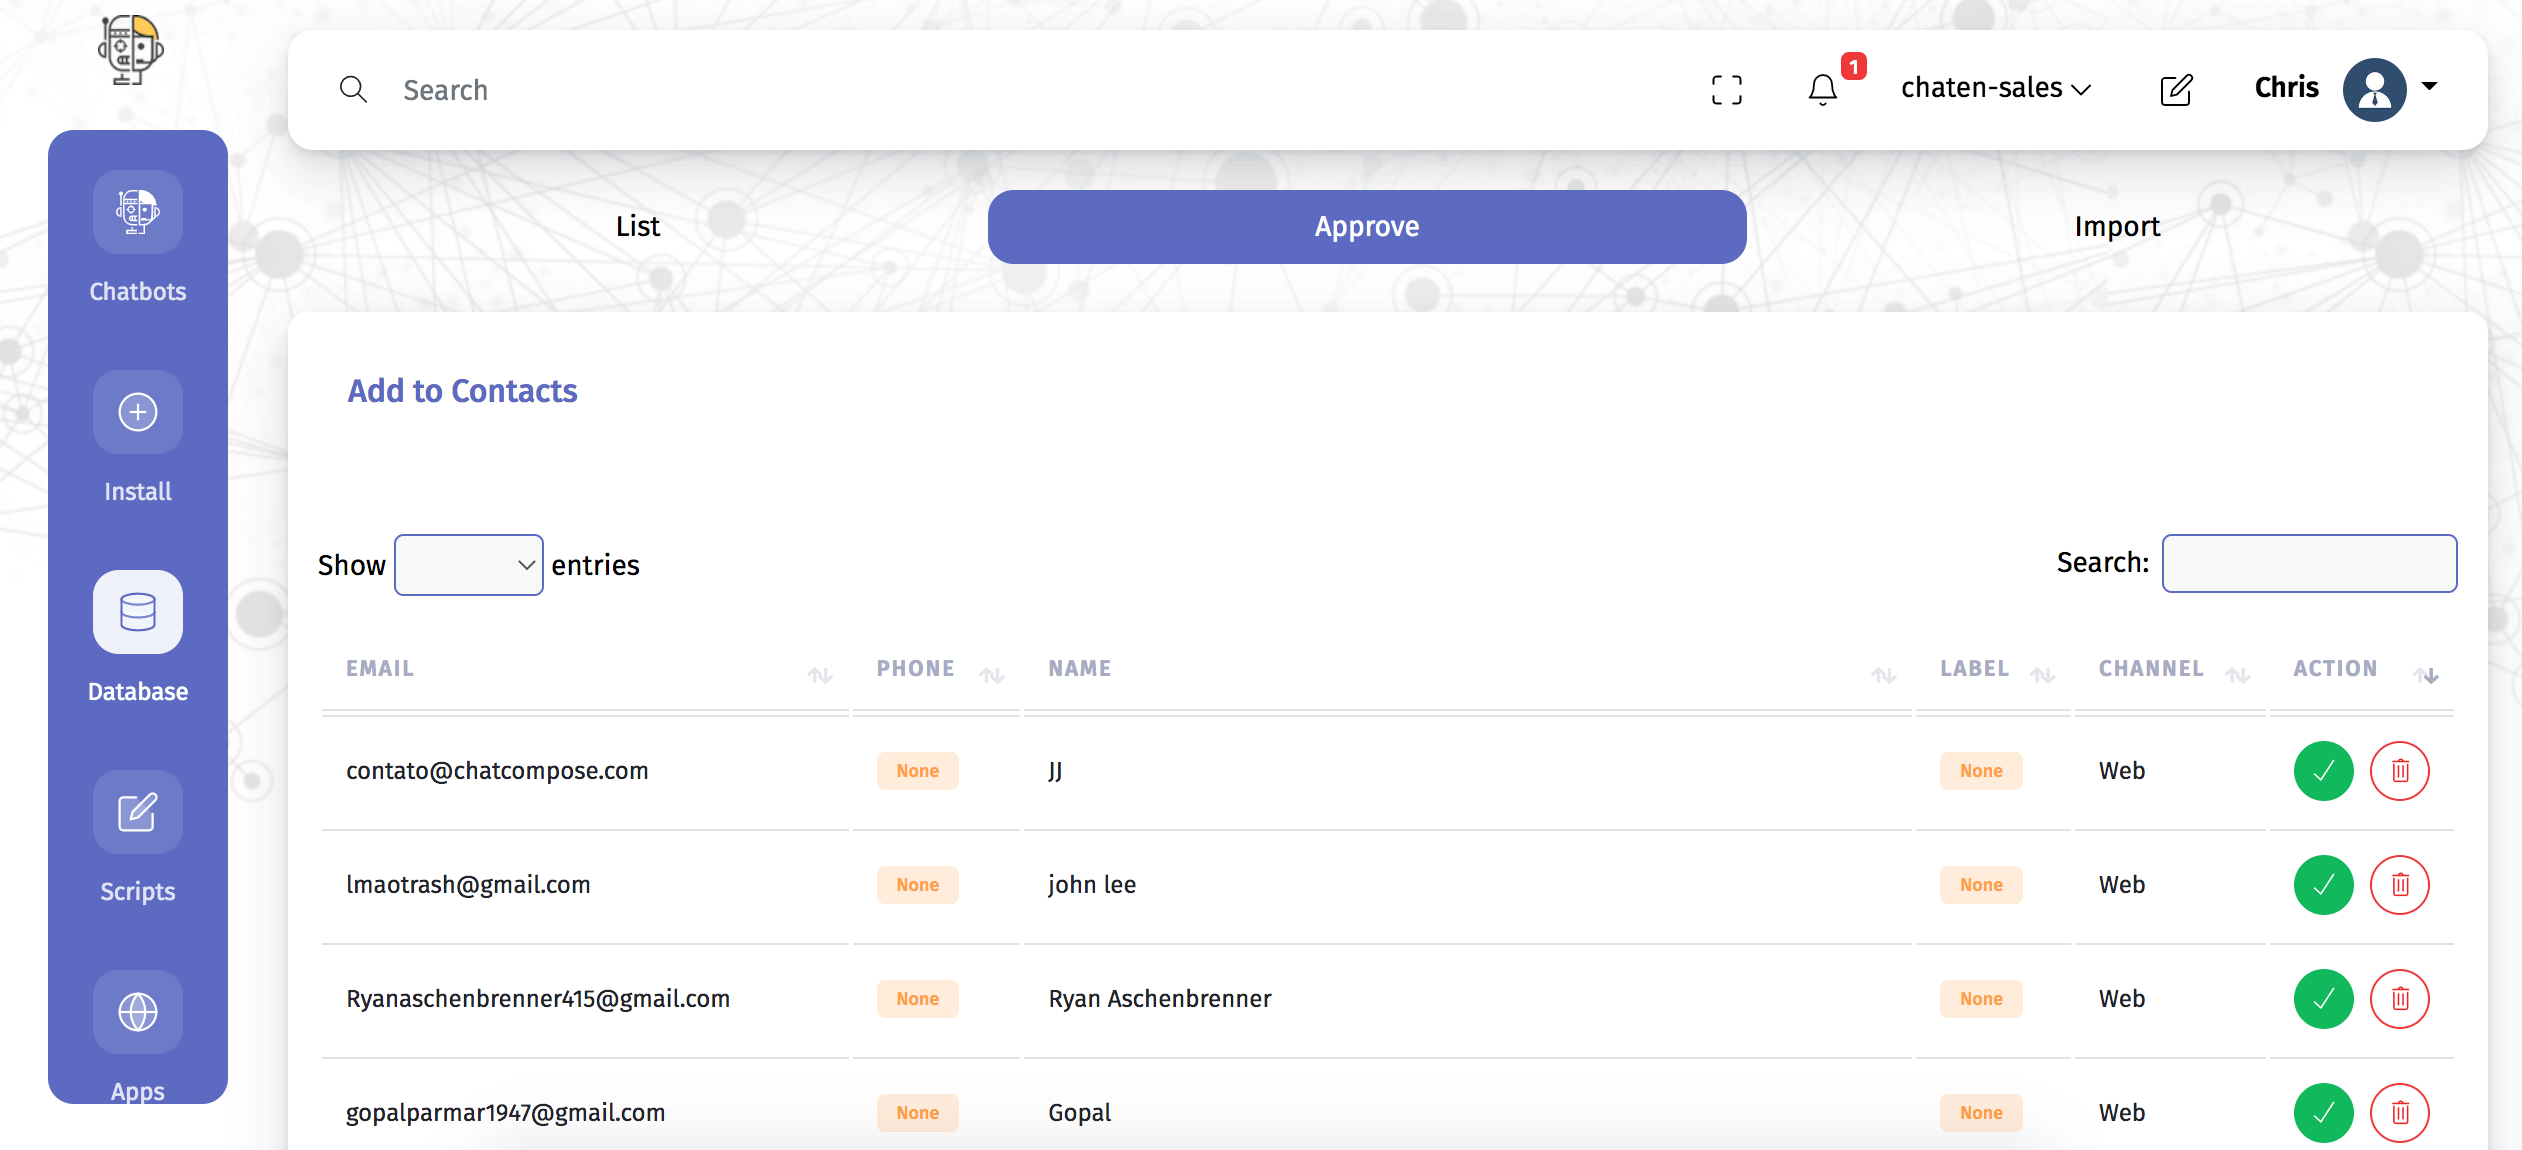
The contacts you approve will appear on your list. Refresh the page to see them on your list.

Your contact list will let you edit, delete, label and export your contacts. You can also add new contacts mannually by clicking on the "Add Contact" button.

An email or phone is required to add a new contact. You can also select a label, enter the name and add some notes to use internally.
To import contacts you need to upload a CSV file. You can find an example here. To make calls don't forget to add a phone number including the country code (+ country code).
To add contacts for your messaging Apps select the APP ID field. Each App has its own internal identification for users, for example WhatsApp uses something like (whatsapp:+58583940355), Facebook uses a 16 digit number, and Telegram a 10 digit number.
More information here.
You can also connect forms to your contact list so new contacts are added automatically.
Scripts that include the Form Component can be used to build contact lists without any manual action.
After you have designed your script go to DataBase>Form Results. In this section you will see the data your scripts are capturing with the Form component. Click on a specific Form, and then press "Integrations".

Here you can integrate your forms with additional services. Click on "Contacts" to set up the new integration.

Here you will need to match each question or request to data that is being captured. For example if one of your messages asks for their email, match it with the email field. The same applies for name, phone number, etc.
Leave the field blank if it does not exist in your form.
To edit and delete your contacts you have two options. By one or by multiple selection. To delete or edit a contact individually, press the edit or delete icon next to the contact.
To edit or delete by multiple selection, select the rows and press the button on the left corner, on top of the column.

Here you can delete multiple contacts, and edit their label or notes.
You have various functions to manage you contact list. You can filter your list by specific fields, create and add labels to your contacts and change their status.
You can create labels to make sublists of your contacts. For example if you sell multiple products or services, you can create a label for each product. So each time a new contact enters your list, you can assign them the label showing their product of interest.
To create a label click on "Create Label".

Here you can create new labels, and delete them if needed. If you delete a label, that label will be also cleared for all your contacts.
You can also use these labels to segment your list for when you are creating notifications or marketing campaigns.
A mass mailing campaign is the practice of creating a single message for a large group of recipients (also known as subscribers). Although there are several arguments for and against it, this practice is widely used in modern marketing.
The reasons for running these types of campaigns can vary: you might have a limited-time offer, you want to reconnect with potential customers, or something else you need people to know.
After you have created and segmented your contact list, you will be ready to transmit your message to that list.
To start go to Apps>Broadcast. Your first step will be to select the target channel.

You can send your message by email, SMS, Phone Call, WhatsApp and Telegram, among other channels.
To send emails first you need to select your subject and message. Email messages are designed in HTML.
Your subject line is the first impression, and can inspire people to open and read your message. Make sure that this text is attractive.

Here you can also select the email address where your contacts can reply to. To add an email address different from the one on your account you will need to verify it first.
You can include some variables inside the content of your messages. To include the name of the contact use "{name}". You can also include your notes on that contact by using "{notes}", and the label by using "{label}".

After you have created the message, go to the next step.

Here you can create the sending list for your contacts by selecting a specific label or status. If you haven't created any label yet leave those fields empty. The page will inform you on how many contacts you have selected.
The final step will let you schedule the transmission or send it immediately (within 15 minutes).

To schedule the transmission select the day, time and your timezone. Press Send to finish.

If this is the first time you are using this feature, we will need to conduct some sort of validation on the types of messages you are sending. This will be a one time validation and after you are approved, the message will be sent.

You can check and delete all your pending transmissions at the bottom of the page.
It is also possible to create campaigns to send SMS, and phone calls to your contact list. Only users with the Phone Integration can create this type of campaign.
Create a new message or select a script in the second step of the process instead of writing HTML. Then continue as before to finish.

To send messages to messaging apps, create the message or select the script (sames as with SMS). Only contacts with the correct APP ID or who have already interacted with your chatbots will receive your message.
To create a good campaign: